1、Springmvc介绍
Spring MVC 是一个模型 - 视图 - 控制器(MVC)的Web框架建立在中央前端控制器servlet(DispatcherServlet),它负责发送每个请求到合适的处理程序,使用视图来最终返回响应结果的概念。Spring MVC 是 Spring 产品组合的一部分,它享有 Spring IoC容器紧密结合Spring松耦合等特点,因此它有Spring的所有优点。
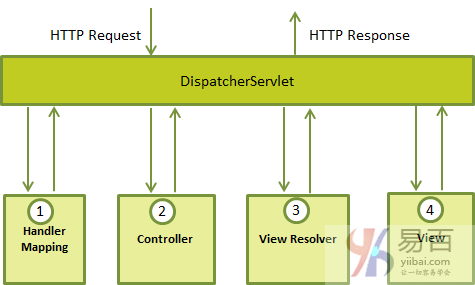
Springmvc处理流程
2、入门程序
1、开发环境
- IDEA 2017.2
- JDK 1.8.0.141
- Tomcat 9.0.0 M22
- Springmvc 4.1.3
2、需求
使用Springmvc实现商品列表的展示:
请求的url:/itemList.action
参数:无
数据:静态数据
3、开发步骤
创建一个Javaweb工程
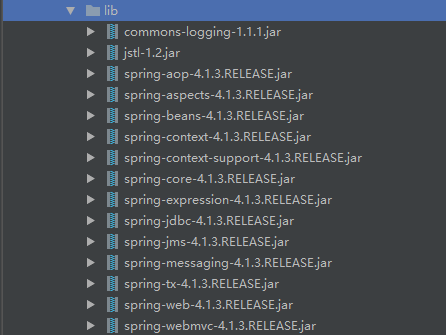
导入jar包
创建itemList.jsp
1234567891011121314151617181920212223242526272829303132333435363738394041424344<%@ page language="java" contentType="text/html; charset=UTF-8"pageEncoding="UTF-8"%><%@ taglib uri="http://java.sun.com/jsp/jstl/core" prefix="c" %><%@ taglib uri="http://java.sun.com/jsp/jstl/fmt" prefix="fmt"%><!DOCTYPE html PUBLIC "-//W3C//DTD HTML 4.01 Transitional//EN" "http://www.w3.org/TR/html4/loose.dtd"><html><head><meta http-equiv="Content-Type" content="text/html; charset=UTF-8"><title>查询商品列表</title></head><body><form action="${pageContext.request.contextPath }/item/queryitem.action" method="post">查询条件:<table width="100%" border=1><tr><td><input type="submit" value="查询"/></td></tr></table>商品列表:<table width="100%" border=1><tr><td>商品名称</td><td>商品价格</td><td>生产日期</td><td>商品描述</td><td>操作</td></tr><c:forEach items="${itemList }" var="item"><tr><td>${item.name }</td><td>${item.price }</td><td><fmt:formatDate value="${item.createtime}" pattern="yyyy-MM-dd HH:mm:ss"/></td><td>${item.detail }</td><td><a href="${pageContext.request.contextPath }/itemEdit.action?id=${item.id}">修改</a></td></tr></c:forEach></table></form></body></html>创建ItemsController
ItemController是一个普通的java类,不需要实现任何接口,只需要在类上添加@Controller注解即可。@RequestMapping注解指定请求的url,其中“.action”可以加也可以不加。在ModelAndView对象中,将视图设置为“/WEB-INF/jsp/itemList.jsp”。
12345678910111213141516171819202122232425262728293031@Controllerpublicclass ItemController {@RequestMapping("/itemList")public ModelAndView itemList() throws Exception {List<Items>itemList = new ArrayList<>();//商品列表Items items_1 = new Items();items_1.setName("联想笔记本_3");items_1.setPrice(6000f);items_1.setDetail("ThinkPad T430 联想笔记本电脑!");Items items_2 = new Items();items_2.setName("苹果手机");items_2.setPrice(5000f);items_2.setDetail("iphone6苹果手机!");itemList.add(items_1);itemList.add(items_2);//创建modelandView对象ModelAndView modelAndView = new ModelAndView();//添加modelmodelAndView.addObject("itemList", itemList);//添加视图modelAndView.setViewName("/WEB-INF/jsp/itemList.jsp");// modelAndView.setViewName("itemsList");returnmodelAndView;}}创建springmvc.xml
123456789101112131415161718<?xml version="1.0" encoding="UTF-8"?><beans xmlns="http://www.springframework.org/schema/beans"xmlns:xsi="http://www.w3.org/2001/XMLSchema-instance"xmlns:p="http://www.springframework.org/schema/p"xmlns:context="http://www.springframework.org/schema/context"xmlns:dubbo="http://code.alibabatech.com/schema/dubbo"xmlns:mvc="http://www.springframework.org/schema/mvc"xsi:schemaLocation="http://www.springframework.org/schema/beanshttp://www.springframework.org/schema/beans/spring-beans-4.0.xsdhttp://www.springframework.org/schema/mvchttp://www.springframework.org/schema/mvc/spring-mvc-4.0.xsdhttp://code.alibabatech.com/schema/dubbohttp://code.alibabatech.com/schema/dubbo/dubbo.xsdhttp://www.springframework.org/schema/contexthttp://www.springframework.org/schema/context/spring-context-4.0.xsd"><!--配置controller注解扫描--><context:component-scan base-package="cn.itheima.controller"/></beans>配置前端控制器:在web.xml中添加DispatcherServlet的配置
123456789101112131415161718<!--springmvc前端控制器--><servlet><servlet-name>springMvc</servlet-name><servlet-class>org.springframework.web.servlet.DispatcherServlet</servlet-class><!--指定配置文件--><init-param><param-name>contextConfigLocation</param-name><param-value>classpath*:springmvc.xml</param-value></init-param><!--启动加载--><load-on-startup>1</load-on-startup></servlet><servlet-mapping><servlet-name>springMvc</servlet-name><url-pattern>*.action</url-pattern></servlet-mapping>
3、Springmvc架构
1、框架结构
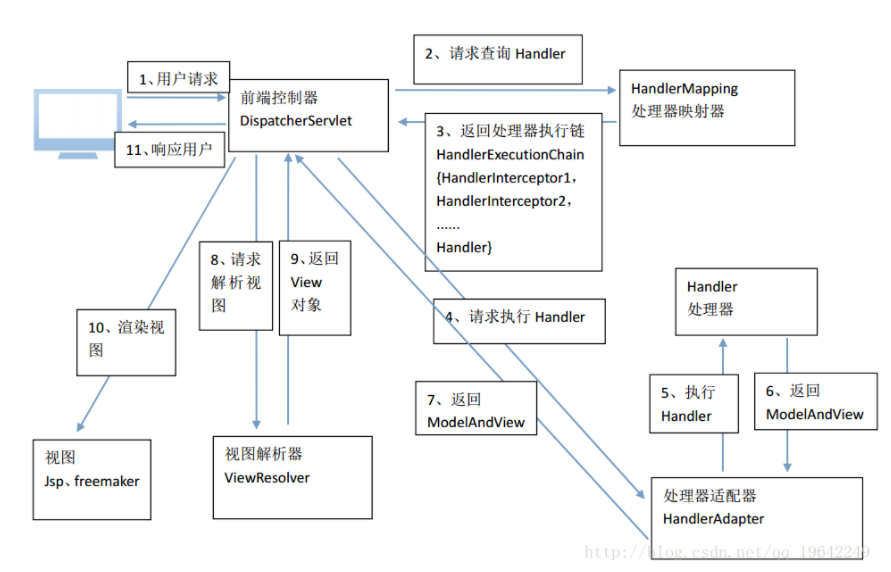
2、架构流程
用户发送请求至前端控制器DispatcherServlet
DispatcherServlet收到请求调用HandlerMapping(处理器映射器)
处理器映射器根据请求url找到具体的处理器,生成处理器对象及处理器拦截器一并返回给DispatcherServlet
DispatcherServlet通过HandlerAdapter(处理器适配器)调用处理器
执行处理器(Controller,也叫后端控制器)
Controller执行完成返回ModelAndView
HandlerAdapter将controller执行结果ModelAndView返回给DispatcherServlet
DispatcherServlet将ModelAndView传给ViewResolver(视图解析器)
ViewResolver解析后返回具体View
DispatcherServlet对View进行渲染视图(也就是讲模型数据填充至视图中)
DispatcherServlet相应用户
3、组件说明
DispatcherServlet:前段控制器,用户请求到达前端控制器,它就相当于mvc模式中的c,dispatcherServlet是整个流程控制的中心,由它调用其它组件处理用户的请求,dispatcherServlet的存在降低了组件之间的耦合性。
HandlerMapping:处理器映射器,HandlerMapping负责根据用户请求找到Handler即处理器,springmvc提供了不同的映射器实现不同的映射方式,例如:配置文件方式,实现接口方式,注解方式等。
Handler:处理器,Handler 是继DispatcherServlet前端控制器的后端控制器,在DispatcherServlet的控制下Handler对具体的用户请求进行处理。由于Handler涉及到具体的用户业务请求,所以一般情况需要程序员根据业务需求开发Handler。
HandlAdapter:处理器适配器,通过HandlerAdapter对处理器进行执行,这是适配器模式的应用,通过扩展适配器可以对更多类型的处理器进行执行。
View Resolver:视图解析器,View Resolver负责将处理结果生成View视图,View Resolver首先根据逻辑视图名解析成物理视图名即具体的页面地址,再生成View视图对象,最后对View进行渲染将处理结果通过页面展示给用户。
View:视图,springmvc框架提供了很多的View视图类型的支持,包括:jstlView、freemarkerView、pdfView等。我们最常用的视图就是jsp。一般情况下需要通过页面标签或页面模版技术将模型数据通过页面展示给用户,需要由程序员根据业务需求开发具体的页面。
在springmvc的各个组件中,处理器映射器、处理器适配器、视图解析器称为springmvc的三大组件。
需要用户开放的组件有handler、view
4、框架默认加载组件:DispatcherServelet.properties
|
|
5、注解映射器和适配器
组件扫描器:使用组件扫描器省去在Spring容器中配置每个controller类的繁琐。使用
12<!--配置controller注解扫描--><context:component-scan base-package="cn.itheima.controller"/>RequestMappingHandlerMapping
注解式处理器映射器,对类中标记@ResquestMapping的方法进行映射,根据ResquestMapping定义的url匹配ResquestMapping标记的方法,匹配成功返回HandlerMethod对象给前端控制器,HandlerMethod对象中封装url对应的方法Method。从spring3.1版本开始,废除了DefaultAnnotationHandlerMapping的使用,推荐使用RequestMappingHandlerMapping完成注解式处理器映射。
1234567<!--如果没有显示的配置处理器映射器和处理器适配器,那么SpringMVC会去默认的dispatcherServlet.properties中查找,对应的处理器映射器和处理器适配器来使用。导致每个请求都要扫描一次他的默认文件,效率很低,降低访问速度,需要显示的配置处理器映射器和处理器适配器--><!--注解形式的处理器映射器--><bean class="org.springframework.web.servlet.mvc.method.annotation.RequestMappingHandlerMapping"/>
RequestMappingHandlerAdapter
注解式处理器适配器,对标记@ResquestMapping的方法进行适配。从spring3.1版本开始,废除了AnnotationMethodHandlerAdapter的使用,推荐使用RequestMappingHandlerAdapter完成注解式处理器适配。
12<!--注解形式的处理器适配器--><bean class="org.springframework.web.servlet.mvc.method.annotation.RequestMappingHandlerAdapter"/>
<mvc:annotation-driven>springmvc使用
12<!--//注解驱动:自动配置最新版的处理器映射器和处理器适配器--><mvc:annotation-driven/>
6、视图解析器
- InternalResourceViewResolver:支持JSP视图解析
- viewClass:JstlView表示JSP模板页面需要使用JSTL标签库,所以classpath中必须包含jstl的相关jar 包。此属性可以不设置,默认为JstlView。
- prefix 和suffix:查找视图页面的前缀和后缀,最终视图的址为:前缀+逻辑视图名+后缀,逻辑视图名需要在controller中返回ModelAndView指定,比如逻辑视图名为hello,则最终返回的jsp视图地址 “WEB-INF/jsp/hello.jsp”
12345678
<!--配置视图解析器,在controller中指定路径名称时不用谢完整的扩展名名称,只写名称就可以--><bean class="org.springframework.web.servlet.view.InternalResourceViewResolver"> <!--真正的页面路径 = 前缀 + 去掉后缀名的页面名称 + 后缀--> <!--前缀--> <property name="prefix" value="/WEB-INF/jsp/"/> <!--后缀--> <property name="suffix" value=".jsp"/></bean>
4、Springmvc整合mybatis
控制层采用Springmvc,持久层使用mybatis。
1、需求
实现商品查询列表,从MySQL数据库查询商品信息。
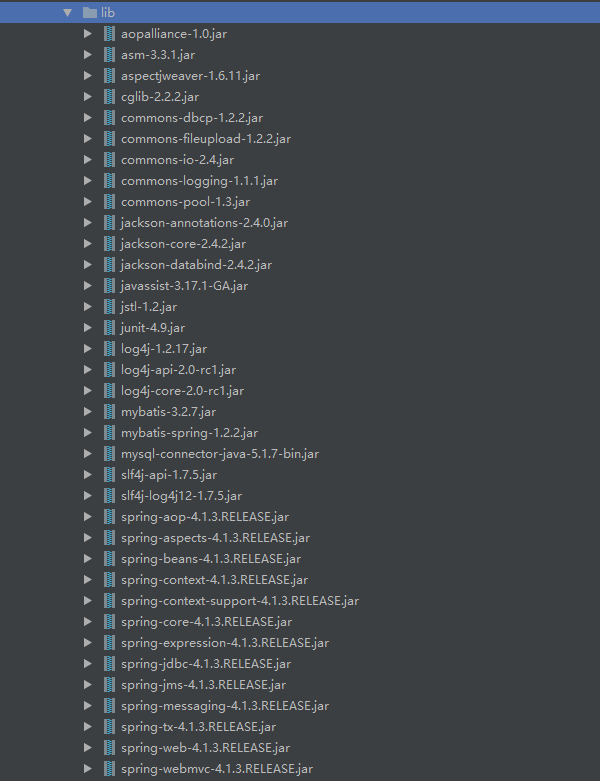
2、jar包
3、工程搭建
1、整合思路
DAO层:
SqlMapConfig.xml,空文件,需要头文件。
application.xml中配置:
数据库连接池
SqlSessionFactory对象,需要Spring和mybatis整合包下的
配置mapper文件扫描器
Service层:
applicationContext-service.xml包扫描器,扫描
@Service注解的类applicationContext-trans.xml配置事务
表现层:
springmvc.xml:
包扫描器,扫描
@Controller注解的类配置注解驱动
视图解析器
Web.xml:
- 配置前端控制器
2、sqlMapConfig.xml
|
|
3、applicationContext-dao.xml
|
|
db.properties:
|
|
4、applicationContext-service.xml
|
|
5、applicationContext-transaction.xml
|
|
6、springmvc.xml
|
|
7、web.xml
|
|
4、Dao
通过mybatis逆向工程生成
|
|
|
|
5、Service
Service由Spring管理,Spring对service进行事务控制。
1、ItemService接口
|
|
2、ItemsServiceImplement实现类
|
|
Controller
|
|
访问http://localhost:8080//items/list.action进行测试。
5、参数绑定
1、简单数据类型
需求:打开商品编辑页面,展示商品信息。
编辑商品信息,需要根据id查询商品信息,然后展示到页面,
请求:/itemsEdit.action,
参数:id,
相应结果:商品编辑页面,展示商品详细信息
1、service
|
|
2、Controller参数绑定
根据id查询商品数据,需要从请求的参数中把请求的id提取出来。Id应该包含在Request对象中。可以从Request中取id。
|
|
3、Springmvc默认支持的类型
处理器形参中添加如下类型的参数,处理适配器会默认识别并进行赋值。
HttpServletRequest:通过request对象获取请求信息
HttpServletResponse: 通过response处理相应信息
HttpSession:通过Session对象得到session中存放的对象
Model/ModelMap:ModelMap是Model接口的实现类,通过Model或ModelMap向页面传递数据:
123//调用service查询商品信息Items item = itemService.findItemById(id);model.addAttribute("item", item);页面通过${item.xxx}获取Model中的属性。实际上使用Model和ModelMap效果一样,使用Model,springmvc会实例化ModelMap。
如果使用Model则可以不使用ModelAndView对象,Model对象可以向页面传递数据,View对象则可以使用String返回值替代。不管是Model还是ModelAndView,其本质都是使用Request对象向jsp传递数据。
使用ModelAndView则方法可以变为:
123456789@RequestMapping("/itemEdit")public String itemEdit(HttpServletRequest reuqest, Model model) throws Exception{String idStr = reuqest.getParameter("id");Items items = itemsService.findItemsById(Integer.parseInt(idStr));model.addAttribute("item", items);//如果springmvc方法返回一个简单的字符串,nameSpringmvc就会认为这个字符串是页面的名称return "editItem";}
4、绑定简单类型
当请求的参数名称和处理器形参 名称一致 时,会将请求参数与形参进行绑定。从request取参数的方法可以进一步简化:
|
|
支持的数据类型:参数类型推荐使用包装数据类型,因为基础数据类型不可以为null
Integer,int
Float Float
Double Double
Boolean Boolean :对于Boolean类型的参数,请求的参数值为true或者false。
@RequestParam:使用@RequestParam用于处理简单类型的绑定value:参数名字,即入参的请求参数名字,如value=“item_id”表示请求的参数区中的名字为item_id的参数的值将传入;
required:是否必须,默认是true,表示请求中一定要有相应的参数,否则将报:TTP Status 400 - Required Integer parameter ‘XXXX’ is not present
defaultValue:默认值,表示如果请求中没有同名参数时的默认值
1public String editItem(@RequestParam(value="item_id",required=true) String id) {}形参名称为id,这里使用value=”item_id”限定请求的参数名为item_id,所以页面出传递的参数名必须为item_id。如果请求参数中没有该参数会报500错误。同时通过require=true限定item_id参数Wie必穿阐述,如果不传递则会报400错误。可以使用defaultvalue设置默认值。
3、绑定pojo类型
1、需求
将页面修改后的商品信息保存到数据库中。
请求的url:/updateitem.action结尾的
参数:表单中的数据
相应内容:更新成功页面
2、使用pojo接收表单数据
如果提交的参数很多,或者提交的表单的内容很多的时候可以使用pojo接收数据。要求pojo对象中的属性名和表单input的name属性一致。
页面定义如下:
|
|
Pojo定义
|
|
Controller:
|
|
此时提交的表单中不能有日期类型的数据,否则会报400错误。需要自定义参数绑定才可以提交日期类型的数据。
3、解决post提交的乱码问题:在web.xml中加入:
|
|
而对于get请求中文参数的乱码问题解决方案有两个:
修改Tomcat配置文件添加编码与工程编码一致:
<Connector URIEncoding="utf-8" connectionTimeout="20000" port="8080" protocol="HTTP/1.1" redirectPort="8443"/>对参数重新编码:
String userName new
String(request.getParamter("userName").getBytes("ISO8859-1"),"utf-8")
4、pojo包装类型
- 需求
使用包装的pojo接收商品信息的查询条件。
- 包装对象定义如下:
|
|
- 页面定义:
|
|
- Controller:
|
|
5、自定义参数绑定
- 需求
在商品修改页面可以修改商品的日期,并且根据业务需求自定义日期格式。
由于日期数据有多种格式,所以springmvc没办法把字符串转换成日期类型。所以需要自定义参数绑定。前端控制器接收到请求后,找到注解形式的处理器适配器,对RequestMapping标记的方法进行适配,并对方法中的形参进行参数绑定。在springmvc这可以在处理器适配器上自定义Converter进行参数绑定。如果使用
自定义Convert
12345678910111213public class CustomGlobalStrToDataConvert implements Converter<String, Date>{@Overridepublic Date convert(String s) {try {Date date = new SimpleDateFormat("yyyy-MM-dd HH:mm:ss").parse(s);return date;} catch (ParseException e) {e.printStackTrace();}return null;}}配置Convert:此方法需要独立配置处理器映射器,处理器适配器,不能使用
1234567891011121314151617181920<!--配置自定义转换器--><mvc:annotation-driven conversion-service="conversionService"/><bean id="conversionService" class="org.springframework.format.support.FormattingConversionServiceFactoryBean"><property name="converters"><set><bean class="cn.itheima.controller.convert.CustomGlobalStrToDataConvert"/></set></property></bean><!-- 自定义webBinder --><beanid="customBinder" class="org.springframework.web.bind.support.ConfigurableWebBindingInitializer"><propertyname="conversionService"ref="conversionService"/></bean><!--注解适配器 --><beanclass="org.springframework.web.servlet.mvc.method.annotation.RequestMappingHandlerAdapter"><propertyname="webBindingInitializer"ref="customBinder"></property></bean><!-- 注解处理器映射器 --><beanclass="org.springframework.web.servlet.mvc.method.annotation.RequestMappingHandlerMapping"/>
6、Springmvc和Struts2的区别
springmvc的入口是一个servlet,也就是前端控制器,Struts2入口是一个filter过滤器。
springmvc是基于方法开发(一个url对应一个方法),请求参数传递到方法的形参,可以设计为单例或者多例。Struts2是基于类开发的,传递参数是通过类的属性,只能设计为多例。
Struts2采用值栈存储请求和相应的数据,通过OGNL表达式存取数据。springmvc通过参数解析器是将request中请求内容解析,并给方法形参赋值,将数据和视图封装成ModelAndView对象,通过又将ModelAndView中的模型数据通过request域传输到页面。JSP视图解析器默认使用jstl。
7、高级参数绑定
1、数组类型的参数绑定
1、需求
在商品列表页面选中多个商品,然后删除,此功能要求商品列表页面的每个商品签名有个复选框,选中多个商品后点击删除按钮,将商品id传递给Controller,根据id删除商品信息。
2、jsp页面修改
|
|
3、Controller
Controller方法可以用String[]接收,或者pojo的String[]属性接收。
|
|
Vo:
|
|
2、List类型的参数绑定
1、需求
实现商品数据的批量修改。要想实现商品数据的批量修改,需要在商品列表中可以对商品信息进行修改,并且可以批量提交修改后的商品数据。
2、pojo类:List中存放对象,并将定义的List放入包装类中,使用包装类pojo对象接收。
|
|
3、jsp修改
|
|
其中name属性必须是包装pojo的list属性+下表+元素属性。
varStatus属性常用参数总结:
- ${status.index} 输出行号,从0开始。
- ${status.count} 输出行号,从1开始。
- ${status.current} 当前这次迭代的(集合中的)项
- ${status.first} 判断当前项是否为集合中的第一项,返回值为true或false
- ${status.last} 判断当前项是否为集合中的最后一项,返回值为true或false
- begin、end、step分别表示:起始序号,结束序号,跳跃步伐。
4、Controller
|
|
接收List类型的数据必须是pojo的属性,方法的形参为List类型无法正确接收到数据
8、@RequestMapping注解的使用
通过@RequestMapping注解可以定义不同的处理器映射规则。
@RequestMapping(value="/item")或者@RequestMapping("/item"), value的值是数组,可以将多个url映射到一个方法中。窄化请求映射,在class上添加
@RequestMapping(url)指定通用请求前缀,限制此类下的所有方法请求url必须以请求前缀开头,通过此方法对url进行分类管理。例如:在类名上添加@RequestMapping("/item"),在方法名上添加@RequestMapping("/list"),则访问地址为:/item/list方法请求限定:
限定Get方法:
@RequestMapping(method = RequestMethod.GET)如果通过post请求会报错:HTTP Status 405 - Request method 'POST' not supported限定POST方法:
@RequestMapping(method = RequestMethod.POST)如果通过get请求则报错:HTTP Status 405 - Request method 'GET' not supportedGET和POST都可以:
@RequestMapping(method={RequestMethod.GET,RequestMethod.POST})
9、Controller方法的返回值
返回ModelAndView:controller方法中定义ModelAndView对象并返回,对象中可添加model数据,指定view。
返回Void:在controller方法形参上可以定义request和response,使用request或者response指定响应结果:
使用request转向页面:
request.getRequestDispatcher("/WEB-INF/jsp/success.jsp").forward(request, response);使用response重定向:
response.sendRedirect("url")也可以通过response指定响应结果:
123response.setCharacterEncoding("utf-8");response.setContentType("application/json;charset=utf-8");response.getWriter().write("json串");
返回字符串
逻辑视图名
controller方法返回字符串可以指定逻辑视图名,通过视图解析器解析为物理视图地址。
12//指定逻辑视图名,经过视图解析器解析为jsp物理路径:/WEB-INF/jsp/item/editItem.jspreturn "item/editItem";
Redirect重定向
Controller方法返回结果重定向到一个url地址吗,如下商品修改提交后重定向到商品查询方法,参数无法带到商品查询方法中
12//重定向到queryItem.action地址,request无法带过去return "redirect:queryItem.action";redirect方式相当于
response.sendRedirect(),转发后浏览器的地址栏变为转发后的地址,因为转发执行了一个新的request和response。由于发起了一个request原来的参数在转发时就不能传递到下一个url,如果要传入参数可以在url中添加
forward转发
controller方法执行后继续执行另一个controller方法,如下商品修改提交后转向到商品修改页面,修改商品的id参数可以带到商品修改方法中去。
12//结果转发到editItem.action,request可以带过去return "forward:editItem.action";forward方式相当于
request.getRequestDispatcher().forward(request,response),转发后浏览器地址栏还是原来的地址,转发并没有执行新的request和response,而是和转发前的请求公用一个request和response。所以转发请求的参数在转发后仍然可以读取到。
10、Springmvc中的异常处理
springmvc在处理请求过程中出现异常信息交由异常处理器进行处理,自定义异常处理器可以实现一个系统的异常处理逻辑。
1、异常处理思路
系统中异常分为两类:
预期异常,通过捕获异常从而获取异常
运行时异常,规范代码开发
系统的dao、service、controller出现都通过throws Exception向上抛出,最后由springmvc的前端控制器交由异常处理器进行异常处理
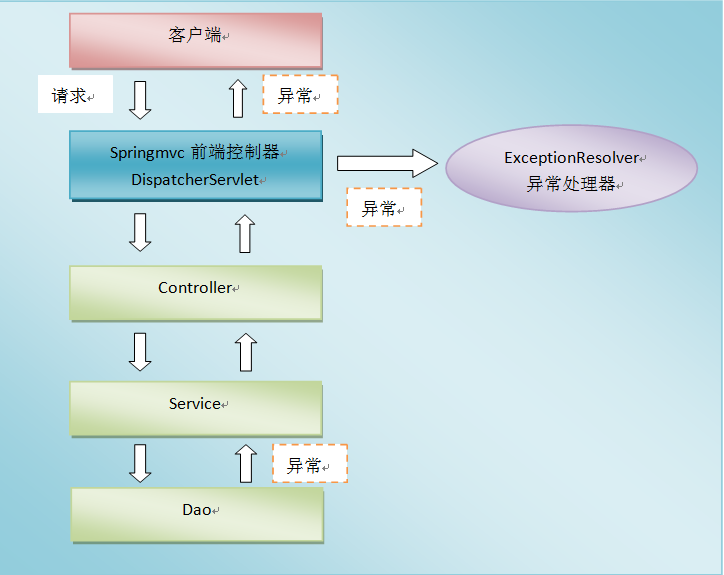
2、自定义异常类
|
|
3、自定义异常处理器
|
|
4、配置异常处理器
|
|
11、 图片上传处理
1、Tomcat上配置图片虚拟目录
2、jar包
CommonsMultipartResolver解析器依赖commons-fileupload和commons-io
3、配置解析器
|
|
4、图片上传实现
Controller
12345678910111213141516@RequestMapping("/updateitem")public String update(MultipartFile pictureFile, Items items) throws Exception {//1获取图片完整名称String fileStr = pictureFile.getOriginalFilename();//2使用随机生成的字符串+原图片扩展名,放置图片重名String newFileStr = UUID.randomUUID().toString() + fileStr.substring(fileStr.lastIndexOf("."));//3将图片保存到硬盘pictureFile.transferTo(new File("E:\\pic\\" + newFileStr));//4将图片名称保存到数据库items.setPic(newFileStr);itemsService.updateItem(items);return "redirect:itemEdit/" + items.getId();}页面
1234567891011121314<form id="itemForm" action="${pageContext.request.contextPath }/items/updateitem" method="post" enctype="multipart/form-data">...<tr><td>商品图片</td><td><c:if test="${item.pic !=null}"><img src="/pic/${item.pic}" width=100 height=100/><br/></c:if><input type="file" name="pictureFile"/></td></tr>...</form>
12、Json数据交互
1、@RequestBody
@RequestBody注解用于读取http请求的内容,通过springmvc提供的HttpMessageConvert接口架构读到的内容转换为json,xml等格式的数据并绑定到controller方法的参数上。
2、@ResponseBody
- 该注解用于将Controller的方法返回的对象,通过HttpMessageConverter接口转换为指定格式的数据如:json,xml等,通过Response响应给客户端
3、请求json,相应json的实现
环境准备:springmvc默认用MappingJacksonHttpMesseageConvert对json数据进行转换,需要加入Jackson的包:
jackson-core-asl-1.9.11.jar
jackson-mapper-asl-1.9.11.jar
配置json转换器:在注解适配器中加入messageConvert
12345678<!--注解适配器 --><bean class="org.springframework.web.servlet.mvc.method.annotation.RequestMappingHandlerAdapter"><property name="messageConverters"><list><bean class="org.springframework.http.converter.json.MappingJacksonHttpMessageConverter"></bean></list></property></bean>如果使用了
Controller编写
1234567891011//导入jsckson的jar包在controller的方法中可以使用@RequestBody,让springmvc将// json格式字符串自动转换成java中的pojo对象,要求json的key的值等于pojo中的属性@RequestMapping("/sendJson")//controller方法返回pojo类型的对象,添加@ResponseBody注解,// springmvc会自动将对象转换成json格式字符串并传递给页面@ResponseBodypublic Items json(@RequestBody Items items) throws Exception {System.out.println(items);return items;}页面js方法的编写
引入js:
ajax请求:
123456789101112131415<script type="text/javascript">function sendJson(){//请求json响应json$.ajax({type:"post",url:"${pageContext.request.contextPath }/items/sendJson.action",contentType:"application/json;charset=utf-8",data:'{"name":"测试商品","price":99.9}',success:function(data){alert(data);}});}</script>
13、Springmvc实现Restful
1、RESTful定义
Restful就是一个资源定位及资源操作的风格。不是标准也不是协议,只是一种风格,是对http协议的诠释。
资源定位:互联网所有的事物都是资源,要求url中没有动词,只有名词。没有参数:Url格式:http://blog.csdn.net/beat_the_world/article/details/45621673
资源操作:使用put、delete、post、get,使用不同方法对资源进行操作。分别对应添加、删除、修改、查询。一般使用时还是post和get。Put和Delete几乎不使用。
2、需求
RESTful方式实现商品信息查询,返回json数据。
3、添加DispatcherServlet的rest配置
|
|
4、URL模板模式映射
@RequestMapping(value="/ viewItems/{id}"):{×××}占位符,请求的URL可以是“/viewItems/1”或“/viewItems/2”,通过在方法中使用@PathVariable获取{×××}中的×××变量。@PathVariable用于将请求URL中的模板变量映射到功能处理方法的参数上。123456789101112@RequestMapping("/itemEdit/{id}")public String itemEdit(@PathVariable("id") Integer id, HttpServletRequest reuqest, Model model) throws Exception{// String idStr = reuqest.getParameter("id");Items items = itemsService.findItemsById(id);// if (items == null) {// throw new CustomException("商品信息不存在!");// }model.addAttribute("item", items);//如果springmvc方法返回一个简单的字符串,nameSpringmvc就会认为这个字符串是页面的名称return "editItem";}- 如果RequestMapping中表示为”/itemEdit/{id}”,id和形参名称一致,使用
@PathVariable不用指定名称。
- 如果RequestMapping中表示为”/itemEdit/{id}”,id和形参名称一致,使用
5、静态资源访问
如果在DispatcherServlet中设置url-pattern为 /则必须对静态资源进行访问处理。spring mvc 的
如下是对js文件访问配置:
<mvc:resources location="/js/" mapping="/js/**"/>
14、拦截器
1、定义
- Spring Web MVC 的处理器拦截器类似于Servlet 开发中的过滤器Filter,用于对处理器进行预处理和后处理。
2、拦截器定义
实现HandlerInterceptor接口,如下:
1234567891011121314151617181920212223242526272829303132333435363738394041424344454647public class Inteceptor1 implements HandlerInterceptor{/*** 执行时间:controller方法没有被执行, modelAndView没有被返回* 使用场景:权限验证* @param httpServletRequest* @param httpServletResponse* @param o* @return true:放行, false:拦截* @throws Exception*/@Overridepublic boolean preHandle(HttpServletRequest httpServletRequest, HttpServletResponse httpServletResponse, Object o) throws Exception {System.out.println("==========Inteceptor1===========pre===========");return true;}/*** 执行时机:controller方法已经执行,modelAndView没有返回* 使用场景:可以在此方法中设置全局的数据处理业务,* @param httpServletRequest* @param httpServletResponse* @param o* @param modelAndView* @throws Exception*/@Overridepublic void postHandle(HttpServletRequest httpServletRequest, HttpServletResponse httpServletResponse, Object o, ModelAndView modelAndView) throws Exception {System.out.println("==========Inteceptor1===========post===========");}/*** 执行时机:controller方法已经执行,modelAndView已经返回* 使用场景:记录操作日志,记录登录用户的IP,时间等* @param httpServletRequest* @param httpServletResponse* @param o* @param e* @throws Exception*/@Overridepublic void afterCompletion(HttpServletRequest httpServletRequest, HttpServletResponse httpServletResponse, Object o, Exception e) throws Exception {System.out.println("==========Inteceptor1===========after===========");}}
3、拦截器配置
1、针对某种mapping配置拦截器
|
|
2、针对所有mapper配置全局拦截器
|
|
4、测试流程
定义两个拦截器分别为HandlerInterceptor1和HandlerInterceptor2,每个拦截器的preHandler方法都返回true:
12345@Overridepublic boolean preHandle(HttpServletRequest httpServletRequest, HttpServletResponse httpServletResponse, Object o) throws Exception {System.out.println("==========Inteceptor1===========pre===========");return true;}运行流程:
- HandlerInterceptor1..preHandle..
- HandlerInterceptor2..preHandle..
- HandlerInterceptor2..postHandle..
- HandlerInterceptor1..postHandle..
- HandlerInterceptor2..afterCompletion..
- HandlerInterceptor1..afterCompletion..
5、终端流程测试
定义两个拦截器分别为HandlerInterceptor1和HandlerInterceptor2
运行流程:
preHandler按拦截器定义顺序调用
postHandler按拦截器定义逆序调用
afterCompletion按拦截器定义逆序调用
postHandler在拦截器链内所有拦截器返回成功调用
afterCompletion只有preHandler返回true才调用
6、拦截器应用
1、处理流程
有一个登录页面,需要写一个controler访问页面
登录页面有一项提交表单的动作,需要在controller中处理。
判断用户名是否正确
如果正确,向session中写入用户信息
返回登录成功,或者跳转到登录页面
拦截器
拦截用户请求,判断用户是否登录
如果已经登录,放行
如果用户未登录,跳转到登录页面
2、用户身份认证
|
|
3、用户登录controller
|
|
15、重点总结
springMvc:是一个表现层框架
- 作用:就是从请求中接收传入的参数,将处理后的结果数据返回给页面展示
ssm整合:
Dao层
pojo和映射文件以及接口使用逆向工程生成
SqlMapConfig.xml mybatis核心配置文件
ApplicationContext-dao.xml 整合后spring在dao层的配置
数据源
会话工厂
扫描Mapper
service层
事务 ApplicationContext-trans.xml
@Service注解扫描 ApplicationContext-service.xml
controller层
SpringMvc.xml
注解扫描:扫描@Controller注解
注解驱动:替我们显示的配置了最新版的处理器映射器和处理器适配器
视图解析器:显示的配置是为了在controller中不用每个方法都写页面的全路径
web.xml
springMvc前端控制器配置
spring监听
参数绑定:(从请求中接收参数)
默认支持的类型:Request,Response,Session,Model
基本数据类型(包含String)
Pojo类型
Vo类型
Converter自定义转换器
数组
List
controller方法返回值(指定返回到哪个页面, 指定返回到页面的数据)
ModelAndView
modelAndView.addObject(“itemList”, list); 指定返回页面的数据
modelAndView.setViewName(“itemList”); 指定返回的页面
String(推荐使用)
返回普通字符串,就是页面去掉扩展名的名称, 返回给页面数据通过Model来完成
返回的字符串以forward:开头为请求转发
返回的字符串以redirect:开头为重定向
返回void(使用它破坏了springMvc的结构,所以不建议使用)
可以使用request.setAttribut 来给页面返回数据
可以使用request.getRquestDispatcher().forward()来指定返回的页面
如果controller返回值为void则不走springMvc的组件,所以要写页面的完整路径名称
相对路径:相对于当前目录,也就是在当前类的目录下,这时候可以使用相对路径跳转
绝对路径:从项目名后开始.
在springMvc中不管是forward还是redirect后面凡是以/开头的为绝对路径,不以/开头的为相对路径例如:forward:/items/itemEdit.action 为绝对路径,forward:itemEdit.action为相对路径
架构级别异常处理:
- 主要为了防止项目上线后给用户抛500等异常信息,所以需要在架构级别上整体处理.hold住异常首先自定义全局异常处理器实现HandlerExceptionResolver接口,在spirngMvc.xml中配置生效
上传图片:
在tomcat中配置虚拟图片服务器
导入fileupload的jar包
在springMvc.xml中配置上传组件
在页面上编写上传域,更改form标签的类型
在controller方法中可以使用MultiPartFile接口接收上传的图片
将文件名保存到数据库,将图片保存到磁盘中
Json数据交互:
需要加入jackson的jar包
@Requestbody:将页面传到controller中的json格式字符串自动转换成java的pojo对象@ResponseBody:将java中pojo对象自动转换成json格式字符串返回给页面
RestFul支持:
就是对url的命名标准,要求url中只有能名词,没有动词(不严格要求),但是要求url中不能用问号?传参
传参数:页面:${pageContext.request.contextPath }/items/itemEdit/${item.id}
方法: @RquestMapping(“/itemEdit/{id}”)
方法: @PathVariable(“id”) Integer idd
拦截器:
作用:拦截请求,一般做登录权限验证时用的比较多
需要编写自定义拦截器类,实现HandlerInterceptor接口
在spirngMvc.xml中配置拦截器生效
登录权限验证:
编写登录的controller, 编写跳转到登录页面的方法, 编写登录验证方法
编写登录页面
编写拦截器
- 运行过程:
访问随意一个页面,拦截器会拦截请求,会验证session中是否有登录信息,如果已登录,放行, 如果未登录,跳转到登录页面
在登录页面中输入用户名,密码,点击登录按钮,拦截器会拦截请求,如果是登录路径放行,在controller方法中判断用户名密码是否正确,如果正确则将登录信息放入session