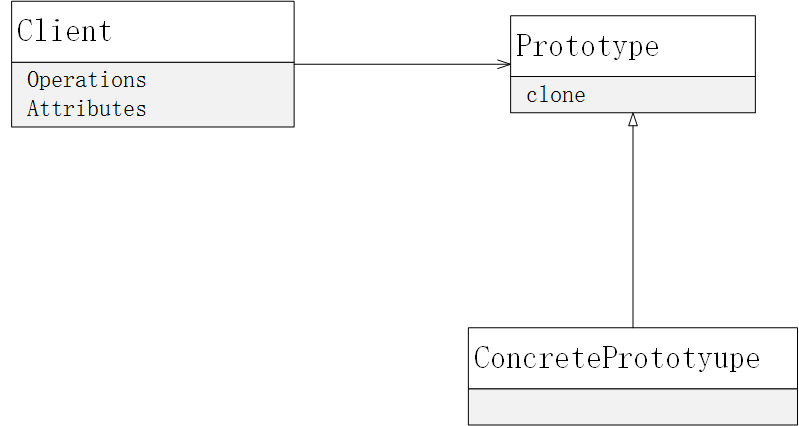
小黄

黄小黄的幸福生活!


  • 首页

  • 标签

  • 分类

  • 归档

  • Java

go语言实战 - 并发

发表于 2020-04-17 | 分类于 go

go语言实战 - 并发

第六章 并发

  • go语言的并发是指让某个函数独立于其他函数运行的能力
  • go语言的并发同步模型来自于通信顺序进程泛型(Communication SequentialProcess,CSP)
    • CSP是一种消息传递模型,通过在goroutine之间传递数据来传递消息,而非对数据加锁来实现同步访问
    • go引入了新数据类型,通道channle

并发与并行

  • 操作系统的进程与线程

    • 进程包含了应用程序在运行时需要用到和维护的各种资源的容器,如内存地址空间,文件,设备的句柄及线程
    • 线程是一个执行空间,被操作系统调度来执行代码
  • 操作系统会在物理处理器上调度线程来运行,go语言会在逻辑处理器上调度goroutine来运行

  • go语言默认给每个可用的物理处理器分配一个逻辑处理器
  • 一个逻辑处理器可以调度无数个goroutine
    • 创建一个goroutine并准备运行
    • goroutine会首先进入调度器的全局运行队列中
    • 调度器将队列中的goroutine分配给一个逻辑处理器,也就是将goroutinue放置到逻辑处理器对应的本地运行队列中
    • 本地运行队列中的goroutine会等待到自己被分配的逻辑处理器执行

goroutine

  • runtime.GOMAXPROCS可以更改调度器可以使用的逻辑处理器的数量
1
2
3
4
5
6
7
8
9
10
11
12
13
14
15
16
17
18
19
20
21
22
23
24
25
26
27
28
29
30
31
32
33
func main() {
runtime.GOMAXPROCS(1)
var wg sync.WaitGroup
wg.Add(2)
fmt.Println("Start Goroutine")
go func() {
defer wg.Done()
for count := 0; count < 3; count++ {
for char := 'a'; char < 'z'; char++ {
fmt.Printf("%c", char)
}
}
}()
go func() {
defer wg.Done()
for count := 0; count < 3; count++ {
for char := 'A'; char < 'Z'; char++ {
fmt.Printf("%c", char)
}
}
}()
fmt.Println("Waiting To Finish")
wg.Wait()
fmt.Println("Finish this")
}
  • 设置一个逻辑处理器的结果
1
2
3
4
Start Goroutine
Waiting To Finish
A B C D E F G H I J K L M N O P Q R S T U V W X Y A B C D E F G H I J K L M N O P Q R S T U V W X Y A B C D E F G H I J K L M N O P Q R S T U V W X Y a b c d e f g h i j k l m n o p q r s t u v w x y a b c d e f g h i j k l m n o p q r s t u v w x y a b c d e f g h i j k l m n o p q r s t u v w x y
Finish this
  • 设置多个逻辑处理器的结果
1
2
3
4
Start Goroutine
Waiting To Finish
a b c d e f g h A B C D E F G H I J K L M N i j k l m n o p q r O P Q R S s t u v w x y a b c d e f g h i j k l m n o p q r s t u v w x y a b c d e f g h i j k l m n o p q r s t u v w x y T U V W X Y A B C D E F G H I J K L M N O P Q R S T U V W X Y A B C D E F G H I J K L M N O P Q R S T U V W X Y
Finish this
  • 一个正运行的goroutine再工作结束前,可以被停止并重新调度,避免一个goroutine长时间占用逻辑处理器
  • runtime包提供了修改go语言运行时配置参数的能力
  • 并不是逻辑处理器数量越多越好,需要经过基准测试来评估

竞争状态

  • 两个或者多个goroutine访问某个共享资源,则称其处于互相竞争的状态
  • runtime.Gosched()强制调度器切换两个goroutine
1
2
3
4
5
6
7
8
9
10
11
12
13
14
15
16
17
18
19
20
21
22
23
24
25
26
27
var (
counter int
waitGroup sync.WaitGroup
)
func main() {
waitGroup.Add(2)
go incCounter(1)
go incCounter(2)
waitGroup.Wait()
fmt.Println("Final Counter: ", counter)
}
func incCounter(Iid int) {
defer waitGroup.Done()
for count := 0; count < 2; count++ {
value := counter
// 退出当前goroutine,将其放回队列
runtime.Gosched()
value++
counter = value
}
}

锁住共享资源

原子函数

  • 原子函数能够以底层的加锁机制来同步访问整醒变量和指针
  • atomic包的AddInt64函数会同步整型值的加法,强制同一时刻只能有一个goroutine运行并完成这个加法操作
1
2
3
4
5
6
7
8
9
10
11
12
13
14
15
16
17
18
19
20
21
22
23
24
25
26
27
var (
counter int64
waitGroup sync.WaitGroup
)
func main() {
waitGroup.Add(2)
go incCounter(1)
go incCounter(2)
waitGroup.Wait()
fmt.Println("Final Counter: ", counter)
}
func incCounter(Iid int) {
defer waitGroup.Done()
for count := 0; count < 2; count++ {
atomic.AddInt64(&counter, 1)
// 退出当前goroutine,将其放回队列
runtime.Gosched()
}
}
  • LoadInt64和StoreInt64提供了一种安全地读写一个整型值的方法
1
2
3
4
5
6
7
8
9
10
11
12
13
14
15
16
17
18
19
20
21
22
23
24
25
26
27
28
29
30
31
32
33
var (
shutdown int64
wg sync.WaitGroup
)
func main() {
wg.Add(2)
go doWork("A")
go doWork("B")
time.Sleep(1*time.Second)
fmt.Println("shutdown now")
atomic.StoreInt64(&shutdown, 1)
wg.Wait()
}
func doWork(name string) {
defer wg.Done()
for {
fmt.Printf("Doing %s Work \n", name)
time.Sleep(250*time.Millisecond)
if atomic.LoadInt64(&shutdown) == 1 {
fmt.Printf("Shutting %s Down \n", name)
break
}
}
}

互斥锁

  • 互斥锁mutex用于在代码上创建一个临界区,保证统一时间只有一个goroutine可以执行这个临界区代码,修正上述代码如下
  • 使用大括号可以使得临界区看起来更加清晰
  • 强制退出当前线程之后,如果调度器分配其他线程执行,会因为拿不到临界区的互斥锁而等待,从而保证调度器会分配回当前线程来进行程序继续执行
1
2
3
4
5
6
7
8
9
10
11
12
13
14
15
16
17
18
19
20
21
22
23
24
25
26
27
28
29
30
31
32
var (
counter int
waitGroup sync.WaitGroup
mutex sync.Mutex
)
func main() {
waitGroup.Add(2)
go incCounter(1)
go incCounter(2)
waitGroup.Wait()
fmt.Println("Final Counter: ", counter)
}
func incCounter(Iid int) {
defer waitGroup.Done()
for count := 0; count < 2; count++ {
mutex.Lock()
{
value := counter
// 退出当前goroutine,将其放回队列
runtime.Gosched()
value++
counter = value
}
mutex.Unlock()
}
}

通道

  • 通道通过发送和接收需要共享的资源,在goroutine之间做同步
  • 声明通道时,需要指定将要被共享的数据的类型,可以通过通道共享内置类型,命名类型,结构类型和引用类型的值或者指针
  • make关键字来创建通道
  • <-运算符表示数据的流向

无缓冲的通道

  • 无缓冲的通道指的是接手前没有能力保存任何值的通道
  • 这种对通道进行发送和接收的交互 行为本身就是同步的,否则会阻塞,发送和接收的goroutine互相依赖
  • 网球比赛示例如下
1
2
3
4
5
6
7
8
9
10
11
12
13
14
15
16
17
18
19
20
21
22
23
24
25
26
27
28
29
30
31
32
33
34
35
36
37
38
39
40
41
42
var wg sync.WaitGroup
func init() {
rand.Seed(time.Now().UnixNano())
}
func main() {
court := make(chan int)
wg.Add(2)
go player("Nodal", court)
go player("Dick", court)
court <- 1
wg.Wait()
}
func player(name string, court chan int) {
defer wg.Done()
for {
ball, ok := <- court
if !ok {
fmt.Printf("Player %s win \n", name)
return
}
n := rand.Intn(100)
if n % 13 == 0 {
fmt.Printf("Player %s missed \n", name)
close(court)
return
}
fmt.Printf("Player %s hit %d \n", name, ball)
ball++
court <- ball
}
}

有缓冲通道

  • 有缓冲通道时一种在被接收前能存储一个或多个值的通道
  • 并不强制要求goroutine之间必须同时完成接收和发送
  • 4个goroutine来完成10个工作可以使用带缓冲的通道来实现
  • 需要注意,通道关闭之后是只能从通道读取数据,不能写入,不会有数据丢失
1
2
3
4
5
6
7
8
9
10
11
12
13
14
15
16
17
18
19
20
21
22
23
24
25
26
27
28
29
30
31
32
33
34
35
36
37
38
39
40
41
42
43
44
45
46
47
48
49
50
51
52
53
54
55
56
57
58
59
60
61
62
63
64
65
66
67
68
69
70
71
const (
numberGoroutine = 4
taskLoad = 10
)
var wg sync.WaitGroup
func init() {
rand.Seed(time.Now().UnixNano())
}
func main() {
tasks := make(chan string, taskLoad)
wg.Add(numberGoroutine)
for gr := 1; gr <= numberGoroutine; gr++ {
go worker(tasks, gr)
}
for post := 1; post <= taskLoad; post++ {
tasks <- fmt.Sprintf("Task %d", post)
}
close(tasks)
wg.Wait()
}
func worker(tasks chan string, worker int) {
defer wg.Done()
for {
task, ok := <- tasks
if !ok {
fmt.Printf("Worker %d shutdown \n", worker)
return
}
fmt.Printf("Worker %d start work %s \n", worker, task)
time.Sleep(time.Duration(rand.Int63n(100))*time.Millisecond)
fmt.Printf("Worker %d finshed work %s \n", worker, task)
}
}
/*
Worker 2 start work Task 1
Worker 4 start work Task 4
Worker 1 start work Task 2
Worker 3 start work Task 3
Worker 4 finshed work Task 4
Worker 4 start work Task 5
Worker 1 finshed work Task 2
Worker 1 start work Task 6
Worker 3 finshed work Task 3
Worker 3 start work Task 7
Worker 2 finshed work Task 1
Worker 2 start work Task 8
Worker 4 finshed work Task 5
Worker 4 start work Task 9
Worker 4 finshed work Task 9
Worker 4 start work Task 10
Worker 1 finshed work Task 6
Worker 1 shutdown
Worker 2 finshed work Task 8
Worker 3 finshed work Task 7
Worker 3 shutdown
Worker 2 shutdown
Worker 4 finshed work Task 10
Worker 4 shutdown
*/

小结

  • 并发是指goroutine运行的时候是互相独立的
  • 使用关键字go创建goroutine来运行函数
  • goroutine在逻辑处理器上执行,而逻辑处理器则具有独立的系统线程和运行队列
  • 竞争状态是指两个或者多个goroutine试图访问同一个资源
  • 原子函数和互斥锁提供了一种防止出现竞争状态的方法
  • 通道提供了一种在两个goroutine之间共享数据的简单方法
  • 无缓冲的通道保证同时交换数据,有缓冲的通道不做这种保证

第七章 并发模式

runner

  • runner包用于展示如何通过通道来监视程序的执行时间
  • runner包也可以终止程序
  • 适合用于定时任务中
1
2
3
4
5
6
7
8
9
10
11
12
13
14
15
16
17
18
19
20
21
22
23
24
25
26
27
28
29
30
31
32
33
34
35
36
37
38
39
40
41
42
43
44
45
46
47
48
49
50
51
52
53
54
55
56
57
58
59
60
61
62
var ErrTimeout = errors.New("received timeout")
var ErrInterrupt = errors.New("received interrupt")
// Runner 在给定的超时时间内执行一组任务,并且在操作系统发出终端信号时结束这些任务
type Runner struct {
// 操作系统信号
interrupt chan os.Signal
complete chan error
timeout <-chan time.Time
tasks []func(int)
}
func NewRunner(d time.Duration) *Runner {
return &Runner{
interrupt: make(chan os.Signal, 1),
complete: make(chan error),
timeout: time.After(d),
}
}
func (r *Runner) Add(tasks ...func(int)) {
r.tasks = append(r.tasks, tasks...)
}
func (r *Runner) Start() error {
signal.Notify(r.interrupt, os.Interrupt)
go func() {
r.complete <- r.run()
}()
select {
case err := <- r.complete:
return err
case <-r.timeout:
return ErrTimeout
}
}
func (r *Runner) run() error {
for id, task := range r.tasks {
if r.gotInterrupt() {
return ErrInterrupt
}
task(id)
}
return nil
}
func (r *Runner) gotInterrupt() bool {
select {
case <- r.interrupt:
signal.Stop(r.interrupt)
return true
default:
return false
}
}
  • 函数调用方法
1
2
3
4
5
6
7
8
9
10
11
12
13
14
15
16
17
18
19
20
21
22
23
24
25
26
27
28
29
30
const timeout = 3 * time.Second
func main() {
log.Println("Starting work")
r := runner.NewRunner(timeout)
r.Add(createTask(), createTask(), createTask())
if err := r.Start(); err != nil {
switch err {
case runner.ErrTimeout:
log.Println("Terminating due to timeout.")
os.Exit(1)
case runner.ErrInterrupt:
log.Println("Terminating due to interrupt")
os.Exit(2)
}
}
log.Println("Process ended.")
}
func createTask() func(int) {
return func(id int) {
log.Printf("Processor - Task %d.", id)
time.Sleep(time.Duration(id) * time.Second)
}
}

pool

  • pool用于展示如何使用有缓冲的通道实现资源池
1
2
3
4
5
6
7
8
9
10
11
12
13
14
15
16
17
18
19
20
21
22
23
24
25
26
27
28
29
30
31
32
33
34
35
36
37
38
39
40
41
42
43
44
45
46
47
48
49
50
51
52
53
54
55
56
57
58
59
60
61
62
63
64
65
66
67
68
69
70
71
72
73
74
75
76
77
package pool
import (
"errors"
"io"
"log"
"sync"
)
type Pool struct {
m sync.Mutex
resources chan io.Closer
factory func() (io.Closer, error)
closed bool
}
func NewPool(fn func() (io.Closer, error), size uint) (*Pool, error) {
if size <= 0 {
return nil, errors.New("size value too small")
}
return &Pool{
factory:fn,
resources: make(chan io.Closer, size),
}, nil
}
var ErrPoolClosed = errors.New("pool has been closed")
func (p *Pool) Acquire() (io.Closer, error) {
select {
case r, ok := <- p.resources:
log.Println("Acquire:", "Shared Resource")
if !ok {
return nil, ErrPoolClosed
}
return r, nil
default:
log.Println("Acquire:", "New Resource")
return p.factory()
}
}
func (p *Pool) Release(r io.Closer) {
p.m.Lock()
defer p.m.Unlock()
if p.closed {
r.Close()
return
}
select {
case p.resources <- r:
log.Println("Release: ", "In Queue")
default:
log.Println("Release:", "Closing")
r.Close()
}
}
func (p *Pool) Close() {
p.m.Lock()
defer p.m.Unlock()
if p.closed {
return
}
p.closed = true
close(p.resources)
for r := range p.resources{
r.Close()
}
}
  • 连接池的使用代码如下
1
2
3
4
5
6
7
8
9
10
11
12
13
14
15
16
17
18
19
20
21
22
23
24
25
26
27
28
29
30
31
32
33
34
35
36
37
38
39
40
41
42
43
44
45
46
47
48
49
50
51
52
53
54
55
56
57
58
59
60
61
62
63
64
65
66
67
68
package main
import (
"api/books/go-in-action/7-concurrency-pattern/pool"
"io"
"log"
"math/rand"
"sync"
"sync/atomic"
"time"
)
const (
maxGoroutines = 25
poolResources = 2
)
type dbConnection struct {
ID int32
}
func (conn *dbConnection) Close() error {
log.Println("Close: Connection", conn.ID)
return nil
}
var idCounter int32
func createConnection() (io.Closer, error) {
id := atomic.AddInt32(&idCounter, 1)
log.Println("Create: New Connection", id)
return &dbConnection{ID:id}, nil
}
func main() {
var wg sync.WaitGroup
wg.Add(maxGoroutines)
p, err := pool.NewPool(createConnection, poolResources)
if err != nil {
log.Println(err)
}
for query := 0; query < maxGoroutines; query++ {
go func(q int) {
performQueries(q, p)
wg.Done()
}(query)
}
wg.Wait()
log.Println("Shutdown Program")
p.Close()
}
func performQueries(query int, p *pool.Pool) {
conn, err := p.Acquire()
if err != nil {
log.Println(err)
return
}
defer p.Release(conn)
time.Sleep(time.Duration(rand.Intn(1000)) * time.Millisecond)
log.Printf("QID[%d] CID[%d] \n", query, conn.(*dbConnection).ID)
}

work

  • work包的目的是展示如何使用无缓冲的通道来创建一个goroutine池
1
2
3
4
5
6
7
8
9
10
11
12
13
14
15
16
17
18
19
20
21
22
23
24
25
26
27
28
29
30
31
32
33
34
35
36
37
38
39
40
package work
import "sync"
type Worker interface {
Task()
}
type Pool struct {
work chan Worker
wg sync.WaitGroup
}
func New(maxGoroutines int) *Pool {
p := Pool{
work: make(chan Worker),
}
p.wg.Add(maxGoroutines)
for i := 1; i < maxGoroutines; i++ {
go func() {
for w := range p.work {
w.Task()
}
p.wg.Done()
}()
}
return &p
}
func (p *Pool) Run(w Worker) {
p.work <- w
}
func (p *Pool) Shutdown() {
close(p.work)
p.wg.Wait()
}
  • 运行函数
1
2
3
4
5
6
7
8
9
10
11
12
13
14
15
16
17
18
19
20
21
22
23
24
25
26
27
28
29
30
31
32
33
34
35
36
37
38
39
40
41
42
43
44
package main
import (
"api/books/go-in-action/7-concurrency-pattern/work"
"log"
"sync"
"time"
)
var names = []string {
"steve",
"bob",
"mary",
"therese",
"jason",
}
type namePrinter struct {
name string
}
func (m *namePrinter) Task() {
log.Println(m.name)
time.Sleep(time.Second)
}
func main() {
p := work.New(2)
var wg sync.WaitGroup
wg.Add(100 * len(names))
for i := 0; i < 100; i++ {
for _, name := range names {
np := namePrinter{name:name}
go func() {
p.Run(&np)
wg.Done()
}()
}
}
wg.Wait()
p.Shutdown()
}

小结

  • 可以使用通道来控制程序的声明周期
  • 带default分支的select语句可以用来尝试向通道发送或者接受数据,而不会被阻塞
  • 有缓冲的通道可以用来管理一组可服用的资源
  • 语言运行时会处理好通道的协作和同步
  • 使用无缓冲的通道来创建完成工作的goroutines池
  • 任何时间都可以用无缓冲的通道来让两个goroutine交换数据,在通道操作完成时一定保证对方接收到了数据

the way to go advaced

发表于 2020-04-16 | 分类于 go

第12章 读写数据

12.1 读取用户的输入

  • fmt.Scanln扫描来自标准输入的文本,空格分隔,直到换行为止
  • fmt.Scanf第一个参数用来格式化字符串
  • fmt.Sscan从字符串读取
  • bufio.Reader缓冲读,读到指定字符输出一次
1
2
3
inputReader := bufio.NewReader(os.Stdin)
fmt.Println("Please enter your name:")
input, err := inputReader.ReadString('\n')

12.2 文件读写

12.2.1 读文件

  • go语言中os.File类型的指针叫做文件句柄
1
2
3
4
5
6
7
8
9
10
11
12
13
14
15
16
func main() {
inputFile, inputError := os.Open("input.dat")
if inputError != nil {
fmt.Printf("An error occurred on opening the inputfile\n Does the file exist?\n Have you got acces to it?\n")
return
}
defer inputFile.Close()
inputReader := bufio.NewReader(inputFile)
for {
inputString, readerError := inputReader.ReadString('\n')
if readerError == io.EOF {
return
}
fmt.Printf("The input was: %s", inputString)
}
}
  • 将整个文件的内容读到一个字符串里边去 - ioutil.ReadFile(),第一个返回值是[]byte,第二个是error
  • 带缓冲的读取 - bufio.Reader.Read()
  • 按列读取文件中的数据,空格分隔,fmt.Fscanln(file, str1 str2 str3)

12.2.2 compress包:读取压缩文件

  • compress包支持的压缩文件格式为bzip2,flate,gzip,lzw,zlib
1
fz, err := gzip.NewReader(fi)

12.2.3 写文件

1
2
3
4
5
6
7
8
9
10
11
outputFile, outputError := os.OpenFile("output.dat", os.O_WRONLY|os.O_CREATE, 0666)
if outputError != nil {
return
}
defer outputFile.Close()
outputWriter := bufio.NewWriter(outputFile)
outputString := "Hello hello hello"
for i := 0; i < 10; i++ {
outputWriter.WriteString(outputString)
}
outputWrite.Flush()
  • os.O_RDONLY
  • os.O_WRONLY
  • os.O_CREATE:不存在创建
  • os.O_TRUNC:存在截断长度为0,类似清空
  • 使用os.Stdout.WriteString(“string”) 可以输出到屏幕

12.3 文件拷贝

1
2
3
4
5
6
7
8
9
10
11
12
13
14
15
16
17
18
func main() {
CopyFile("target.txt", "source.txt")
}
func CopyFile(dstName, srcName string) (written int64, err error) {
src, err := os.Open(srcName)
if err != nil {
panic()
}
defer src.Close()
dst, err := os.Create(dstName)
if err != nil {
panic()
}
defer dst.Close()
return io.Copy(dst, src)
}

12.4 从命令行读取参数

12.4.1 os包

  • os包中的os.Args来处理命令行参数,在程序启动后读取命令行输入的参数
1
2
3
4
5
6
7
func main() {
who := "Alice"
if len(os.Args) > 1 {
who += strings.Join(os.Args[1:], " ")
}
fmt.Println("hello", who)
}

12.4.2 flag包

  • flag包可以用来替换变量
  • flag.Parse()扫描参数列表或者常量列表
  • flag.Arg(0) 第一个参数

12.5 buffer读取文件

1
2
3
4
5
6
7
8
9
10
11
12
13
14
15
16
17
18
19
20
21
22
func cat(r *bufio.Reader) {
for {
buf, err := r.ReadBytes('\n')
if err == io.EOF {
break
}
fmt.Fprintf(os.Stdout, "%s", buf)
}
}
func main() {
flag.Parse()
if flag.NArgs() == 0 {
cat(bufio.NewReader(os.Stdin))
}
for i := 0; i < flag.NArg(); i++ {
f, err := os.Open(flag.Arg(i))
if err != nil {
continue
}
cat(bufio.NewReader(f))
}
}

12.6 用切片读写文件

1
2
3
4
5
6
7
8
9
10
11
12
13
14
15
16
17
func cat(f *os.File) {
const NBUF = 512
var buf [NBUF]byte
for {
switch nr, err := f.Read(buf[:]); true {
case nr < 0:
fmt.Fprintf(os.Stderr, "cat: error reading: %s\n", err.Error())
os.Exit(1)
case nr == 0: // EOF
return
case nr > 0:
if nw, ew := os.Stdout.Write(buf[0:nr]); nw != nr {
fmt.Fprintf(os.Stderr, "cat: error writing: %s\n", ew.Error())
}
}
}
}

12.7 defer关闭文件

函数退出前会执行文件关闭

1
2
3
4
5
6
func data(name string) string {
f, _ := os.Open(name, os.O_RDONLY, 0)
defer f.Close()
contents, _ := ioutil.ReadAll(f)
return string(contents)
}

12.8 fmt.Fprintf

接口概念阐述例子:

1
2
3
4
5
6
7
8
9
func main() {
// unbuffered
fmt.Fprintf(os.Stdout, "%s\n", "hello world! - unbuffered")
// buffered: os.Stdout implements io.Writer
buf := bufio.NewWriter(os.Stdout)
// and now so does buf.
fmt.Fprintf(buf, "%s\n", "hello world! - buffered")
buf.Flush()
}
  • 函数签名:func Fprintf(w io.Writer, format string, a ...interface{}) (n int, err error)

  • 第一个参数必须实现io.Writer接口

12.9 json数据格式

  • 编码格式JSON,XML,gob等

  • 术语

    • 数据结构->指定格式=序列化或者编码-传输之前
    • 指定格式->数据结构=反序列化或者解码-传输之后
  • 序列化是将内存中的数据结构转换成指定格式

  • json.Marshal() - 编码,web中使用json.MarshalforHTML()

  • JSON和go类型对应:

    • bool-boolean
    • float64-number
    • string-string
    • nil-null
  • 编码要求:

    • JSON 对象只支持字符串类型的 key;要编码一个 Go map 类型,map 必须是 map[string]T(T是 json 包中支持的任何类型)
    • Channel,复杂类型和函数类型不能被编码
    • 不支持循环数据结构;它将引起序列化进入一个无限循环
    • 指针可以被编码,实际上是对指针指向的值进行编码(或者指针是 nil)
  • 反序列化

    • json.Unmarshal(json, &v)
  • 编码和解码流

1
2
func NewDecoder(r io.Reader) *Decoder
func NewEncoder(r io.Writer) *Encoder
  • json到文件 encode
  • 文件到json decode

12.10 XML数据格式

  • encoding/xml包含了xml解析器来解析xml内容
  • marshal(),unMarshal()完成数据结构和xml内容的转换
  • xml中的标签
    • StartElement
    • Chardata
    • EndElement
    • Comment
    • Directive
    • ProcInst
1
2
3
4
5
6
7
8
9
10
11
12
13
14
15
16
17
18
19
20
21
22
23
24
25
26
func main() {
input := "<Person><FirstName>Laura</FirstName><LastName>Lynn</LastName></Person>"
inputReader := strings.NewReader(input)
p := xml.NewDecoder(inputReader)
for t, err = p.Token(); err == nil; t, err = p.Token() {
switch token := t.(type) {
case xml.StartElement:
name := token.Name.Local
fmt.Printf("Token name: %s\n", name)
for _, attr := range token.Attr {
attrName := attr.Name.Local
attrValue := attr.Value
fmt.Printf("An attribute is: %s %s\n", attrName, attrValue)
// ...
}
case xml.EndElement:
fmt.Println("End of token")
case xml.CharData:
content := string([]byte(token))
fmt.Printf("This is the content: %v\n", content)
// ...
default:
// ...
}
}
}

Gob传输数据

  • Gob是go自己的以二进制形式序列化和反序列化程序数据的格式
  • Gob通常用于远程调用参数和结果的传输,机器和程序之间的数据传输
  • Gob只用于go语言中
  • Gob 文件或流是完全自描述的:里面包含的所有类型都有一个对应的描述,并且总是可以用 Go 解码,而不需要了解文件的内容。
  • 可导出字段会被编码,零值会被忽略
  • Gob 使用通用的 io.Writer 接口,通过 NewEncoder() 函数创建 Encoder 对象并调用 Encode();相反的过程使用通用的 io.Reader 接口,通过 NewDecoder() 函数创建 Decoder 对象并调用 Decode()
1
2
3
4
5
6
7
8
9
10
11
12
13
14
15
16
17
18
19
20
21
22
23
24
25
26
27
28
type P struct {
X, Y, Z int
Name string
}
type Q struct {
X, Y *int32
Name string
}
func main() {
// Initialize the encoder and decoder. Normally enc and dec would be
// bound to network connections and the encoder and decoder would
// run in different processes.
var network bytes.Buffer // Stand-in for a network connection
enc := gob.NewEncoder(&network) // Will write to network.
dec := gob.NewDecoder(&network) // Will read from network.
// Encode (send) the value.
err := enc.Encode(P{3, 4, 5, "Pythagoras"})
if err != nil {
log.Fatal("encode error:", err)
}
// Decode (receive) the value.
var q Q
err = dec.Decode(&q)
if err != nil {
log.Fatal("decode error:", err)
}
fmt.Printf("%q: {%d,%d}\n", q.Name, *q.X, *q.Y)
}
  • 编码到文件
1
2
3
4
5
6
7
8
9
10
11
12
13
14
15
16
17
18
19
20
21
22
23
24
25
26
type Address struct {
Type string
City string
Country string
}
type VCard struct {
FirstName string
LastName string
Addresses []*Address
Remark string
}
var content string
func main() {
pa := &Address{"private", "Aartselaar","Belgium"}
wa := &Address{"work", "Boom", "Belgium"}
vc := VCard{"Jan", "Kersschot", []*Address{pa,wa}, "none"}
// fmt.Printf("%v: \n", vc) // {Jan Kersschot [0x126d2b80 0x126d2be0] none}:
// using an encoder:
file, _ := os.OpenFile("vcard.gob", os.O_CREATE|os.O_WRONLY, 0666)
defer file.Close()
enc := gob.NewEncoder(file)
err := enc.Encode(vc)
if err != nil {
log.Println("Error in encoding gob")
}
}

12.12 go中的密码学

  • hash 包:实现了 adler32、crc32、crc64 和 fnv 校验;
  • crypto 包:实现了其它的 hash 算法,比如 md4、md5、sha1 等。以及完整地实现了 aes、blowfish、rc4、rsa、xtea 等加密算法。
  • sha1
1
2
3
4
5
6
7
8
9
10
11
12
13
14
15
16
func main() {
hasher := sha1.New()
io.WriteString(hasher, "test")
b := []byte{}
fmt.Printf("Result: %x\n", hasher.Sum(b))
fmt.Printf("Result: %d\n", hasher.Sum(b))
//
hasher.Reset()
data := []byte("We shall overcome!")
n, err := hasher.Write(data)
if n!=len(data) || err!=nil {
log.Printf("Hash write error: %v / %v", n, err)
}
checksum := hasher.Sum(b)
fmt.Printf("Result: %x\n", checksum)
}

第13章 错误处理与测试

  • go没有try-catch-finally机制
  • go有defer-panic-and-recover机制
  • 永远不要忽略错误,否则可能会导致程序崩溃!!
  • 普通错误通过返回值来返回
  • 真正的异常用panic和recover来处理
  • 产生错误的函数会返回两个变量,一个值和一个错误码;如果后者是 nil 就是成功,非 nil 就是发生了错误。
  • 为了防止发生错误时正在执行的函数(如果有必要的话甚至会是整个程序)被中止,在调用函数后必须检查错误。

13.1 错误处理

  • go中的error接口
1
2
3
type error interface {
Error() string
}

13.1.1 定义错误

  • 新建:err := errors.New("error string")
  • 自定义error
1
2
3
4
5
6
7
8
9
// PathError records an error and the operation and file path that caused it.
type PathError struct {
Op string // "open", "unlink", etc.
Path string // The associated file.
Err error // Returned by the system call.
}
func (e *PathError) String() string {
return e.Op + " " + e.Path + ": "+ e.Err.Error()
}
  • 错误类型以Error结尾,错误变量以err或者Err开头

13.1.2 用fmt创建错误对象

1
fmt.Errorf("math: square root of negative number %g", f)

13.2 运行时异常和panic

  • 运行时异常:数组越界,断言失败等会触发panic
1
2
3
4
5
6
7
8
9
10
11
12
13
Starting the program
panic: A severe error occurred: stopping the program!
panic PC=0x4f3038
runtime.panic+0x99 /go/src/pkg/runtime/proc.c:1032
runtime.panic(0x442938, 0x4f08e8)
main.main+0xa5 E:/Go/GoBoek/code examples/chapter 13/panic.go:8
main.main()
runtime.mainstart+0xf 386/asm.s:84
runtime.mainstart()
runtime.goexit /go/src/pkg/runtime/proc.c:148
runtime.goexit()
---- Error run E:/Go/GoBoek/code examples/chapter 13/panic.exe with code Crashed
---- Program exited with code -1073741783
  • Go panicking:在多层嵌套的函数调用中调用 panic,可以马上中止当前函数的执行,所有的 defer 语句都会保证执行并把控制权交还给接收到 panic 的函数调用者。这样向上冒泡直到最顶层,并执行(每层的) defer,在栈顶处程序崩溃,并在命令行中用传给 panic 的值报告错误情况:这个终止过程就是 panicking

13.3 recover

  • recover用于从panic中恢复,停止终止过程,恢复正常执行
  • recover中能在defer修饰的函数中使用,用来取得panic调用中传递过来的错误值,如果是正常执行,调用recover会返回nil,不会生效
  • panic 会导致栈被展开直到 defer 修饰的 recover() 被调用或者程序中止。
1
2
3
4
5
6
7
8
9
10
11
func protect(g func()) {
defer func() {
log.Println("done")
// Println executes normally even if there is a panic
if err := recover(); err != nil {
log.Printf("run time panic: %v", err)
}
}()
log.Println("start")
g() // possible runtime-error
}
  • recover和catch很像
  • defer-panic-recover 在某种意义上也是一种像 if,for 这样的控制流机制

13.4 自定义包中的错误处理和panicking

  • 最佳实践
    • 在包的内部,总是应该从panic中recover,不允许显式的超出包范围的panic()
    • 向包的调用者返回错误值,而不是panic
1
2
3
4
5
6
7
8
9
10
11
12
13
14
15
16
17
18
19
20
21
22
23
24
25
26
27
28
29
30
31
32
33
34
35
36
37
38
39
40
41
42
43
44
45
// parse.go
package parse
import (
"fmt"
"strings"
"strconv"
)
// A ParseError indicates an error in converting a word into an integer.
type ParseError struct {
Index int // The index into the space-separated list of words.
Word string // The word that generated the parse error.
Err error // The raw error that precipitated this error, if any.
}
// String returns a human-readable error message.
func (e *ParseError) String() string {
return fmt.Sprintf("pkg parse: error parsing %q as int", e.Word)
}
// Parse parses the space-separated words in in put as integers.
func Parse(input string) (numbers []int, err error) {
defer func() {
if r := recover(); r != nil {
var ok bool
err, ok = r.(error)
if !ok {
err = fmt.Errorf("pkg: %v", r)
}
}
}()
fields := strings.Fields(input)
numbers = fields2numbers(fields)
return
}
func fields2numbers(fields []string) (numbers []int) {
if len(fields) == 0 {
panic("no words to parse")
}
for idx, field := range fields {
num, err := strconv.Atoi(field)
if err != nil {
panic(&ParseError{idx, field, err})
}
numbers = append(numbers, num)
}
return
}
1
2
3
4
5
6
7
8
9
10
11
12
13
14
15
16
17
18
19
20
21
22
23
24
// panic_package.go
package main
import (
"fmt"
"./parse/parse"
)
func main() {
var examples = []string{
"1 2 3 4 5",
"100 50 25 12.5 6.25",
"2 + 2 = 4",
"1st class",
"",
}
for _, ex := range examples {
fmt.Printf("Parsing %q:\n ", ex)
nums, err := parse.Parse(ex)
if err != nil {
fmt.Println(err) // here String() method from ParseError is used
continue
}
fmt.Println(nums)
}
}

13.5 一种用闭包处理错误的模式

  • 每当函数返回时,我们检查是否有错误发生,会很繁琐
  • defer/panic/recover和闭包可以优雅的解决这个问题,但是要求所有函数都是同一种签名才可以
1
2
3
4
5
6
7
8
9
10
11
12
13
14
15
16
17
18
19
20
21
22
23
24
25
26
27
28
29
30
31
32
33
34
35
36
37
func main() {
f()
fmt.Println("Returned normally from f.")
}
func f() {
defer func() {
if r := recover(); r != nil {
fmt.Println("Recovered in f", r)
}
}()
fmt.Println("Calling g.")
g(0)
fmt.Println("Returned normally from g.")
}
func g(i int) {
if i > 3 {
fmt.Println("Panicking!")
panic(fmt.Sprintf("%v", i))
}
defer fmt.Println("Defer in g", i)
fmt.Println("Printing in g", i)
g(i + 1)
}
/*
Calling g.
Printing in g 0
Printing in g 1
Printing in g 2
Printing in g 3
Panicking!
Defer in g 3
Defer in g 2
Defer in g 1
Defer in g 0
Recovered in f 4
Returned normally from f.
*/

13.6 启动外部命令和程序

  • os包又一个StartProcess函数可以调用或者启动外部系统命令和二进制可执行文件
1
2
3
4
5
6
7
8
9
10
11
12
13
14
15
16
17
18
19
20
21
22
23
24
25
26
27
28
29
30
31
32
33
34
35
36
37
38
39
40
41
42
43
44
45
46
47
48
49
50
51
52
53
54
55
56
57
58
// exec.go
package main
import (
"fmt"
"os/exec"
"os"
)
func main() {
// 1) os.StartProcess //
/*********************/
/* Linux: */
env := os.Environ()
procAttr := &os.ProcAttr{
Env: env,
Files: []*os.File{
os.Stdin,
os.Stdout,
os.Stderr,
},
}
// 1st example: list files
pid, err := os.StartProcess("/bin/ls", []string{"ls", "-l"}, procAttr)
if err != nil {
fmt.Printf("Error %v starting process!", err) //
os.Exit(1)
}
fmt.Printf("The process id is %v", pid)
// 2nd example: show all processes
pid, err = os.StartProcess("/bin/ps", []string{"-e", "-opid,ppid,comm"}, procAttr)
if err != nil {
fmt.Printf("Error %v starting process!", err) //
os.Exit(1)
}
fmt.Printf("The process id is %v", pid)
/* Output 1st:
The process id is &{2054 0}total 2056
-rwxr-xr-x 1 ivo ivo 1157555 2011-07-04 16:48 Mieken_exec
-rw-r--r-- 1 ivo ivo 2124 2011-07-04 16:48 Mieken_exec.go
-rw-r--r-- 1 ivo ivo 18528 2011-07-04 16:48 Mieken_exec_go_.6
-rwxr-xr-x 1 ivo ivo 913920 2011-06-03 16:13 panic.exe
-rw-r--r-- 1 ivo ivo 180 2011-04-11 20:39 panic.go
*/
// 2) exec.Run //
/***************/
// Linux: OK, but not for ls ?
// cmd := exec.Command("ls", "-l") // no error, but doesn't show anything ?
// cmd := exec.Command("ls") // no error, but doesn't show anything ?
cmd := exec.Command("gedit") // this opens a gedit-window
err = cmd.Run()
if err != nil {
fmt.Printf("Error %v executing command!", err)
os.Exit(1)
}
fmt.Printf("The command is %v", cmd)
// The command is &{/bin/ls [ls -l] [] <nil> <nil> <nil> 0xf840000210 <nil> true [0xf84000ea50 0xf84000e9f0 0xf84000e9c0] [0xf84000ea50 0xf84000e9f0 0xf84000e9c0] [] [] 0xf8400128c0}
}
// in Windows: uitvoering: Error fork/exec /bin/ls: The system cannot find the path specified. starting process!

13.7 go中的单元测试和基准测试

  • testing包是用来进行自动化测试,日志和错误报告的
  • 单元测试文件名为*_test.go,测试文件不会被普通的go编译器编译,不会被部署,只会被gotest编译
  • func TestAbcde(t *testing.T)
  • 测试失败
    • Fail 失败继续执行
    • FailNow失败终止执行,继续执行下一个文件
    • Log 打印到错误日志
    • Fatal Log+FailNow
  • 基准测试函数 BenchmarkReverse() 用go test -test.bench=.*来执行基准函数

13.8 测试实例

1
2
3
4
5
6
7
8
9
10
11
12
13
14
15
16
17
18
19
20
21
22
package even
import "testing"
func TestEven(t *testing.T) {
if !Even(10) {
t.Log(" 10 must be even!")
t.Fail()
}
if Even(7) {
t.Log(" 7 is not even!")
t.Fail()
}
}
func TestOdd(t *testing.T) {
if !Odd(11) {
t.Log(" 11 must be odd!")
t.Fail()
}
if Odd(10) {
t.Log(" 10 is not odd!")
t.Fail()
}
}
  • 测试用例需要覆盖
    • 正常的用例
    • 反面的用例
    • 边界检查用例

13.9 用测试数据表驱动测试

  • 将测试的输入数据和期望的结果写在一起组成一个数据表,数据表中的每条记录都是一个含有输入和期望值的完整测试用例
1
2
3
4
5
6
7
8
9
10
11
12
13
14
15
16
17
var tests = []struct{ // Test table
in string
out string
}{
{"in1", "exp1"},
{"in2", "exp2"},
{"in3", "exp3"},
...
}
func TestFunction(t *testing.T) {
for i, tt := range tests {
s := FuncToBeTested(tt.in)
if s != tt.out {
t.Errorf("%d. %q => %q, wanted: %q", i, tt.in, s, tt.out)
}
}
}

13.10 性能调试:分析并优化go程序

13.10.1 时间和内存消耗

  • /usr/bin/time -f '%Uu %Ss %er %MkB %C' goprogexec 用户时间,系统时间,实际时间,最大内存占用

13.10.2 go test调试

  • go test -x -v -cpuprofile=prof.out -file x_test.go

13.10.3 pprof调试

  • pprof运行时报告数据
  • 有用的命令
    • topN - 分析结果中最开头的N份样本
    • web - 调用统计,浏览器打开
    • list - 代码行数和执行消耗时间

第14章 协程和通道

不需要共享内存来通信,而是通过通信来共享内存。

14.1 并发,并行和协程

  • 不要使用全局变量或者共享内存,会给你代码在并发运算时带来风险
  • go中使用goroutine进行并发运算
  • 协程和操作系统的线程不是一对一的关系,协程是根据一个或多个线程的可用性,映射(多路复用,执行于)在他们之上的;协程调度器在 Go 运行时很好的完成了这个工作。
  • 协程工作在相同的地址空间中,所以共享内存的方式一定是同步的
  • go使用channel来同步协程
  • 当系统调用阻塞协程时,其他协程会继续在其他线程上工作
  • 协程比线程更轻量级,4K的内存就可以创建一个协程
  • 协程通过关键字go来创建
  • 协程的栈会根据需要进行伸缩,不会溢出,结束会自动退出清理
  • main可以看做一个协程
  • init函数中可以运行协程
  • 并发程序可能并行,也可能不是
  • 并行是一种通过多处理器来提高速度的能力
  • go中设置GOMASXPROCS来支持多个系统线程的应用,n个核设置GOMAXPROCS=n-1

  • Go 协程意味着并行(或者可以以并行的方式部署),协程一般来说不是这样的

  • Go 协程通过通道来通信;协程通过让出和恢复操作来通信

14.2 协程间的通信

14.2.1 概念

  • 通道(channel),就像一个可以用于发送类型化数据的管道,由其负责协程之间的通信,从而避开所有由共享内存导致的陷阱;这种通过通道进行通信的方式保证了同步性。数据在通道中进行传递:在任何给定时间,一个数据被设计为只有一个协程可以对其访问,所以不会发生数据竞争。 数据的所有权(可以读写数据的能力)也因此被传递。
  • channel未初始化未nil
  • channel只能传递一种类型的数据
  • channel实际上是类型化消息的队列,使数据得以传输。它是先进先出(FIFO)的结构所以可以保证发送给他们的元素的顺序
  • channel是引用类型,make来初始化 ch1 := make(chan string)

14.2.2 通信操作符<-

  • 数据是按照箭头的方向流动的
    • ch <-int1
    • int2 := <- ch
    • <-ch
  • channel的收发都是原子操作
1
2
3
4
5
6
7
8
9
10
11
12
13
14
15
16
17
18
19
20
21
22
23
24
25
26
package main
import (
"fmt"
"time"
)
func main() {
ch := make(chan string)
go sendData(ch)
go getData(ch)
time.Sleep(1e9)
}
func sendData(ch chan string) {
ch <- "Washington"
ch <- "Tripoli"
ch <- "London"
ch <- "Beijing"
ch <- "Tokyo"
}
func getData(ch chan string) {
var input string
// time.Sleep(2e9)
for {
input = <-ch
fmt.Printf("%s ", input)
}
}
  • 协程的同步:
    • main() 等待了 1 秒让两个协程完成,如果不这样,sendData() 就没有机会输出。
    • getData() 使用了无限循环:它随着 sendData() 的发送完成和 ch 变空也结束了。
    • 如果我们移除一个或所有 go 关键字,程序无法运行,Go 运行时会抛出 panic:

14.2.3 通道阻塞

  • 通道默认是同步且无缓冲的:接收者接收数据之前,发送不会结束。通道的发送和接收操作都是在对方准备好之前是阻塞的
1
2
3
4
5
6
7
8
9
10
11
12
13
package main
import "fmt"
func main() {
ch1 := make(chan int)
go pump(ch1) // pump hangs
fmt.Println(<-ch1) // prints only 0
}
func pump(ch chan int) {
for i := 0; ; i++ {
ch <- i
}
}
// 0

14.2.4 通过channel进行协程同步

  • 通过channel,两个协程在通信中的某刻同步交换数据
1
2
3
4
5
6
7
8
func f1(in chan int) {
fmt.Println(<-in)
}
func main() {
out := make(chan int)
out <- 2
go f1(out)
}

14.2.5 同步通道-使用带缓冲的通道

  • ch1 := make(chan string, buf) buf为个数
  • 在缓冲满载之前,给通道发送数据是不会被阻塞的
  • 在缓冲空之前,读取是不会阻塞的

14.2.6 协程中用通道输出结果

用通道来完成阻塞

1
2
3
4
ch := make(chan int)
go sum(bigArray, ch) // bigArray puts the calculated sum on ch
// .. do something else for a while
sum := <- ch // wait for, and retrieve the sum

14.2.7 信号量模式

  • 协程通过在通道中放置一个值来处理结束的信号
1
2
3
4
5
6
7
8
9
func compute(ch chan int){
ch <- someComputation() // when it completes, signal on the channel.
}
func main(){
ch := make(chan int) // allocate a channel.
go compute(ch) // stat something in a goroutines
doSomethingElseForAWhile()
result := <- ch
}

14.2.8 实现并行的for循环

1
2
3
4
5
6
for i, v := range data {
go func (i int, v float64) {
doSomething(i, v)
...
} (i, v)
}

14.2.8 用带缓冲通道实现一个信号量

  • 信号量是实现互斥锁常见的同步机制
    • 带缓冲通道的容量和要同步的资源容量相同
    • 通道的长度(当前存放的元素个数)与当前资源被使用的数量相同
    • 容量减去通道的长度就是未处理的资源个数(标准信号量的整数值)
1
2
3
4
5
6
7
8
9
10
11
12
13
14
15
16
17
18
19
20
21
22
23
24
package main
import (
"fmt"
"time"
)
func main() {
stream := pump()
go suck(stream)
time.Sleep(1e9)
}
func pump() chan int {
ch := make(chan int)
go func() {
for i := 0; ; i++ {
ch <- i
}
}()
return ch
}
func suck(ch chan int) {
for {
fmt.Println(<-ch)
}
}

14.2.10 给通道使用for循环

  • for-range
1
2
3
for v := range ch {
fmt.Printf("The value is %v\n", v)
}
  • 通道迭代模式
1
2
3
4
5
6
7
8
9
10
11
12
13
14
15
16
17
18
19
20
21
22
23
24
25
package main
import (
"fmt"
"time"
)
func main() {
suck(pump())
time.Sleep(1e9)
}
func pump() chan int {
ch := make(chan int)
go func() {
for i := 0; ; i++ {
ch <- i
}
}()
return ch
}
func suck(ch chan int) {
go func() {
for v := range ch {
fmt.Println(v)
}
}()
}

14.2.11 通道的方向

  • 只接收:var recv_noly <-chan int
  • 只发送:var send_only chan<- int

14.3 协程的同步:关闭通道-测试阻塞的通道

  • 通道可以被显示的关闭
  • 发送者需要关闭通道,接收者不需要
  • 关闭方法:defer close(ch)
1
2
3
4
5
6
7
8
9
10
11
12
13
14
15
16
17
18
19
20
21
22
func main() {
ch := make(chan string)
go sendData(ch)
getData(ch)
}
func sendData(ch chan string) {
ch <- "Washington"
ch <- "Tripoli"
ch <- "London"
ch <- "Beijing"
ch <- "Tokio"
close(ch)
}
func getData(ch chan string) {
for {
input, open := <-ch
if !open {
break
}
fmt.Printf("%s ", input)
}
}
  • for-range来读取通道会检测通道是否会关闭

14.4 使用select切换协程

  • select 被称为通信开关
  • select可以处理多个通信中的一个
1
2
3
4
5
6
7
8
9
10
11
12
13
14
15
16
17
18
19
20
21
22
23
24
25
26
27
28
func main() {
ch1 := make(chan int)
ch2 := make(chan int)
go pump1(ch1)
go pump2(ch2)
go suck(ch1, ch2)
time.Sleep(1e9)
}
func pump1(ch chan int) {
for i := 0; ; i++ {
ch <- i * 2
}
}
func pump2(ch chan int) {
for i := 0; ; i++ {
ch <- i + 5
}
}
func suck(ch1, ch2 chan int) {
for {
select {
case v := <-ch1:
fmt.Printf("Received on channel 1: %d\n", v)
case v := <-ch2:
fmt.Printf("Received on channel 2: %d\n", v)
}
}
}

14.5 通道、超时和计时器

  • time.Ticker结构体
1
2
3
4
5
type Ticker struct {
C <-chan Time // the channel on which the ticks are delivered.
// contains filtered or unexported fields
...
}
  • 可以返回一个通道并且不关闭
1
2
3
4
5
6
7
rate_per_sec := 10
var dur Duration = 1e9
chRate := time.Tick(dur)
for req := range requests {
<- chRate
go client.Call("Service.Method", req, ...)
}

实现了按照指定频率处理请求

  • Timer和Ticker类似,但是只会发送一次时间,可以应用在超时模式中
1
2
3
4
5
6
7
8
9
10
timeout := make(chan bool, 1)
go func() {
time.Sleep(1e9)
timeout<-true
}()
select {
case <-ch:
case <-timeout
}

14.6 协程和恢复

1
2
3
4
5
6
7
8
9
10
11
12
13
func server(workChan <-chan *Work) {
for work := range workChan {
go safelyDo(work)
}
}
func safelyDo(work *Work) {
defer func() {
if err := revocer(); err != nil {
log.Printf("")
}
}()
do(work)
}

一个协程发生panic会继续执行其他的协程

14.7 新旧模型对比

旧模式 - 使用共享内存来进行同步

  • 首先定义一个结构体处理一个任务
  • 各个任务组成任务池来共享内存,引入锁机制
  • 任务数量巨大,则锁机制的开销会导致效率急剧下降

新模式 - 使用通道

  • 使用一个通道接受需要处理的任务,一个通道接受处理完成的任务及其结果。worker在协程中启动,数量N可以调整
  • 不使用锁的机制,因为从通道获取到新任务不存在竞争关系
  • 我理解实际上锁机制是实现在了channel中,一个channel的获取是原子性的,从而提高性能
1
2
3
4
5
6
7
8
//Worker的写法, Master -> Workers
func Worker(in, out chan *Task) {
for {
t := <- in
process(t)
out <- t
}
}
  • 使用锁的情景:
    • 访问共享数据结构中的缓存信息
    • 保存应用程序上下文和状态信息数据
  • 使用通道的情景
    • 与异步操作的结果进行交互
    • 分发任务
    • 传递数据所有权

14.8 惰性生成器的实现

  • 生成器是指当被调用时返回一个序列中下一个值的函数,也被称为惰性求值
  • int channel实现的生成器
1
2
3
4
5
6
7
8
9
10
11
12
13
14
15
16
var resume chan int
func integers() chan int {
yield := make(chan int)
count := 0
go func() {
for {
yield <- count
count++
}
}()
return yield
}
func generateInteger() int {
resume = integers()
return <- resume
}
  • 使用空接口,闭包和高阶函数可以实现一个通用的惰性生产期的工厂函数
1
2
3
4
5
6
7
8
9
10
11
12
13
14
15
16
17
18
19
20
21
22
23
24
25
26
27
28
29
30
31
32
33
34
35
36
37
38
type Any interface{}
type EvalFunc func(Any) (Any, Any)
func BuildLazyEvaluator(evalFunc, initState Any) func() Any {
retValChan := make(chan Any)
loopFunc := func(){
var actState Any = initState
var retVal
for {
retVal, actState = evalFunc(actState)
retValChan <- retVal
}
}
retFunc := func() Any {
return <- retValChan
}
go loopFunc()
return retFunc
}
func BuildLazyIntEvaluator(evalFunc EvalFunc, initState Any) func() int {
ef := BuildLazyIntEvaluator(evalFunc, initState)
return func() int {
return ef().(int)
}
}
func main() {
evenFunc := func(state Any) (Any, Any) {
os := state.(int)
ns := os + 2
return os, ns
}
even := BuildLazyIntEvaluator(evenFunc, 0)
for i := 0; i < 10; i++ {
fmt.
}
}

14.9 实现Future模式

  • Future指的是你使用某一个值之前需要先对其进行计算,因此可以提前计算好
  • 求两个矩阵的乘积的逆 -> 先逆运算再乘
1
2
3
4
5
6
7
8
9
10
11
12
13
14
func InverseProduct(a, b Matrix) {
a_inv_future := InverseFuture(a)
b_inv_future := InverseFuture(b)
a_inv := <- a_inv_future
b_inv := <- b_inv_future
return Product(a_inv, b_inv)
}
func InverseFuture(a Matrix) chan Matrix {
future := make(chan Matrix)
go func() {
future <- Inverse(a)
}()
return future
}

14.10 复用

CS模式

  • go中服务器通常会在协程中执行向客户端的响应,故而会对每一个客户端请求启动一个协程,常见操作为客户端请求包含一个通道,服务器向这个通道中发送响应
  • 使用协程可以大大提高QPS
1
2
3
4
5
6
7
8
9
10
11
12
13
14
15
16
17
18
19
20
21
22
23
24
25
26
27
28
29
30
31
type Request struct {
a, b int
replyc chan int
}
type binOp func(a, b int) int
func run(op binOp, req *Request) {
req.replyc <- op(req.a, req.b)
}
func server (op binOp, service chan *Request) {
for {
req := <- service
go run(op, req)
}
}
func startServer(op binOp) chan *Request {
reqChan := make(chan *Request)
go server(op, reqChan)
return reqChan
}
func main(){
adder := startServer(func(a, b int) int {return a + b})
const N = 100
var reqs [n]Request
for i := 0; i < N; i++ {
req := &reqs[i]
req.a = i
req.b = i + N
req.replyc = make(chan int)
adder <- req
}
}

通过信号通道关闭服务器

1
2
3
4
5
6
7
8
9
10
11
12
13
14
15
16
func startServer(op binOp) (service chan *Request, quit chan bool) {
service = make(chan *Request)
quit = make(chan bool)
go server(op, service, quit)
return service, quit
}
func server(op binOp, service chan *request, quit chan bool) {
for {
select {
case req := <-service:
go run(op, req)
case <- quit:
return
}
}
}

14.11 限制同时处理的请求数 - 带缓冲的通道

1
2
3
4
5
6
7
8
9
10
11
12
13
14
15
16
17
18
19
20
21
22
23
24
const MAXREQS = 50
var sem = make(chan int, MAXREQS)
type Request struct {
a, b int
replyc chan int
}
func process(r *Request) {
// ...
}
func handle(r *Request) {
sem <- 1
process(r)
<- sem
}
func server(service chan *Request) {
for {
request := <- service
go handler(request)
}
}
func main() {
service := make(chan *Request)
go server(service)
}

14.12 链式协程

  • 海量协程的创建和运行
1
2
3
4
5
6
7
8
9
10
11
12
13
14
15
16
var ngoroutine = flag.Int("n", 100000, "how many goroutines")
func f(left, right chan int) {
left <- 1 + <- right
}
func main() {
flag.Parse()
leftmost := make(chan int)
var left, right chan int = nil, leftmost
for i := 0; i < *ngoroutine; i++ {
left, right = right, make(chan int)
go f(left, right)
}
right <- 0
x := <-leftmost
fmt.Println(x)
}

14.13 在多核心上并行运算

  • 信号量模式
1
2
3
4
5
6
7
8
9
10
11
12
13
14
15
16
17
18
func DoAll() {
sem := make(chan int, NCPU)
for i := 0; i < NCPU; i++ {
go DoPart(sem)
}
for i := 0; i < NCPU; i++ {
<-sem // wait for one task to complete
}
}
func DoPart(sem chan int) {
sem <- 1
}
func main() {
runtime.GOMAXPROCS(NCPU)
DOAll()
}

14.14并行化大量数据的计算

  • 串行处理流水线
1
2
3
4
5
6
7
8
func SerialProcessData(in <- chan *Data, out chan <- *Data) {
for data := range in {
tmpA := PreproceeData(data)
tmpB := ProcessStepA(tmpA)
tmpC := ProcessStepB(tmpB)
out <- PostProcessData(tmpC)
}
}
  • 并行计算
1
2
3
4
5
6
7
8
9
10
11
12
13
func ParallelProcessData(in <-chan *Data, out chan<- *Data) {
// make channels:
preOut := make(chan *Data, 100)
stepAOut := make(chan *Data, 100)
stepBOut := make(chan *Data, 100)
stepCOut := make(chan *Data, 100)
// start parallel computations:
go PreprocessData(in, preOut)
go ProcessStepA(preOut,StepAOut)
go ProcessStepB(StepAOut,StepBOut)
go ProcessStepC(StepBOut,StepCOut)
go PostProcessData(StepCOut,out)
}

14.15 漏桶算法

  • 客户端
1
2
3
4
5
6
7
8
9
10
11
12
func client() {
for {
var b *Buffer
select {
case b = <- freeList
// got one
default: b = new(Buffer)
}
loadInto(b)
serverChan <- b
}
}
  • 服务端
1
2
3
4
5
6
7
8
9
10
11
12
13
func server() {
for {
b := <-serverChan // Wait for work.
process(b)
// Reuse buffer if there's room.
select {
case freeList <- b:
// Reuse buffer if free slot on freeList; nothing more to do
default:
// Free list full, just carry on: the buffer is 'dropped'
}
}
}

14.16 对go协程进行基准测试

1
2
3
4
5
6
7
8
9
10
11
12
13
14
15
16
17
18
19
20
21
22
23
24
25
26
27
28
func main() {
fmt.Println(" sync", testing.Benchmark(BenchmarkChannelSync).String())
fmt.Println("buffered", testing.Benchmark(BenchmarkChannelBuffered).String())
}
func BenchmarkChannelSync(b *testing.B) {
ch := make(chan int)
go func() {
for i := 0; i < b.N; i++ {
ch <- i
}
close(ch)
}()
for range ch {
}
}
func BenchmarkChannelBuffered(b *testing.B) {
ch := make(chan int, 128)
go func() {
for i := 0; i < b.N; i++ {
ch <- i
}
close(ch)
}()
for range ch {
}
}

14.17 使用通道并发访问对象

1
2
3
4
5
6
7
8
9
10
11
12
13
14
15
16
17
18
19
20
21
22
23
24
25
26
27
28
29
30
31
32
33
34
35
36
37
38
39
40
41
type Person struct {
Name string
salary float64
chF chan func()
}
func NewPerson(name string, salary float64) *Person {
p := &Person{name, salary, make(chan func())}
go p.backend()
return p
}
func (p *Person) backend() {
for f := range p.chF {
f()
}
}
// Set salary.
func (p *Person) SetSalary(sal float64) {
p.chF <- func() { p.salary = sal }
}
// Retrieve salary.
func (p *Person) Salary() float64 {
fChan := make(chan float64)
p.chF <- func() { fChan <- p.salary }
return <-fChan
}
func (p *Person) String() string {
return "Person - name is: " + p.Name + " - salary is: " + strconv.FormatFloat(p.Salary(), 'f', 2, 64)
}
func main() {
bs := NewPerson("Smith Bill", 2500.5)
fmt.Println(bs)
bs.SetSalary(4000.25)
fmt.Println("Salary changed:")
fmt.Println(bs)
}

第15章 网络,模板和网页应用

15.1 tcp服务器

  • 服务器
1
2
3
4
5
6
7
8
9
10
11
12
13
14
15
16
17
18
19
20
21
22
23
24
func main() {
listener, err := net.Listen("tcp", "localhost:50000")
if err != nil {
return
}
for {
conn, err := listener.Accept()
if err != nil {
return
}
go doServerStuff(conn)
}
}
func doServerStuff(conn net.Conn) {
for {
buf := make([]byte, 512)
len, err := conn.Read(buf)
if err != nil {
return
}
fmt.Println("%v", string(buf[:len]))
}
}
  • 客户端
1
2
3
4
5
6
7
8
9
10
11
12
13
14
15
16
17
18
19
20
21
22
23
24
25
26
27
func main() {
//打开连接:
conn, err := net.Dial("tcp", "localhost:50000")
if err != nil {
//由于目标计算机积极拒绝而无法创建连接
fmt.Println("Error dialing", err.Error())
return // 终止程序
}
inputReader := bufio.NewReader(os.Stdin)
fmt.Println("First, what is your name?")
clientName, _ := inputReader.ReadString('\n')
// fmt.Printf("CLIENTNAME %s", clientName)
trimmedClient := strings.Trim(clientName, "\r\n") // Windows 平台下用 "\r\n",Linux平台下使用 "\n"
// 给服务器发送信息直到程序退出:
for {
fmt.Println("What to send to the server? Type Q to quit.")
input, _ := inputReader.ReadString('\n')
trimmedInput := strings.Trim(input, "\r\n")
// fmt.Printf("input:--%s--", input)
// fmt.Printf("trimmedInput:--%s--", trimmedInput)
if trimmedInput == "Q" {
return
}
_, err = conn.Write([]byte(trimmedClient + " says: " + trimmedInput))
}
}
  • 改进后的tcp_server
1
2
3
4
5
6
7
8
9
10
11
12
13
14
15
16
17
18
19
20
21
22
23
24
25
26
27
28
29
30
31
32
33
34
35
36
37
38
39
40
41
42
43
44
45
46
47
48
49
50
51
52
53
54
55
56
57
58
59
60
61
62
63
64
65
66
67
68
69
70
71
72
73
const maxRead = 25
func main() {
flag.Parse()
if flag.NArg() != 2 {
panic("usage: host port")
}
hostAndPort := fmt.Sprintf("%s:%s", flag.Arg(0), flag.Arg(1))
listener := initServer(hostAndPort)
for {
conn, err := listener.Accept()
checkError(err, "Accept: ")
go connectionHandler(conn)
}
}
func initServer(hostAndPort string) *net.TCPListener {
serverAddr, err := net.ResolveTCPAddr("tcp", hostAndPort)
checkError(err, "Resolving address:port failed: `" + hostAndPort + "'")
listener, err := net.ListenTCP("tcp", serverAddr)
checkError(err, "ListenTCP: ")
println("Listening to: ", listener.Addr().String())
return listener
}
func connectionHandler(conn net.Conn) {
connFrom := conn.RemoteAddr().String()
println("Connection from: ", connFrom)
sayHello(conn)
for {
var ibuf []byte = make([]byte, maxRead + 1)
length, err := conn.Read(ibuf[0:maxRead])
ibuf[maxRead] = 0 // to prevent overflow
switch err {
case nil:
handleMsg(length, err, ibuf)
case syscall.EAGAIN: // try again
continue
default:
goto DISCONNECT
}
}
DISCONNECT:
err := conn.Close()
println("Closed connection: ", connFrom)
checkError(err, "Close: ")
}
func sayHello(to net.Conn) {
obuf := []byte{'L', 'e', 't', '\'', 's', ' ', 'G', 'O', '!', '\n'}
wrote, err := to.Write(obuf)
checkError(err, "Write: wrote " + string(wrote) + " bytes.")
}
func handleMsg(length int, err error, msg []byte) {
if length > 0 {
print("<", length, ":")
for i := 0; ; i++ {
if msg[i] == 0 {
break
}
fmt.Printf("%c", msg[i])
}
print(">")
}
}
func checkError(error error, info string) {
if error != nil {
panic("ERROR: " + info + " " + error.Error()) // terminate goprogram
}
}

15.2 简单的网页服务器

  • net/http包
  • http.ListenAndServer
  • http.URL
  • http.Request
  • request.FormValue
  • request.ParseForm
  • http.HandlerFunc 具体函数 - 对应路径,类似于controller
1
2
3
4
5
6
7
8
9
10
11
12
func HelloServer(w http.ResponseWriter, req *http.Request) {
fmt.Println("Inside HelloServer handler")
fmt.Fprintf(w, "Hello,"+req.URL.Path[1:])
}
func main() {
http.HandleFunc("/", HelloServer)
err := http.ListenAndServe("localhost:8080", nil)
if err != nil {
log.Fatal("ListenAndServe: ", err.Error())
}
}
  • http.ListenAndServerTLS - https

15.3 访问并读取页面

  • http.Head()来请求URL
  • http.Get()获取Body中的网页内容
  • http.Redirect(w RespoonseWriter, r *Request, url string, code int) 浏览器重定向URL
  • http.NotFound(w ResponseWriter, r *Request) 404
  • http.Error(w ResponseWriter, r *Request) 错误信息和错误码
  • http.Request
  • req.Method

  • go定义的HTTP状态码

    • http.StatusContinue = 100
    • http.StatusOK = 200
    • http.StatusFound = 302
    • http.StatusBadRequest = 400
    • http.StatusUnauthorized = 401
    • http.StatusForbidden = 403
    • http.StatusNotFound = 404
    • http.StatusInternalServerError = 500

15.4 网页应用

1
2
3
4
5
6
7
8
9
10
11
12
13
14
15
16
17
18
19
20
21
22
23
24
25
26
27
28
29
30
const form = `
<html><body>
<form action="#" method="post" name="bar">
<input type="text" name="in" />
<input type="submit" value="submit"/>
</form>
</body></html>
`
func SimpleServer(w http.ResponseWriter, request *http.Request) {
io.WriteString(w, "<h1>hello, world</h1>")
}
func FormServer(w http.ResponseWriter, request *http.Request) {
w.Header().Set("Content-Type", "text/html")
switch request.Method {
case "GET":
io.WriteString(w, form)
case "POST":
io.WriteString(w, request.FormValue("in"))
}
}
func main() {
http.HandleFunc("/test1", SimpleServer)
http.HandleFunc("/test2", FormServer)
if err := http.ListenAndServe(":8088", nil); err != nil {
panic(err)
}
}

15.5 网页应用健壮

  • 使用闭包的错误处理模式
1
2
3
4
5
6
7
8
9
10
11
12
type HandleFnc func(http.ResponseWriter, *http.Request)
func logPanics(function HandlerFunc) HandlerFnc {
return func(writer http.ResponseWriter, request *http.Request) {
defer func() {
if x := recover(); x != nil {
log...
}
}()
function(writer, request)
}
}

15.6 模板技术动态生成页面

  • 模板缓存
1
2
3
4
5
6
7
8
9
10
11
12
13
14
15
16
17
18
19
20
21
22
23
24
25
26
27
28
29
30
31
32
33
34
35
36
37
38
39
40
41
42
43
44
45
46
47
48
49
50
51
52
53
54
55
56
57
58
59
60
61
62
63
64
65
66
67
68
69
70
71
72
73
74
75
76
77
78
79
80
81
82
83
84
85
86
87
88
89
90
91
92
93
94
95
96
97
package main
import (
"io/ioutil"
"log"
"net/http"
"regexp"
"text/template"
)
const lenPath = len("/view/")
var titleValidator = regexp.MustCompile("^[a-zA-Z0-9]+$")
var templates = make(map[string]*template.Template)
var err error
type Page struct {
Title string
Body []byte
}
func init() {
for _, tmpl := range []string{"edit", "view"} {
templates[tmpl] = template.Must(template.ParseFiles(tmpl + ".html"))
}
}
func main() {
http.HandleFunc("/view/", makeHandler(viewHandler))
http.HandleFunc("/edit/", makeHandler(editHandler))
http.HandleFunc("/save/", makeHandler(saveHandler))
err := http.ListenAndServe("localhost:8080", nil)
if err != nil {
log.Fatal("ListenAndServe: ", err.Error())
}
}
func makeHandler(fn func(http.ResponseWriter, *http.Request, string)) http.HandlerFunc {
return func(w http.ResponseWriter, r *http.Request) {
title := r.URL.Path[lenPath:]
if !titleValidator.MatchString(title) {
http.NotFound(w, r)
return
}
fn(w, r, title)
}
}
func viewHandler(w http.ResponseWriter, r *http.Request, title string) {
p, err := load(title)
if err != nil { // page not found
http.Redirect(w, r, "/edit/"+title, http.StatusFound)
return
}
renderTemplate(w, "view", p)
}
func editHandler(w http.ResponseWriter, r *http.Request, title string) {
p, err := load(title)
if err != nil {
p = &Page{Title: title}
}
renderTemplate(w, "edit", p)
}
func saveHandler(w http.ResponseWriter, r *http.Request, title string) {
body := r.FormValue("body")
p := &Page{Title: title, Body: []byte(body)}
err := p.save()
if err != nil {
http.Error(w, err.Error(), http.StatusInternalServerError)
return
}
http.Redirect(w, r, "/view/"+title, http.StatusFound)
}
func renderTemplate(w http.ResponseWriter, tmpl string, p *Page) {
err := templates[tmpl].Execute(w, p)
if err != nil {
http.Error(w, err.Error(), http.StatusInternalServerError)
}
}
func (p *Page) save() error {
filename := p.Title + ".txt"
// file created with read-write permissions for the current user only
return ioutil.WriteFile(filename, p.Body, 0600)
}
func load(title string) (*Page, error) {
filename := title + ".txt"
body, err := ioutil.ReadFile(filename)
if err != nil {
return nil, err
}
return &Page{Title: title, Body: body}, nil
}

15.7 template包 - 先不看

15.8 多功能网页服务器

15.9 RPC远程调用

  • net/rpc包实现互相通信

  • rpc_object

1
2
3
4
5
6
7
8
9
10
package rpc_objects
type Args struct {
N, M int
}
func (t *Args) Multiply(args *Args, reply *int) error {
*reply = args.N * args.M
return nil
}
  • server
1
2
3
4
5
6
7
8
9
10
11
func main() {
calc := new(rpc_objects.Args)
rpc.Register(calc)
rpc.HandleHTTP()
listener, e := net.Listen("tcp", "localhost:1234")
if e != nil {
log.Fatal("Starting RPC-server -listen error:", e)
}
go http.Serve(listener, nil)
time.Sleep(1000e9)
}
  • rpc_client
1
2
3
4
5
6
7
8
9
10
11
12
13
14
15
16
const serverAddress = "localhost"
func main() {
client, err := rpc.DialHTTP("tcp", serverAddress + ":1234")
if err != nil {
log.Fatal("Error dialing:", err)
}
// Synchronous call
args := &rpc_objects.Args{7, 8}
var reply int
err = client.Call("Args.Multiply", args, &reply)
if err != nil {
log.Fatal("Args error:", err)
}
fmt.Printf("Args: %d * %d = %d", args.N, args.M, reply)
}

15.10 基于网络的通道 netchan

  • netchan包实现了类型安全的网络通道:允许一个通道两端出现由网络连接的不同计算机
  • 一组导出器会按名称发布一组通道,导入器连接到导出的机器,并按照名称导入这些通道

  • 发送端

1
2
3
4
5
6
7
8
9
exp, err := netchan.NewExporter("tcp", "netchanserver.mydomain.com:1234")
if err != nil {
log.Fatalf("Error making Exporter: %v", err)
}
ch := make(chan myType)
err := exp.Export("sendmyType", ch, netchan.Send)
if err != nil {
log.Fatalf("Send Error: %v", err)
}
  • 接收端
1
2
3
4
5
6
7
8
9
imp, err := netchan.NewImporter("tcp", "netchanserver.mydomain.com:1234")
if err != nil {
log.Fatalf("Error making Importer: %v", err)
}
ch := make(chan myType)
err = imp.Import("sendmyType", ch, netchan.Receive)
if err != nil {
log.Fatalf("Receive Error: %v", err)
}

15.11 websocket

  • 服务端
1
2
3
4
5
6
7
8
9
10
11
12
13
14
15
16
17
18
19
20
func server(ws *websocket.Conn) {
fmt.Printf("new connection\n")
buf := make([]byte, 100)
for {
if _, err := ws.Read(buf); err != nil {
fmt.Printf("%s", err.Error())
break
}
}
fmt.Printf(" => closing connection\n")
ws.Close()
}
func main() {
http.Handle("/websocket", websocket.Handler(server))
err := http.ListenAndServe(":12345", nil)
if err != nil {
panic("ListenAndServe: " + err.Error())
}
}
  • 客户端
1
2
3
4
5
6
7
8
9
10
11
12
13
14
15
16
17
18
19
20
func main() {
ws, err := websocket.Dial("ws://localhost:12345/websocket", "",
"http://localhost/")
if err != nil {
panic("Dial: " + err.Error())
}
go readFromServer(ws)
time.Sleep(5e9)
ws.Close()
}
func readFromServer(ws *websocket.Conn) {
buf := make([]byte, 1000)
for {
if _, err := ws.Read(buf); err != nil {
fmt.Printf("%s\n", err.Error())
break
}
}
}

15.12 使用smtp发送邮件

  • smpt Simple Mail Transfer Protocol
1
2
3
4
5
6
7
8
9
10
11
12
13
14
15
16
17
18
19
20
21
func main() {
// Set up authentication information.
auth := smtp.PlainAuth(
"",
"user@example.com",
"password",
"mail.example.com",
)
// Connect to the server, authenticate, set the sender and recipient,
// and send the email all in one step.
err := smtp.SendMail(
"mail.example.com:25",
auth,
"sender@example.org",
[]string{"recipient@example.net"},
[]byte("This is the email body."),
)
if err != nil {
log.Fatal(err)
}
}

第16章 常见的错误与陷阱

  • 永远不要声明形如var p*a的变量
  • 永远不要在for循环中改变计数器的变量
  • 永远不要在for-range循环中使用一个值去改变自身的值
  • 永远不要将goto和前置标签一起使用
  • 永远不要忘记在函数名后边加上()
  • 永远不要使用new()创建map
  • 为一个两类型定义一个String方法时,不要使用fmt.Print或者类似的代码
  • 永远不要忘记当终止缓存写入时,使用Flush函数
  • 永远不要忽略错误提示,忽略错误会导致程序崩溃
  • 不要使用全局变量或者共享内存,并发不安全
  • println函数仅仅用于调试
  • 使用正确的方式初始化一个元素是切片的映射,例如map[type]slice
  • 一直使用逗号,ok或者checked形式作为类型断言
  • 使用一个工厂函数创建并初始化自己定义的类型
  • 仅当一个结构体的方法想改变结构体时,使用结构体指针作为方法的接受者,否则使用一个结构体类型

16.1 误用短声明导致变量覆盖

1
2
3
4
5
6
7
8
9
10
11
12
func shadow() (err error) {
x, err := check1() // x是新创建变量,err是被赋值
if err != nil {
return // 正确返回err
}
if y, err := check2(x); err != nil { // y和if语句中err被创建
return // if语句中的err覆盖外面的err,所以错误的返回nil!
} else {
fmt.Println(y)
}
return
}

16.2 误用字符串

  • 字符串不可变
  • 字符串运算效率低下
  • 使用字符数组进行运算
1
2
3
4
5
6
var b bytes.Buffer
...
for condition {
b.WriteString(str) // 将字符串str写入缓存buffer
}
return b.String()

16.3 发生错误时使用defer关闭一个文件

1
2
3
4
5
6
7
8
9
for _, file := range files {
if f, err = os.Open(file); err != nil {
return
}
// 对文件进行操作
f.Process(data)
// 关闭文件
f.Close()
}
  • defer只在函数返回时才会被执行,在循环的结尾或其他一些有限范围的代码内是不会被执行的

16.4 new和make

  • 切片,Map和channel,用make
  • 数组,结构体,值类型用new

16.5 不需要将一个指向切片的指针传递给函数

  • 切片实际上就是一个指向潜在数组的指针
  • 当切片作为参数传递时,切记不要解引用切片

16.6 使用指针指向接口类型

  • 接口类型已经是一个指针了

16.7 使用值类型时误用指针

  • 值类型的内存时栈上分配,内存分配快速且开销不大
  • 指针类型需要在堆上创建,导致额外的内存分配

16.8 误用协程和通道

  • 大多数情况下,通过栈传递参数会更有效率
  • 当且仅当代码中并发执行非常重要,才使用协程和通道

16.9 闭包和协程的使用

1
2
3
4
5
6
7
8
9
10
11
12
13
14
15
16
17
18
19
20
21
22
23
24
25
26
27
28
29
30
31
32
33
34
35
36
37
38
39
40
41
42
43
44
45
var values = [5]int{10, 11, 12, 13, 14}
func main() {
// 版本A:
for ix := range values { // ix是索引值
func() {
fmt.Print(ix, " ")
}() // 调用闭包打印每个索引值
}
fmt.Println()
// 版本B: 和A版本类似,但是通过调用闭包作为一个协程
for ix := range values {
go func() {
fmt.Print(ix, " ")
}()
}
fmt.Println()
time.Sleep(5e9)
// 版本C: 正确的处理方式
for ix := range values {
go func(ix interface{}) {
fmt.Print(ix, " ")
}(ix)
}
fmt.Println()
time.Sleep(5e9)
// 版本D: 输出值:
for ix := range values {
val := values[ix]
go func() {
fmt.Print(val, " ")
}()
}
time.Sleep(1e9)
}
/*
0 1 2 3 4
4 4 4 4 4
1 0 3 4 2
10 11 12 13 14
*/

16.10 糟糕的错误处理

  • 创建一个布尔型变量用于测试错误条件是多余的
  • 避免错误检测使代码变得混乱,使用闭包来封装你的错误检验

第17章 Go语言模式

17.1 逗号,ok模式

  1. 函数返回时检查错误
    1. val, err := pack1.Func()
  2. 检测Map中是否存在一个键值
    1. if value, isPresent = map1[key1]; isPresent {}
  3. 检测一个接口类型变量varI是否包含了类型T,类型断言
    1. if value, ok := varI.(T); ok {}
  4. 检测一个通道ch是否关闭
    1. for input := range ch {}

17.2 defer模式

使用场景 例子
关闭一个文件流 defer f.Close()
解锁一个被锁定的资源 defer mu.Unlock()
关闭一个通道 defer close(ch)
从panic恢复 defer func(){if err := revocer(); err != nil {}}
停止一个计时器 defer tick1.Stop()
释放一个进程p defer p,Release()
停止CPU性能分析并立即写入 defer pprof.StopCPUProfile()

17.3 可见性模式

17.4 运算符模式和接口

17.4.1 函数作为运算符

  • go中没有函数重载,我们不得不给函数起不同的名称,可以将其作为包的私有函数,并暴露单一的 Add() 函数作为公共 API。可以在嵌套的 switch 断言中测试类型,以便在任何支持的参数组合上执行操作
1
2
3
4
5
6
7
8
9
10
11
12
13
14
15
func Add(a Matrix, b Matrix) Matrix {
switch a.(type) {
case sparseMatrix:
switch b.(type) {
case sparseMatrix:
return addSparseToSparse(a.(sparseMatrix), b.(sparseMatrix))
case denseMatrix:
return addSparseToDense(a.(sparseMatrix), b.(denseMatrix))
…
}
default:
// 不支持的参数
…
}
}

17.4.2 方法作为运算符

  • 根据接收者的不同,可以区分不同的方法
1
2
3
4
5
6
7
8
9
10
11
12
func (a *sparseMatrix) Add(b Matrix) Matrix {
switch b.(type) {
case sparseMatrix:
return addSparseToSparse(a.(sparseMatrix), b.(sparseMatrix))
case denseMatrix:
return addSparseToDense(a.(sparseMatrix), b.(denseMatrix))
…
default:
// 不支持的参数
…
}
}

17.4.3 使用接口

  • 不同类型上执行相同的方法时,创建一个通用化的接口以实现多态
1
2
3
4
5
6
7
8
9
10
11
12
13
14
15
16
17
type Algebraic interface {
Add(b Algebraic) Algebraic
Min(b Algebraic) Algebraic
Mult(b Algebraic) Algebraic
…
Elements()
}
func (a *denseMatrix) Add(b Algebraic) Algebraic {
switch b.(type) {
case sparseMatrix:
return addDenseToSparse(a, b.(sparseMatrix))
…
default:
for x in range b.Elements() …
}
}

第18章 实用代码块

18.1 字符串

  • 如何修改字符串中的一个字符
1
2
3
4
str := "hello"
c := []byte(str)
c[0] = 'c'
s2 := string(c)
  • 如何获取字符串的子串 - substr := str[n;m]

  • 如何使用for或者for-range遍历一个字符串

1
2
3
4
5
6
7
8
// gives only the bytes:
for i:=0; i < len(str); i++ {
… = str[i]
}
// gives the Unicode characters:
for ix, ch := range str {
…
}
  • 如何获取一个字符串的字节数 - len()

  • 如何获取一个字符串的字符数 - utf8.RuneCountInString(str)

  • 如何连接字符串

    • with a bytes.Buffer
    • Strings.Join()
    • +=
  • 如何解析命令行参数:使用os或者flag包

18.2 数组和切片

  • 创建

    • arr1 := new([len]type)
    • slice1 := make([]type, len)
  • 初始化

    • arr1 := [...]type{i1,i2,i3,i4,i5}
    • arrKeyValue := [len]type{i1:val1, i2: val2}
    • var slice1 []type = arr1[start:end]
  • 截断数组或者切片的最后一个元素

    • line = line[:len(line)-1]
  • 遍历数组或者切片

1
2
3
4
5
6
for i:=0; i < len(arr); i++ {
… = arr[i]
}
for ix, value := range arr {
…
}
  • 二维数组或者切片中查找指定值V
1
2
3
4
5
6
7
8
9
found := false
Found: for row := range arr2Dim {
for column := range arr2Dim[row] {
if arr2Dim[row][column] == V{
found = true
break Found
}
}
}

18.3 Map

  • 创建

    • map1 := make(map[keyType]valueType)
  • 初始化

    • map1 := map[string]int{"one":1, "two":2}
  • 遍历

    • for key, val := range map1{}
  • 在map中检测key1是否存在

    • val1, isPresent = map1[key1]
  • 删除一个键

    • delete(map1, key1)

18.4 结构体

  • 创建
1
2
3
4
5
6
type structName struct {
field1 type1
field2 type2
}
ms := new(struct1)
  • 初始化

    • ms := &struct1{10,10,"chris"}
  • 结构体命名大写开头则包外可见

  • 每个结构体需要定义一个构件函数来初始化结构体

18.5 接口

  • 检测一个值v是否实现了接口Stringer

    • if v, ok := v.(Stringer); ok {}
  • 如何使用接口实现一个类型分类接口

1
2
3
4
5
6
7
8
9
10
11
12
13
14
15
16
17
18
func classifier(items ...interface{}) {
for i, x := range items {
switch x.(type) {
case bool:
fmt.Printf("param #%d is a bool\n", i)
case float64:
fmt.Printf("param #%d is a float64\n", i)
case int, int64:
fmt.Printf("param #%d is an int\n", i)
case nil:
fmt.Printf("param #%d is nil\n", i)
case string:
fmt.Printf("param #%d is a string\n", i)
default:
fmt.Printf("param #%d’s type is unknown\n", i)
}
}
}

18.6 函数

  • 使用recover恢复panic
1
2
3
4
5
6
7
8
9
10
11
func protect(g func()) {
defer func() {
log.Println("done")
// Println executes normally even if there is a panic
if x := recover(); x != nil {
log.Printf("run time panic: %v", x)
}
}()
log.Println("start")
g()
}

18.7 文件

  • 打开并读取
1
2
3
4
5
6
7
8
9
10
11
12
13
14
file, err := os.Open("input.dat")
if err != nil {
}
defer file.Close()
iReader := bufio.NewReader(file)
for {
str, err := iReader.ReadString('\n')
if err != nil {
return
}
fmt.Println("")
}
  • 通过切片读写文件
1
2
3
4
5
6
7
8
9
10
11
12
13
14
15
16
17
18
19
func cat(f *file.File) {
const NBUF = 512
var buf [NBUF]byte
for {
switch nr, er := f.Read(buf[:]); true {
case nr < 0:
fmt.Fprintf(os.Stderr, "cat: error reading from %s: %s\n",
f.String(), er.String())
os.Exit(1)
case nr == 0: // EOF
return
case nr > 0:
if nw, ew := file.Stdout.Write(buf[0:nr]); nw != nr {
fmt.Fprintf(os.Stderr, "cat: error writing from %s: %s\n",
f.String(), ew.String())
}
}
}
}

18.8 goroutine和channel

  • tips

    • 出于性能考虑建议使用带缓存的通道
    • 限制一个通道的数据数量并将它们封装成一个数组
  • 遍历一个channel

    • for v := range ch {}
  • 检测一个通道ch是否关闭

    • input, open := <-ch; !open { }
  • 通过一个通道让主程序等待直到协程完成

1
2
3
4
5
ch := make(chan int)
go func() {
ch <- 1
}()
<-ch
  • 通道的工厂模板
1
2
3
4
5
6
7
8
9
func pump() chan int {
ch := make(chan int)
go func() {
for i := 0; ; i++ {
ch <- i
}
}()
return ch
}
  • 通道迭代器模板
  • 如何限制并发请求的处理数量
1
2
3
4
5
6
7
8
9
10
11
12
13
14
15
16
17
18
19
20
21
22
23
24
25
26
27
28
29
30
const MAXREQS = 50
var sem = make(chan int, MAXREQS)
type Request struct {
a, b int
replyc chan int
}
func process(r *Request) {
// do something
}
func handle(r *Request) {
sem <- 1 // doesn't matter what we put in it
process(r)
<-sem // one empty place in the buffer: the next request can start
}
func server(service chan *Request) {
for {
request := <-service
go handle(request)
}
}
func main() {
service := make(chan *Request)
go server(service)
}
  • 如何在多核上实现并行计算
1
2
3
4
5
6
7
8
9
10
11
12
13
14
15
16
17
18
19
20
21
func DoAll(){
sem := make(chan int, NCPU) // Buffering optional but sensible
for i := 0; i < NCPU; i++ {
go DoPart(sem)
}
// Drain the channel sem, waiting for NCPU tasks to complete
for i := 0; i < NCPU; i++ {
<-sem // wait for one task to complete
}
// All done.
}
func DoPart(sem chan int) {
// do the part of the computation
sem <-1 // signal that this piece is done
}
func main() {
runtime.GOMAXPROCS(NCPU) // runtime.GOMAXPROCS = NCPU
DoAll()
}
  • 如何终止一个协程

    • runtime.Goexit()
  • 简单的超时模板

1
2
3
4
5
6
7
8
9
10
11
timeout := make(chan bool, 1)
go func() {
time.Sleep(1e9) // one second
timeout <- true
}()
select {
case <-ch:
// a read from ch has occurred
case <-timeout:
// the read from ch has timed out
}
  • 使用输入通道和输出通道代替锁
1
2
3
4
5
6
7
func Worker(in, out chan *Task) {
for {
t := <-in
process(t)
out <- t
}
}

18.9 网络和网页应用

  • 制作解析并使模板生效
    • var strTempl = template.Must(template.New("TName").Parse(strTemplateHTML))

18.10 其他

  • 在程序出错时终止程序
1
2
3
4
5
6
7
8
if err != nil {
...
os.Exit(1)
}
if err != nil {
panic("ERROR occurred: " + err.Error())
}

18.11 出于性能考虑的最佳实践和建议

  • 尽可能的使用:=去初始化声明的一个变量
  • 尽可能的使用字符代替字符串
  • 尽可能使用切片替代数组
  • 尽可能使用数组和切片替换映射
  • 如果只想获取切片中的某项值,不需要值的索引,尽可能使用for-range去遍历切片
  • 当数组元素是稀疏的,使用映射会降低内存消耗
  • 初始化Map时指定其容量
  • 当定义一个方法时,使用指针类型所谓方法的接受者
  • 在代码中使用常量或者标志提取常量的值
  • 尽可能在需要分配大量内存时使用缓存
  • 使用缓存模板

the way to go 基础篇

发表于 2020-04-16 | 分类于 go

前言

  • go语言诞生条件

    1. 更快的开发速度
    2. 优越的多核工作
    3. 更好的网络编程环境
    4. 享受开发过程
  • go语言追求短小精悍

第一章 Go语言的起源发展与普及

起源与发展

  1. 起源于07年,09年正式发布,Robert Griesemer, Rob Pike, Ken Thompson
  2. 2019/11/10 完全开源Linux和MacOSX
  3. 2010/1/8 当选2009年年度语言
  4. 2010/5 谷歌开始使用
  5. 2011/5/5 Google App Engine支持Go语言
  6. 几个网址
    • 官网 golang.org
    • github.com/golang/go
      *

语言的主要特性和发展的环境和影响因素

  • go语言追求快速编译(Java),高效执行(C++),易于开发(动态语言)
  • go语言是一门类型安全和内容安全的编程语言
  • go语言存在指针,但是不允许指针运算
  • 对于并发编程,网络编程支持极好-goroutine
  • go语言依赖管理采用分包进行
  • go语言和Java一样有GC机制
  • go install部署第三方包

指导设计原则

  • go语言关键字25个
  • go语言编码规范-https://golang.org/ref/spec

语言特性

  • go语言在本质上支持并发编程
  • go语言没有类的概念,用interface来实现多态
  • go语言是类型安全的语言,使用静态类型
  • go语言是强类型语言
  • go语言支持交叉编译
  • go语言代码和字符串的编码方式都是utf-8,支持国际化

语言用途

  • go语言用于web服务器,存储集群,分布式场景,游戏服务
  • go语言的目标是时限CEP, complex Event Process
  • go语言不适合开发实时性要求高的软件

特性缺失

  • 不支持函数重载和操作符重载
  • 不支持隐式转换
  • 不支持类和类型的继承
  • 不支持变体类型
  • 不支持动态加载代码
  • 不支持动态链接库
  • 不支持泛型
  • 通过recover和panic来替代异常机制
  • 不支持静态变量

小结

  • 简化问题,易于学习
  • 内存管理,语法简洁,易于使用
  • 快速编译,高效开发
  • 高效执行
  • 并发支持,轻松驾驭
  • 静态类型
  • 标准类库,规范统一
  • 易于部署

第二章 安装与运行环境

平台与架构

  • 编译器支持的平台:
    • Linux
    • FreeBSD
    • Mac OS X
  • 编译器
    • gc
    • gccgo

Go环境变量

  • $GOROOT:go的安装位置
  • $GOARCH:机器的处理器架构
  • $GOOS:操作系统
  • $GOBIN:编译器和链接器的安装位置
  • $GOPATH:包含多个Go语言远吗文件,包文件和可执行文件,src,pkg,bin三个目录
  • $GOARM:ARM专用
  • $GOMAXPROCS:设置可用的处理器核数

Linux安装go

  1. Linux下通过$HOME/.bashrc来自定义环境

    • 首先配置GOROOT:export GOROOT=$HOME/go
    • 配置path:export PATH=$PATH:$GOROOT/bin
    • 配置工作路径:export GOPATH=$HOME/Applications/Go
    • source ~/.bashrc生效
    • go env查看
  2. go源码获取

    1
    2
    3
    4
    5
    wget https://storage.googleapis.com/golang/go<VERSION>.src.tar.gz
    tar -zxvf go<VERSION>.src.tar.gz
    sudo mv go $GOROOT
    cd $GOROOT/src
    ./all.bash
  3. go version查看版本信息

安装目录

.
├── CONTRIBUTING.md
├── CONTRIBUTORS
├── PATENTS
├── VERSION
├── api
├── bin     // 可执行文件
├── doc     // 文档
├── favicon.ico
├── lib     // 文档模板
├── misc    // 编辑器相关内容
├── pkg
├── robots.txt
├── src     // 完整源码
└── test

go runtime

  • runtime相当于Java的虚拟机,负责内存分配,垃圾回收,栈处理,goroutine,channel,slice,map,reflect等
  • go的gc采用标记-清除回收器

第三章 Go开发环境的基本要求

调试器

  1. 打印语句,print,println,fmt.Println,fmt.Printf
  2. %+v, %#v,%T打印实例的不同信息
  3. 使用panic获取堆栈信息
  4. defer关键字来跟踪代码执行
  5. go build 编译
  6. go install 编译并安装

格式化代码 - gofmt

  • gofmt -r '(a) -> a' –w *.go
  • gofmt -r 'a[n:len(a)] -> a[n:]' –w *.go
  • 参考-http://golang.org/cmd/gofmt/

代码文档 - go doc

  • go doc package 获取包的文档注释,例如:go doc fmt 会显示使用 godoc 生成的 fmt 包的文档注释。
  • go doc package/subpackage 获取子包的文档注释,例如:go doc container/list。
  • go doc package function 获取某个函数在某个包中的文档注释,例如:go doc fmt Printf 会显示有关 fmt.Printf() 的使用说明

第四章 语言的核心结构和技术

文件名、关键字与标识符

  • 文件名以.go结尾
  • _空白标识符
  • go的25个关键字
关键字
break default func interface selcet
case defer go map struct
chan else goto package switch
const fallthrough if range type
continue for import return var
  • 36个预定义标识符,函数
预定义标识符
append bool byte cap close complex complex64 complex128 unit16
copy false float32 float64 image int int8 int16 uint32
int32 int64 iota len make new nil panic unit64
print println real recover string true uint uint8 uintptr
  • go程序一般由关键字,常量,变量,运算符,类型和函数组成
  • 分隔符 (), [], {}
  • 标点.、,、;、:、...等,但是不用;结尾

Go程序的基本结构要素

包-package

  • 包是结构化的一种方式,每个程序都有包的概念组成,一个包可以由多个.go文件组成
  • 在源文件的第一行指明这个文件属于哪个包
  • 一个包的源文件必须一起编译,包是编译的单元
  • 对一个包进行更改或者重新编译,所有引用了这个包的客户端程序都必须全部重新编译
  • go中包模型采用显示依赖关系机制来打到快速变异的目的
  • 包引入

    1
    2
    3
    4
    5
    6
    7
    import "fmt"
    import "os"
    import (
    "fmt"
    "os"
    )
  • 包名不是以.或者/开头,会在全局文件进行查找,以./开头会在相对目录中查找,以/开头会在绝对路径中查找

  • 可见性规则:标识符的大小写区别
  • 包可以用别名进行区分

函数

  • 定义格式

    1
    2
    3
    func functionName(parameter_list) (return_value_list) {
    …
    }
  • go语言是以;作为语句的结尾,只是由编译器自动完成

  • 内部包命名遵循驼峰命名法,外部调用的遵循Pascal命名法
  • 程序正常退出代码为0,异常退出代码为1

注释

  • // - 单行注释
  • /* */ - 多行注释
  • 每个包都应该有注释,package关键字之前的注释默认为对包的说明
  • 全局作用于的类型、变量、常量、函数、对象都应该有一个合理的注释

类型

  • 类型定义了某个变量的值的集合和可对其进行操作的集合
  • 基础类型:int、float、bool、string、
  • 复合类型:struct、array、slice、map、channel
  • 描述行为的:interface
  • 函数可以作为类型返回

go程序的一般结构

  • 完成包的导入
  • 常量,变量,类型的定义或声明
  • 如果存在init函数,对改函数进行定义,每个含有该函数的文件都会先执行init函数
  • 如果包为main包,则定义main函数
  • 定义其他的函数,首先是类型的方法,函数名字可以按照字母顺序来排列

  • go语言执行顺序:

    • 按顺序导入所有被main包引入的其他包
    • 如果包中引入了其他包,递归执行包的引入
    • 最新引入的包首先开始常量和变量的初始化
    • init
    • main

类型抓换

  • 显示转换
  • a := b(a)

常量

  • const关键字定义
  • 类型:bool,int,float,complex,string
  • const Pi = 3.1415926
  • 常量的值必须在编译时就能够确定
  • 数字型的常量是没有大小和符号的,不会溢出
  • iota特性

变量

  • 实例
    var a string

    (
    1
    2
    3
    4
    a int
    b bool
    str string
    )
  • 变量被声明之后,系统会自动赋给该变量零值0,0.0, false,’’, nil

  • 驼峰命名法
  • 全局变量和局部变量
  • 变量的声明和赋值可以一起进行

    1
    2
    3
    4
    5
    6
    7
    8
    9
    10
    11
    var a = 15
    var b = false
    var str = "Go says hello to the world!"
    var (
    a = 15
    b = false
    str = "Go says hello to the world!"
    numShips = 50
    city string
    )
  • 通过runtime获取运行环境

    1
    2
    3
    4
    5
    6
    7
    8
    9
    10
    11
    12
    13
    14
    package main
    import (
    "fmt"
    "runtime"
    "os"
    )
    func main() {
    var goos string = runtime.GOOS
    fmt.Printf("The operating system is: %s\n", goos)
    path := os.Getenv("PATH")
    fmt.Printf("Path is %s\n", path)
    }

值类型和引用类型

  • 指针 &i
  • 一个引用类型的变量r1存储的是r1的值所在的内存地址,或内存地址中第一个字所在的位置
  • go语言中指针,slice,maps,channel都是引用类型

打印

  • fmt.Printf
  • %s-字符串
  • %v-类型默认输出格式
  • %T-类型

:=赋值操作符

  • a := 50,类型会自动判断
  • 函数体内的首选方案,但是不能用于全局变量
  • a, b, c := 5, 5.5, "5"
  • a, b = b, a 交换值
  • _抛弃不要的值

init函数

  • 不能被人为调用
  • 执行优先级高于main
  • 每个源文件只包含一个init函数
  • init中可以定义变量,检查数据,调用后台goroutine

基本类型和运算符

bool类型

  • var b bool = true
  • ==, !=
  • go语言只有类型相同的两个值才可以进行比较
  • !、&&、||,其中&&和||
  • 布尔值的命名推荐以is开头,如isSorted,isFinished等

数字类型

  • int,uint - 4个字节或者8个字节
  • uintptr - 存放一个指针的长度

  • 整数:

    • int8(-128 -> 127)
    • int16(-32768 -> 32767)
    • int32(-2,147,483,648 -> 2,147,483,647)
    • int64(-9,223,372,036,854,775,808 -> 9,223,372,036,854,775,807)
  • 无符号整数:
    • uint8(0 -> 255)
    • uint16(0 -> 65,535)
    • uint32(0 -> 4,294,967,295)
    • uint64(0 -> 18,446,744,073,709,551,615)
  • 浮点型(IEEE-754 标准):

    • float32(+- 1e-45 -> +- 3.4 * 1e38)
    • float64(+- 5 1e-324 -> 107 1e308
  • 前缀0表示8进制数

  • 前缀0x表示16进制数
  • e表示10的次方
  • go语言中变量之间不可以混用,常量可以,变量之间需要显示转换
  • 格式化占位符

    • %d - 整数
    • %x,%X - 16进制数字
    • %g - 浮点数
    • %f - 输出浮点数
    • %e - 输出科学计数法数
    • %n.mg - 数字n精确到m位
  • 位运算 - 用于整数类型的变量,并且要求变量等长

    • 按位与&
    • 按位或|
    • 按位异或^
    • 位清除&^将指定位置上的值设置为0
    • 按位补足^
    • 位左移<<
    • 位右移>>
  • 逻辑运算符

    • ==
    • !=
    • <
    • <=
    • >
    • =

  • 算数运算符

    • +
    • -
    • *
    • /
    • %
    • -=
    • +=
    • *=
    • /=
    • ++,–等操作可以用于语句,但是不可以用于表达式 a[i] = b[i++]是不允许的
  • 随机数 - rand包

运算符优先级

1
2
3
4
5
6
7
8
优先级 运算符
7 ^ !
6 * / % << >> & &^
5 + - | ^
4 == != < <= >= >
3 <-
2 &&
1 ||

类型别名

  • type TZ int TZ是int的别名
  • 别名不会拥有原类型的方法

字符串

  • utf-8编码中每个字符占据字节数不确定,go中字符可能占据1-4个字节
  • go语言支持两种字面值
    • 解释字符串
      • \n
      • \r
      • \t
      • \u
      • \\
    • 非解释字符串-普通字符串
  • 获取字符串的字节内容:str[i]
  • 拼接符+
  • 效率: bytes.Buffer > strings.Join > +

strings和strconv包

前缀和后缀

  • HasPrefix - 前缀

    1
    2
    3
    4
    // HasPrefix tests whether the string s begins with prefix.
    func HasPrefix(s, prefix string) bool {
    return len(s) >= len(prefix) && s[0:len(prefix)] == prefix
    }
  • HasSuffix - 后缀

1
2
3
4
// HasSuffix tests whether the string s ends with suffix.
func HasSuffix(s, suffix string) bool {
return len(s) >= len(suffix) && s[len(s)-len(suffix):] == suffix
}

字符串包含关系

1
2
3
4
// Contains reports whether substr is within s.
func Contains(s, substr string) bool {
return Index(s, substr) >= 0
}

判断子字符串或字符在父字符串中出现的位置

1
2
3
4
5
6
7
8
9
10
11
12
13
14
15
16
17
18
19
20
21
22
23
24
25
26
27
28
29
// Index returns the index of the first instance of substr in s, or -1 if substr is not present in s.
func Index(s, substr string) int {
}
// LastIndex returns the index of the last instance of substr in s, or -1 if substr is not present in s.
func LastIndex(s, substr string) int {
}
// IndexRune returns the index of the first instance of the Unicode code point
// r, or -1 if rune is not present in s.
// If r is utf8.RuneError, it returns the first instance of any
// invalid UTF-8 byte sequence.
func IndexRune(s string, r rune) int {
switch {
case 0 <= r && r < utf8.RuneSelf:
return IndexByte(s, byte(r))
case r == utf8.RuneError:
for i, r := range s {
if r == utf8.RuneError {
return i
}
}
return -1
case !utf8.ValidRune(r):
return -1
default:
return Index(s, string(r))
}
}

字符串替换

1
2
3
4
5
6
7
8
9
10
11
12
13
14
15
16
17
18
19
20
21
22
23
24
25
26
27
28
29
30
31
32
33
34
35
36
37
38
39
// Replace returns a copy of the string s with the first n
// non-overlapping instances of old replaced by new.
// If old is empty, it matches at the beginning of the string
// and after each UTF-8 sequence, yielding up to k+1 replacements
// for a k-rune string.
// If n < 0, there is no limit on the number of replacements.
func Replace(s, old, new string, n int) string {
if old == new || n == 0 {
return s // avoid allocation
}
// Compute number of replacements.
if m := Count(s, old); m == 0 {
return s // avoid allocation
} else if n < 0 || m < n {
n = m
}
// Apply replacements to buffer.
t := make([]byte, len(s)+n*(len(new)-len(old)))
w := 0
start := 0
for i := 0; i < n; i++ {
j := start
if len(old) == 0 {
if i > 0 {
_, wid := utf8.DecodeRuneInString(s[start:])
j += wid
}
} else {
j += Index(s[start:], old)
}
w += copy(t[w:], s[start:j])
w += copy(t[w:], new)
start = j + len(old)
}
w += copy(t[w:], s[start:])
return string(t[0:w])
}

重复字符串

1
2
3
4
5
6
// Repeat returns a new string consisting of count copies of the string s.
//
// It panics if count is negative or if
// the result of (len(s) * count) overflows.
func Repeat(s string, count int) string {
}

修改字符串大小写

  • strings.ToLower(s) string
  • strings.ToUpper(s) string

修剪字符串

  • strings.TrimSpcae(s)-剔除字符串开头和结尾的空白
  • strings.Trim(s, “cut”)-剔除字符串开头和结尾的指定字符
  • TrimLeft,TrimRight

分割字符串

  • strings.Fields(s) - 根据空白字符分割
  • strigns.Split(s, sep) - 根据sep来分割字符串

拼接slice到字符串

  • strings.Join(sl []string, sep string) string - 将slice使用分隔符sep来拼接成一个字符串

从字符串中读取内容

  • strings.NewReader(str)
  • Read()
  • ReadByte()
  • ReadRune()

字符串和其他类型的转换

  • strconv.Itoa(i int) string - int转换成字符串
  • strconv.FormatFloat() string
  • strconv.Atoi(s string) (int, error) 字符串到int
  • strconv.ParseFloat(s string, bitSize int) (f float, err error)

时间和日期

  • time包
  • time.Now
  • time.Day()
  • time.Minute()
  • time.Duration()

指针

  • 取地址符&
  • 一个指针变量可以指向任何一个值的内存地址
  • 通过指针来实现对原来变量值的修改
  • 指针可以用来传递变量的引用,而不是变量的值的拷贝,节省开销

第五章 控制结构

5.1 if-else结构

1
2
3
4
5
6
7
if condition1 {
// do something
} else if condition2 {
// do something else
} else {
// catch-all or default
}
  • 判断一个字符串是否为空
1
2
3
4
5
if str == "" {
}
if len(str) == 0 {
}
  • 判断go运行的操作系统
1
2
3
if runtime.GOOS == "windows" {
} else {
}

测试多返回值函数的错误

  • 程序应该在最接近的位置检查所有相关的错误
1
2
3
4
5
6
7
8
9
value, err := pack1.Function1(param1)
if err != nil {
fmt.Printf("An error occured in pack1.Function1 with parameter %v", param1)
return err
}
if value, ok := readData(); ok {
…
}

switch结构

  • 使用fallthrough表示执行完当前分支之后继续执行后续分支
  • 分支之间没有break关键字
1
2
3
4
5
6
7
8
9
10
11
12
13
14
15
16
package main
import "fmt"
func main() {
var num int = 100
switch num {
case 98, 99:
fmt.Println("..")
case 100:
fmt.Println("..")
default:
fmt.Println("..")
}
}
  • 无初始值
1
2
3
4
5
6
7
8
9
10
11
12
13
14
15
16
package main
import "fmt"
func main() {
var num1 int = 7
switch {
case num1 < 0:
fmt.Println("Number is negative")
case num1 > 0 && num1 < 10:
fmt.Println("Number is between 0 and 10")
default:
fmt.Println("Number is 10 or greater")
}
}
  • 包含一个初始化语句
1
2
3
4
5
switch a, b := x[i], y[j] {
case a < b: t = -1
case a == b: t = 0
case a > b: t = 1
}

for结构

  • 基于计数器的迭代
1
2
3
for i := 0; i < 5; i++ {
fmt.Printf("This is the %d iteration\n", i)
}
  • 基于条件判断的迭代
1
2
3
4
for i >= 0 {
i = i - 1
fmt.Printf("The variable i is now: %d\n", i)
}
  • 无线循环 - 服务器
1
2
3
for t, err = p.Token(); err == nil; t, err = p.Token() {
...
}
  • for-range结构
1
2
3
4
5
6
7
8
9
10
11
12
13
14
15
16
17
18
19
20
21
22
package main
import "fmt"
func main() {
str := "Go is a beautiful language!"
fmt.Printf("The length of str is: %d\n", len(str))
for pos, char := range str {
fmt.Printf("Character on position %d is: %c \n", pos, char)
}
fmt.Println()
str2 := "Chinese: 日本語"
fmt.Printf("The length of str2 is: %d\n", len(str2))
for pos, char := range str2 {
fmt.Printf("character %c starts at byte position %d\n", char, pos)
}
fmt.Println()
fmt.Println("index int(rune) rune char bytes")
for index, rune := range str2 {
fmt.Printf("%-2d %d %U '%c' % X\n", index, rune, rune, rune, []byte(string(rune)))
}
}

break与continue

  • break关键字可以退出for循环
  • break只会退出一层
  • continue会忽略剩余的循环体跳入下一次循环

标签与goto

  • 标签作用于外部循环
1
2
3
4
5
6
7
8
9
10
11
12
13
func main() {
LABEL1:
for i := 0; i <= 5; i++ {
for j := 0; j <= 5; j++ {
if j == 4 {
continue LABEL1
}
fmt.Printf("i is: %d, and j is: %d\n", i, j)
}
}
}
  • goto和标签可以来模仿循环
1
2
3
4
5
6
7
8
9
10
func main() {
i:=0
HERE:
print(i)
i++
if i==5 {
return
}
goto HERE
}

第六章 函数

6.1 简介

  • 函数是基本的代码块
  • main写在文件的前面
  • 函数主要是为了代码重用
  • 最后一行或者return退出函数
  • go中包含三种函数
    • 普通带有名字的函数
    • 匿名函数或者lambda函数
    • 方法
  • 出了main,init函数之外,其他所有函数都可以有参数和返回值
  • 参数,返回值,及其类型称为函数签名-和其他语言一致
  • 函数可以将其他函数作为它的参数,类型相符合就可以
  • go语言不允许函数重载
  • 函数是一等公民
  • 函数可以相互比较,引用相同就相等
  • go语言不支持泛型

6.2 函数参数与返回值

  • 函数可以接收参数供自己使用,也可以返回零个或者多个值
  • go语言默认值传递
  • go语言通过指针来实现引用传递,实际上指针也是变量类型,有自己的地址和值,只是指针的值指向一个变量的地址,按引用传递可以理解为按值传递,传递的值就是指针的值。
  • slice,map,interface,channel默认引用传递
1
2
3
4
5
6
7
8
9
10
11
12
13
14
15
package main
import "fmt"
func main() {
fmt.Printf("Multiply 2 * 5 * 6 = %d\n", MultiPly3Nums(2, 5, 6))
// var i1 int = MultiPly3Nums(2, 5, 6)
// fmt.Printf("MultiPly 2 * 5 * 6 = %d\n", i1)
}
func MultiPly3Nums(a int, b int, c int) int {
// var product int = a * b * c
// return product
return a * b * c
}

命名的返回值

1
2
3
4
5
6
7
8
9
10
11
12
13
14
15
16
17
18
19
20
21
22
23
24
25
26
27
28
package main
import "fmt"
var num int = 10
var numx2, numx3 int
func main() {
numx2, numx3 = getX2AndX3(num)
PrintValues()
numx2, numx3 = getX2AndX3_2(num)
PrintValues()
}
func PrintValues() {
fmt.Printf("num = %d, 2x num = %d, 3x num = %d\n", num, numx2, numx3)
}
func getX2AndX3(input int) (int, int) {
return 2 * input, 3 * input
}
func getX2AndX3_2(input int) (x2 int, x3 int) {
x2 = 2 * input
x3 = 3 * input
// return x2, x3
return
}
  • 尽量使用命名返回值:会使得代码清晰,更简短,可读性更好。

空白符

  • 空白符用来丢弃一些不需要的值
1
2
3
4
5
6
7
8
9
10
11
12
13
14
package main
import "fmt"
func main() {
var i1 int
var f1 float32
i1, _, f1 = ThreeValues()
fmt.Printf("The int: %d, the float: %f \n", i1, f1)
}
func ThreeValues() (int, int, float32) {
return 5, 6, 7.5
}

改变外部变量

  • 指针传递不仅可以节省内存,而且赋予函数改变外部变量的能力
1
2
3
4
5
6
7
8
9
10
11
12
13
14
15
16
17
package main
import (
"fmt"
)
// this function changes reply:
func Multiply(a, b int, reply *int) {
*reply = a * b
}
func main() {
n := 0
reply := &n
Multiply(10, 5, reply)
fmt.Println("Multiply:", *reply) // Multiply: 50
}

6.3 传递变长参数

1
2
3
4
5
6
7
8
9
10
11
12
13
14
15
16
17
18
19
20
21
22
23
24
package main
import "fmt"
func main() {
x := min(1, 3, 2, 0)
fmt.Printf("The minimum is: %d\n", x)
slice := []int{7,9,3,5,1}
x = min(slice...)
fmt.Printf("The minimum in the slice is: %d", x)
}
func min(s ...int) int {
if len(s)==0 {
return 0
}
min := s[0]
for _, v := range s {
if v < min {
min = v
}
}
return min
}

6.4 defer和追踪

  • defer语句在函数结束之前才开始执行,适用于资源的释放等操作,类似于finally
  • defer的语句会按顺序接收参数,只是执行在最后
1
2
3
4
5
6
func a() {
i := 0
defer fmt.Println(i)
i++
return
} // print 0
  • 多个defer语句,类似栈,先出现后执行
  • 关闭文件流,解锁,打印最终报告,关闭数据库连接
  • defer可以实现代码追踪,在进入和离开函数时打印日志
1
2
3
4
5
6
7
8
9
10
11
12
13
14
15
16
17
18
19
20
21
22
23
24
25
26
27
package main
import "fmt"
func trace(s string) string {
fmt.Println("entering:", s)
return s
}
func un(s string) {
fmt.Println("leaving:", s)
}
func a() {
defer un(trace("a"))
fmt.Println("in a")
}
func b() {
defer un(trace("b"))
fmt.Println("in b")
a()
}
func main() {
b()
}

6.5 内置函数

名称 说明
close 用于管道通信
len 返回某个类型的长度或数量,如字符串,数组,切片,map和管道
cap 返回某个类型的最大容量,如切片,map
new 用于值类型和用户定义的类型的创建
make 用于内置类型的创建
copy,append 用于复制和连接切片
panic,recover 错误处理机制
print, println 底层打印函数
complex, real imag 复数操作

6.6 递归函数

  • 自身调用
1
2
3
4
5
6
func fib(n int) (res int) {
if n <= 1 {
return 1
}
return fib(n - 1) + fib(n - 2)
}
  • 递归的一个问题在于栈溢出
  • go语言中可以使用相互调用的递归函数
1
2
3
4
5
6
7
8
9
10
11
12
13
14
15
16
17
18
19
20
21
22
23
24
25
26
27
28
29
30
31
32
33
34
package main
import (
"fmt"
)
func main() {
fmt.Printf("%d is even: is %t\n", 16, even(16)) // 16 is even: is true
fmt.Printf("%d is odd: is %t\n", 17, odd(17))
// 17 is odd: is true
fmt.Printf("%d is odd: is %t\n", 18, odd(18))
// 18 is odd: is false
}
func even(nr int) bool {
if nr == 0 {
return true
}
return odd(RevSign(nr) - 1)
}
func odd(nr int) bool {
if nr == 0 {
return false
}
return even(RevSign(nr) - 1)
}
func RevSign(nr int) int {
if nr < 0 {
return -nr
}
return nr
}

6.7 将函数作为参数

  • go语言中函数可以作为其他函数的参数进行传递,然后在其他函数内调用执行,称为回调函数
1
2
3
4
5
6
7
8
9
10
11
12
13
14
15
16
17
package main
import (
"fmt"
)
func main() {
callback(1, Add)
}
func Add(a, b int) {
fmt.Printf("The sum of %d and %d is: %d\n", a, b, a+b)
}
func callback(y int, f func(int, int)) {
f(y, 2) // this becomes Add(1, 2)
}
1
2
3
4
5
6
7
8
func indexFunc(s string, f func(rune) bool, truth bool) int {
for i, r := range s {
if f(r) == truth {
return i
}
}
return -1
}

6.8 闭包

  • 不给函数起名,而是将函数指针赋值给某个变量,通过这个变量来实现函数的调用
1
2
3
4
5
6
7
8
9
10
11
12
13
14
15
16
17
18
19
20
package main
func main() {
func() {
sum := 0
for i := 1; i <= 1e6; i++ {
sum += i
}
print(sum)
}()
f()
}
func f() {
for i := 0; i < 4; i++ {
g := func(i int) { fmt.Printf("%d ", i) } //此例子中只是为了演示匿名函数可分配不同的内存地址,在现实开发中,不应该把该部分信息放置到循环中。
g(i)
fmt.Printf(" - g is of type %T and has value %v\n", g, g)
}
}
  • 匿名函数可以被赋值给变量作为值来使用
  • defer关键字和匿名函数配合使用来改变函数的命名返回值
  • 匿名函数被称为闭包,被允许调用定义在其他环境的变量。
  • 一个函数闭包继承了函数所声明时的作用域

闭包应用-将函数作为返回值

1
2
3
4
5
6
7
8
9
10
11
12
13
14
15
16
17
18
19
20
21
22
23
24
package main
import "fmt"
func main() {
// make an Add2 function, give it a name p2, and call it:
p2 := Add2()
fmt.Printf("Call Add2 for 3 gives: %v\n", p2(3))
// make a special Adder function, a gets value 2:
TwoAdder := Adder(2)
fmt.Printf("The result is: %v\n", TwoAdder(3))
}
func Add2() func(b int) int {
return func(b int) int {
return b + 2
}
}
func Adder(a int) func(b int) int {
return func(b int) int {
return a + b
}
}
1
2
3
4
5
6
7
8
9
10
11
12
13
14
15
16
17
18
package main
import "fmt"
func main() {
var f = Adder()
fmt.Print(f(1), " - ")
fmt.Print(f(20), " - ")
fmt.Print(f(300))
}
func Adder() func(int) int {
var x int
return func(delta int) int {
x += delta
return x
}
}
  • x中的值是可以被保存的
  • 在闭包中使用到的变量可以在函数体内声明,也可以在函数体外声明

使用闭包调试

  • runtime中的函数Caller提供了文件和行数的信息,可以用闭包来实现调试定位
1
2
3
4
5
6
7
8
9
where := func() {
_, file, line, _ := runtime.Caller(1)
log.Printf("%s:%d", file, line)
}
where()
// some code
where()
// some more code
where()

计算函数执行时间

1
2
3
4
5
start := time.Now()
longCalculation()
end := time.Now()
delta := end.Sub(start)
fmt.Printf("longCalculation took this amount of time: %s\n", delta)

通过内存缓存来提升性能

  • 内存缓存来避免重复计算,如斐波那契,空间换时间
1
2
3
4
5
6
7
8
9
10
11
12
13
14
15
16
17
18
19
20
21
22
23
24
25
26
27
28
29
30
31
32
33
34
35
36
package main
import (
"fmt"
"time"
)
const LIM = 41
var fibs [LIM]uint64
func main() {
var result uint64 = 0
start := time.Now()
for i := 0; i < LIM; i++ {
result = fibonacci(i)
fmt.Printf("fibonacci(%d) is: %d\n", i, result)
}
end := time.Now()
delta := end.Sub(start)
fmt.Printf("longCalculation took this amount of time: %s\n", delta)
}
func fibonacci(n int) (res uint64) {
// memoization: check if fibonacci(n) is already known in array:
if fibs[n] != 0 {
res = fibs[n]
return
}
if n <= 1 {
res = 1
} else {
res = fibonacci(n-1) + fibonacci(n-2)
}
fibs[n] = res
return
}

第七章 数组和切片

声明和初始化

  • 数组长度是数组类型的一种
  • 数组长度最大为2Gb
  • 数组声明 var identifier [len]type
  • 数组声明之后所有元素会默认为零值
  • 数组遍历用for循环,range更好
  • 数组可以用new来创建,创建之后返回的是数组的地址,而不是数组的值

数组常量

  • var arr = [5]{18, 10, 12, 19, 23}
  • var arr = [...]{18, 10, 12, 19, 23}
  • var arr = [5]string{3: "aa", 4: "bb"} - {“”. “”, “”, aa, bb}

多维数组

1
2
3
4
5
6
7
8
9
10
11
12
13
14
15
16
package main
const (
WIDTH = 1920
HEIGHT = 1080
)
type pixel int
var screen [WIDTH][HEIGHT]pixel
func main() {
for y := 0; y < HEIGHT; y++ {
for x := 0; x < WIDTH; x++ {
screen[x][y] = 0
}
}
}

将数组传递给函数

  • 为了降低内存的消耗,传递数组指针或者切片
1
2
3
4
5
6
7
8
9
10
11
12
13
14
15
16
package main
import "fmt"
func main() {
array := [3]float64{7.0, 8.5, 9.1}
x := Sum(&array) // Note the explicit address-of operator
// to pass a pointer to the array
fmt.Printf("The sum of the array is: %f", x)
}
func Sum(a *[3]float64) (sum float64) {
for _, v := range a { // derefencing *a to get back to the array is not necessary!
sum += v
}
return
}

7.2 切片

  • 切片是对数组一个连续片段的引用
  • 切片可以索引,可以len
  • 切片是一个长度可变的数组
  • cap函数来计算切片的最大容量 0 <= len(s) <= cap(s)
  • 切片是引用,不耗内存,效率更高
  • 声明格式 var identifier []type
  • 切片在未初始化之前是nil,长度为0
  • 切片的初始化格式是:var slice1 []type = arr1[start:end] 前闭后开
  • 切片可以扩展到其上限
  • 切片初始化:var x = []int{2, 3, 4, 7, 11}
  • 切片只能向后移
  • 不要用指针指向切片,因为切片本身就是一个指针

将切片传递给函数

  • 与传递数组相比,节省内存开销,同时函数具备了改变外部变量的能力
1
2
3
4
5
6
7
8
9
10
11
12
func sum(a []int) int {
s := 0
for i := 0; i < len(a); i++ {
s += a[i]
}
return s
}
func main() {
var arr = [5]int{0, 1, 2, 3, 4}
sum(arr[:])
}

make创建切片

  • var slice []type = make(type[], len),在创建切片的同时创建好相关数组
  • make需要两个参数,元素类型和元素个数

make和new的区别

  • new为每个新的类型T分配一片内存,初始化零值并返回类型为*T的内存地址,适用于数组和结构体
  • make返回一个类型为T的初始值,适合创建slice,map和channel
  • new分配内存,make函数初始化

bytes包

1
2
3
4
5
6
7
8
9
var buffer bytes.Buffer
for {
if s, ok := getNextString(); ok { //method getNextString() not shown here
buffer.WriteString(s)
} else {
break
}
}
fmt.Print(buffer.String(), "\n")
  • 字符串串联效率更高

7.3 for-range结构

1
2
for idx, value := range slice {
}
  • idx是数组或者切片的索引
  • value是索引对应的值
  • _忽略不需要的idx或者value

  • 多维切片下的for-range

1
2
3
4
5
for row := range screen {
for column := range screen[row] {
screen[row][column] = 1
}
}

7.4 切片重组

slice1 := make([]type, start_length, capacity)

  • 切片可以反复扩展直到占据整个数组
1
2
3
4
5
6
7
8
9
10
11
12
13
14
15
16
17
package main
import "fmt"
func main() {
slice1 := make([]int, 0, 10)
// load the slice, cap(slice1) is 10:
for i := 0; i < cap(slice1); i++ {
slice1 = slice1[0:i+1]
slice1[i] = i
fmt.Printf("The length of slice is %d\n", len(slice1))
}
// print the slice:
for i := 0; i < len(slice1); i++ {
fmt.Printf("Slice at %d is %d\n", i, slice1[i])
}
}

7.5 切片的复制与追加

  • 先创建再拷贝
1
2
3
4
5
6
7
8
9
10
11
12
13
14
15
package main
import "fmt"
func main() {
sl_from := []int{1, 2, 3}
sl_to := make([]int, 10)
n := copy(sl_to, sl_from)
fmt.Println(sl_to)
fmt.Printf("Copied %d elements\n", n) // n == 3
sl3 := []int{1, 2, 3}
sl3 = append(sl3, 4, 5, 6)
fmt.Println(sl3)
}
  • append方法追加切片并返回新的切片

7.6 字符串、数组和切片的应用

  • 字符串生成切片 - c := []byte(s)

  • 获取字符串的某一部分 - substr := str[start:end]

  • 字符串和切片的内存结构,字符串是一个双字结构,地址指针和长度值

  • go语言中字符串是不可变的,但是可以通过切片操作来改变字符串

  • append函数常见操作

    • 切片追加 - a = append(a, b...)
    • 切片复制 - b = make([]Tm len(a)) copy(b, a)
    • 删除索引i的元素 - a = append(a[:i], a [i+1:])
    • 切除切片 a 中从索引 i 至 j 位置的元素 - a = append(a[:i], a[j:]...)
    • 为切片 a 扩展 j 个元素长度 - a = append(a, make([]T, j)...)
    • 在索引 i 的位置插入元素 x - a = append(a[:i], append([]T{x}, a[i:]...)...)
    • 在索引 i 的位置插入长度为 j 的新切片 - a = append(a[:i], append(make([]T, j), a[i:]...)...)
    • 在索引 i 的位置插入切片 b 的所有元素 - a = append(a[:i], append(b, a[i:]...)...)
    • 取出位于切片 a 最末尾的元素 x - x, a = a[len(a)-1], a[:len(a)-1]
    • 将元素 x 追加到切片 a - a = append(a, x)
  • 底层数组没有切片引用的时候会被回收

第八章 Map

8.1 声明和初始化

声明

  • var map1 map[keyType]valueType
  • var map1 map[string]int
  • map可以动态增长
  • 未初始化的map是nil
  • key可以是string,int,float
  • value可以是任意类型的
1
2
3
4
5
6
7
8
9
10
11
12
13
14
15
16
17
18
19
20
21
package main
import "fmt"
func main() {
var mapLit map[string]int
//var mapCreated map[string]float32
var mapAssigned map[string]int
mapLit = map[string]int{"one": 1, "two": 2}
mapCreated := make(map[string]float32)
mapAssigned = mapLit
mapCreated["key1"] = 4.5
mapCreated["key2"] = 3.14159
mapAssigned["two"] = 3
fmt.Printf("Map literal at \"one\" is: %d\n", mapLit["one"])
fmt.Printf("Map created at \"key2\" is: %f\n", mapCreated["key2"])
fmt.Printf("Map assigned at \"two\" is: %d\n", mapLit["two"])
fmt.Printf("Map literal at \"ten\" is: %d\n", mapLit["ten"])
}
  • map是引用类型,内存用make方法来分配,不要用new
  • map的初始化 - map := make(map[string]float32)

  • map容量 - cap会自动+1扩张

测试键值对是否存在及删除元素

1
2
if _, ok := map[key1]; ok {
}
  • delete(map1, key1)

  • for key, value := range map1 {}

map类型的切片

1
2
3
4
5
6
7
8
9
10
11
12
13
14
15
16
17
18
19
20
package main
import "fmt"
func main() {
// Version A:
items := make([]map[int]int, 5)
for i:= range items {
items[i] = make(map[int]int, 1)
items[i][1] = 2
}
fmt.Printf("Version A: Value of items: %v\n", items)
// Version B: NOT GOOD!
items2 := make([]map[int]int, 5)
for _, item := range items2 {
item = make(map[int]int, 1) // item is only a copy of the slice element.
item[1] = 2 // This 'item' will be lost on the next iteration.
}
fmt.Printf("Version B: Value of items: %v\n", items2)
}

8.5 map排序

  • 将key或者value拷贝到切片
  • 对切片排序
  • 根据切片打印map

第九章 包 package

9.1 标准库概述

  • unsafe:C/C++中调用的类型不安全的包
  • syscall-os-os/exec:底层接口包
  • archive/tar,zip-compress:文件压缩解压缩
  • fmt:格式化输入输出
  • io:基本输入输出
  • bufio:缓冲输入输出
  • path/filepath:操作在当前系统中的目标文件名路径
  • flag:对命令行参数的操作
  • strings:字符串操作
  • strconv:字符串类型转换
  • unicode:Unicode类型字符串功能
  • regexp:正则
  • bytes:字符型分片操作
  • index/suffixarray:子字符串快速查询
  • math:基本数学函数
  • math/cmath:对复数的操作
  • math/rand:随机数
  • sort:排序
  • math/big:大数
  • container-list-ring-heap:集合操作
  • list:双链表
  • ring:环形链表
  • time:日期和时间的基本操作
  • log:记录程序运行时产生的日志
  • encoding/json:读取并解码和写入并编码json数据
  • encoding/xml:xml解析器
  • text/template:数据驱动模板
  • net:网络的基本操作
  • http:可扩展的http服务器和基础客户端
  • html:html5解析器
  • runtime:go程序运行时的交互操作
  • reflect:反射

9.2 regexp包

  • 简单模式使用Match方法

ok, _ := regexp.Match(pattern, []byte(searchIn))
ok, _ := regexp.MatchString(pattern, searchIn)

  • 通过Compile方法返回Regrep对象进行匹配
1
2
3
4
5
6
7
8
9
10
11
12
13
14
15
16
17
18
19
20
//目标字符串
searchIn := "John: 2578.34 William: 4567.23 Steve: 5632.18"
pat := "[0-9]+.[0-9]+" //正则
f := func(s string) string{
v, _ := strconv.ParseFloat(s, 32)
return strconv.FormatFloat(v * 2, 'f', 2, 32)
}
if ok, _ := regexp.Match(pat, []byte(searchIn)); ok {
fmt.Println("Match Found!")
}
re, _ := regexp.Compile(pat)
//将匹配到的部分替换为"##.#"
str := re.ReplaceAllString(searchIn, "##.#")
fmt.Println(str)
//参数为函数时
str2 := re.ReplaceAllStringFunc(searchIn, f)
fmt.Println(str2)

9.3 锁和sync包

  • sync.Mutex是一个互斥锁,保证临界区同一个时间只有一个线程进入
1
2
3
4
5
6
7
8
9
10
11
12
13
14
import "sync"
type Info struct {
mu sync.Mutex
// ... other fields, e.g.: Str string
}
func Update(info *Info) {
info.mu.Lock()
// critical section:
info.Str = // new value
// end critical section
info.mu.Unlock()
}
  • RWMutex锁:可以通过RLock方法来允许同一时间多个线程读取变量,一个线程写变量

精密计算和big包

  • 整数的高精度计算提供了big包
1
2
3
4
5
6
7
8
9
10
11
12
13
14
15
// Here are some calculations with bigInts:
im := big.NewInt(math.MaxInt64)
in := im
io := big.NewInt(1956)
ip := big.NewInt(1)
ip.Mul(im, in).Add(ip, im).Div(ip, io)
fmt.Printf("Big Int: %v\n", ip)
// Here are some calculations with bigInts:
rm := big.NewRat(math.MaxInt64, 1956)
rn := big.NewRat(-1956, math.MaxInt64)
ro := big.NewRat(19, 56)
rp := big.NewRat(1111, 2222)
rq := big.NewRat(1, 1)
rq.Mul(rm, rn).Add(rq, ro).Mul(rq, rp)
fmt.Printf("Big Rat: %v\n", rq)

自定义包和可见性

  • import导入包,路径名或者URL地址
  • 导入外部安装包:go install codesite/..,安装在GOROOT/src/目录下
  • 程序的初始化在于导入包,初始化main包然后调用main函数
  • init函数不能被调用

godoc

  • 命令行执行 godoc -http=:6060 -goroot="."其中.是当前路径,会在127.0.0.1:6060中看到本地go的注释

go install

  • go install是go中自动包安装工具
  • go installl uc会将uc.a包安装到pkg目录下
  • 也可以用gomake来安装
  • go test测试

git打包和安装

  • 安装到GitHub
1
2
3
4
5
git init
git add .
git commit -m ""
git remote add origin git@github.com:NNN/uc.git
git push -u origin master
  • 从GitHub安装 - go get github.com/xxx/xx

外部库的使用

  1. 下载并安装外部库-go install
  2. GOPATH是否有,包会被下载到$GOPATH/PKG/"machine_arch"/

第十章 结构和方法

  • go通过类型别名和结构体的形式支持用户自定义类型
  • 结构体是复合类型,new来创建
  • 数据称为字段fields

10.1 结构体定义

  • 结构体的定义方法:
1
2
3
4
5
6
7
type identifier struct {
field1 type1
field2 type2
...
}
type T struct{a, b int}
  • 数组可以看做使用下标的结构体
  • new函数给结构体分配内存,返回已分配内存的指针
  • var t T,此时t是T的一个实例/对象
  • 结构体打印和%v效果一样
  • 结构体变量和指针都可以通过.来选择字段值
  • p := Point{}是实例,p := &Point{}是指针
1
2
3
4
5
6
7
8
9
10
11
12
13
14
15
16
17
18
19
20
21
22
23
24
25
26
27
28
29
30
31
32
33
34
35
36
37
package main
import (
"fmt"
"strings"
)
type Person struct {
firstName string
lastName string
}
func upPerson(p *Person) {
p.firstName = strings.ToUpper(p.firstName)
p.lastName = strings.ToUpper(p.lastName)
}
func main() {
// 1-struct as a value type:
var pers1 Person
pers1.firstName = "Chris"
pers1.lastName = "Woodward"
upPerson(&pers1)
fmt.Printf("The name of the person is %s %s\n", pers1.firstName, pers1.lastName)
// 2—struct as a pointer:
pers2 := new(Person)
pers2.firstName = "Chris"
pers2.lastName = "Woodward"
(*pers2).lastName = "Woodward" // 这是合法的
upPerson(pers2)
fmt.Printf("The name of the person is %s %s\n", pers2.firstName, pers2.lastName)
// 3—struct as a literal:
pers3 := &Person{"Chris","Woodward"}
upPerson(pers3)
fmt.Printf("The name of the person is %s %s\n", pers3.firstName, pers3.lastName)
}
  • go的内存布局,结构体和其字段在内存中是连续存在的,性能更好,空间换时间

  • 递归结构体,链表,树的实现

  • 结构体可以和他别名进行类型转换

10.2 使用工厂方法创建结构体实例

  • 工厂方法以new或者New开头
1
2
3
4
5
6
7
8
9
10
11
type File struct {
fd int
name string
}
func NewFile(fd int, name string) *File {
if fd < 0 {
return nil
}
return &File{fd, name}
}
  • 推荐使用工厂方法来创建结构体,结构体字段就可以定义为私有的,OO思想

10.3 使用自定义包中的结构体

直接import就OK了

10.4 带标签的结构体

  • 结构体中的字段出了名字和类型之外,还有一个可选的标签
  • 标签是附属于字段的字符串,文档注释等操作
  • reflect可以取到tag
1
2
3
4
5
type TagType struct { // tags
field1 bool "An important answer"
field2 string "The name of the thing"
field3 int "How much there are"
}

10.5 匿名字段和内嵌结构体

  • 字段没有名字,只有类型
  • 匿名字段可以是结构体
1
2
3
4
5
6
7
8
9
10
11
type innerS struct {
in1 int
in2 int
}
type outerS struct {
b int
c float32
int // anonymous field
innerS //anonymous field
}
  • 实际上一个结构体对每一个类型最多有一个匿名字段,通过struct.type获取

  • 内嵌结构体的概念类似于继承

  • 内外的结构体命名冲突,外层的名字会覆盖内层的名字,同级别冲突报错

10.6 方法

  • go方法是作用在接收者上的一个函数,接收者是某个类型的变量

  • 接收者可以是任何对象除了interface

  • go中类型的代码和绑定在它上面的方法的代码可以不放置在一起,只要是同一个包就可以

  • 方法集

  • 方法不允许重载

  • 定义格式 func (_ receiver_type) methodName(parameter_list) (return_value_list) { ... }

  • 接收者可以理解为Java中的this

函数和方法的区别

  • 函数将变量作为参数,方法在变量上被调用
  • 接收者需要显示命名
  • receiver_type必须和方法同包
  • 类型和方法之间的关联由接收者来建立
  • 方法没有和结构体混合,表明数据和方法是独立的

指针或值作为接收者

  • 一般来说接收者都是类型的指针,效率更高

  • 指针方法和值方法都可以在指针或非指针上被调用

  • 未导出的结构体的对象通过setter\getter来修改和获取

内嵌类型的方法和继承

  • 匿名类型被内嵌时,其可见方法也同样被内嵌,等价于外部结构继承了这些方法
1
2
3
4
5
6
7
8
9
10
11
12
13
type Engine interface {
Start()
Stop
}
type Car interface struct {
Engine
}
func (c *Car) GoToWorkIn() {
c.Start()
c.Stop()
}
  • 方法可以被外层结构体覆盖

如何在类型中嵌入功能

  • 两种方法

    • 聚合:包含一个所需要功能的具体字段
    • 内嵌:内嵌需要的功能类型
  • 聚合

1
2
3
4
5
6
7
8
9
10
11
12
13
14
15
16
17
18
19
20
type Log struct {
msg string
}
type Customer struct {
Name string
log *Log
}
func (l *Log) Add(s string) {
l.msg += "\n" + s
}
func (l *Log) String() string {
return l.msg
}
func (c *Customer) Log() *Log {
return c.log
}
  • 内嵌
1
2
3
4
5
6
7
8
9
10
11
12
13
14
15
16
17
18
19
20
21
22
23
24
25
26
27
type Log struct {
msg string
}
type Customer struct {
Name string
Log
}
func main() {
c := &Customer{"Barak Obama", Log{"1 - Yes we can!"}}
c.Add("2 - After me the world will be a better place!")
fmt.Println(c)
}
func (l *Log) Add(s string) {
l.msg += "\n" + s
}
func (l *Log) String() string {
return l.msg
}
func (c *Customer) String() string {
return c.Name + "\nLog:" + fmt.Sprintln(c.Log)
}
  • 内嵌的类型不需要指针

多重继承

  • 多重继承指的是一个类型获得多个父类型的能力
1
2
3
4
5
6
7
8
9
10
11
12
13
14
15
16
17
18
19
20
21
22
23
type Camera struct {
}
func (c *Camera) TakeAPicture() string {
return "click"
}
type Phone struct{
}
func (p *Phone) Call string {
return "ring"
}
type CameraPhone struct {
Camera
Phone
}
func main() {
cp := new(CameraPhone)
fmt.Println(cp.TakeAPicture(), cp.Call())
}

其他语言和GO的类型和方法的比较

  • go中,类型就是类,代码复用和多态更好
  • go中,代码通过组合和委托实现,多态通过接口的使用来实现

10.7 类型的String方法和格式化描述符

  • 定义了string()方法的类型,会被fmt.Println()中生成默认的输出,等同于%v产生的输出
  • 注意不要在String方法里面调用涉及String()方法的方法,放置造成无限递归

10.8 垃圾回收和SetFinalizer

  • go语言有自己的垃圾回收器
  • 通过runtime包访问GC进程,runtime.GC()
  • SetFinalizer可以在对象被移除前进行一些操作runtime.SetFinalizer(obj, func(obj *typeObj))

第11章 接口与反射

  • 接口定义了一组方法
  • go中的接口都很简短,0-3个方法
  • go语言中接口可以有值,为多字数据结构,值为nil
  • 类型来实现接口找那个的方法
  • 类型不需要显示声明它实现了哪个接口:接口被隐式的实现,多个类型可以实现同一个接口
  • 实现某个接口的类型可以有其他的方法
  • 一个类型可以实现多个接口
  • 接口类型可以包含一个实例的引用,该实例的类型实现了此接口,接口是动态类型
1
2
3
4
5
6
7
8
9
10
11
12
13
14
15
16
17
18
19
20
21
22
23
24
25
26
27
28
29
30
type Shaper interface {
Area() float32
}
type Square struct {
side float32
}
func (sq *Square) Area() float32 {
return sq.side * sq.side
}
type Rectangle struct {
length, width float32
}
func (r Rectangle) Area() float32 {
return r.length * r.width
}
func main() {
r := Rectangle{5, 3} // Area() of Rectangle needs a value
q := &Square{5} // Area() of Square needs a pointer
shapes := []Shaper{r, q}
fmt.Println("Looping through shapes for area ...")
for n, _ := range shapes {
fmt.Println("Shape details: ", shapes[n])
fmt.Println("Area of this shape is: ", shapes[n].Area())
}
}

接口的多态实例,父类引用持有子类变量。

1
2
3
4
5
6
7
8
9
10
11
12
13
14
15
16
17
18
19
20
21
22
23
24
25
26
27
28
29
30
31
32
33
34
type stockPosition struct {
ticker string
sharePrice float32
count float32
}
func (s stockPosition) getValue() float32 {
return s.sharePrice * s.count
}
type car struct {
make string
model string
price float32
}
func (c Car) getValue() float32 {
return c.price
}
type valuable interface {
getValue() float32
}
func showValue(asset valuable) {
fmt.Printf("Value of the asset is %f\n", assert.getValue())
}
func main() {
var o valuable = stockPosition{"GOODS", 577.012, 4}
showValue(o)
o = car{"BMW", "M5", 56565465}
showValue(o)
}
  • 标准库中的例子-Reader
1
2
3
type Reader interface {
Read(p []byte) (n int, err error)
}

11.2接口嵌套接口

1
2
3
4
5
6
7
8
9
10
11
12
13
14
15
type ReadWrite interface {
Read(b Buffer) bool
Write(b Buffer) bool
}
type Lock interface {
Lock()
Unlock()
}
type File interface {
ReadWrite
Lokck
Close()
}

11.3 类型断言:如何检测和转换接口变量的类型

  • 一个接口类型的变量可以包含任何类型的值,类型断言来检测某个时刻该接口变量的值
  • v := varI.(T) varI为接口变量
1
2
3
4
5
6
7
8
9
10
11
var areaIntf Shaper
sq1 := new(Square)
sq1.side = 5
areaIntf = sq1
if t, ok := areaIntf.(*Square); ok {
fmt.Println()
}
if u, ok := areaIntf.(*Circle); ok {
fmt.....
}

11.4 类型判断: type-switch

  • 不允许fallthrought关键字
1
2
3
4
5
6
7
8
9
10
11
12
13
14
15
16
17
18
func classifier(items ...interface{}) {
for i, x := range items {
switch x.(type) {
case bool:
fmt.Printf("Param #%d is a bool\n", i)
case float64:
fmt.Printf("Param #%d is a float64\n", i)
case int, int64:
fmt.Printf("Param #%d is a int\n", i)
case nil:
fmt.Printf("Param #%d is a nil\n", i)
case string:
fmt.Printf("Param #%d is a string\n", i)
default:
fmt.Printf("Param #%d is unknown\n", i)
}
}
}

11.5 测试一个值是否实现了某个接口

1
2
3
4
5
6
7
type Stringer interface {
String() string
}
if sv, ok := v.(Stringer); ok {
fmt.Printf("v implements String(): %s\n", sv.String()) // note: sv, not v
}
  • 接口是一种契约,实现类型必须满足它,描述了类型的行为,规定类型可以做什么。
  • 使用接口使得代码更具有普适性

11.6 使用方法集与接口

  • 作用于变量上的方法实际上是不区分变量是值还是指针的,但是如果变量是接口类型时,由于接口变量中村的具体指是不可以寻址的,会编译错误
  • 在指针上调用方法时,必须有和方法定义时相同的接收者类型或者可以从具体类型P直接进行辨识的类型
    • 指针方法可以通过指针调用
    • 值方法可以通过值调用
    • 接收者是值的方法可以通过指针调用,因为指针会首先被解引用
    • 接收者是指针的方法不可以通过值调用,因为存储在接口中的值没有地址
  • 将一个值赋值给接口时,编译器会进行类型检查

小结

  1. 类型*T的可调用方法集合包含接受者为*T或T的所有方法集
  2. 类型T的可调用方法集包含接受者为T的所有方法

11.7 Sorter接口排序

  • Sort函数接收一个Sorter接口类型的参数,Sorter接口定义了len,less,swap方法
1
2
3
4
5
6
7
8
9
10
11
12
13
14
15
16
17
18
19
20
21
22
23
24
25
26
27
28
29
30
31
32
33
34
35
36
37
38
39
40
41
42
43
44
45
package sort
type Sorter interface {
Len() int
Less(i, j int) bool
Swap(i, j, int)
}
func Sort(data Sorter) {
for pass := 1; pass < data.Len(); pass++ {
for i := 0; i < data.Len - pass; i++ {
if data.Less(i+1, j) {
data.Swap(i, i + 1)
}
}
}
}
func IsSorted(data Sorter) bool {
n := data.Len
for i := n - 1; i > 0; i-- {
if data.Less(i, i-1) {
return false
}
}
return true
}
type IntArray []int
func (p IntArray) Len() int{return len(p)}
func (p IntArray) Less(i, j int) bool {return p[i] < p[j]}
func (p IntArray) Swap(i, j int) {p[i], p[j] = p[j], p[i]}
type StringArray []string
func (p StringArray) Len() int { return len(p) }
func (p StringArray) Less(i, j int) bool { return p[i] < p[j] }
func (p StringArray) Swap(i, j int) { p[i], p[j] = p[j], p[i] }
func SortInts(a []int) { Sort(IntArray(a)) }
func SortStrings(a []string) { Sort(StringArray(a)) }
func IntsAreSorted(a []int) bool { return IsSorted(IntArray(a)) }
func StringsAreSorted(a []string) bool { return IsSorted(StringArray(a))
1
2
3
4
5
6
7
8
9
10
11
12
13
14
15
16
17
18
19
20
21
22
23
24
25
26
27
28
29
30
31
32
33
34
35
36
37
38
39
40
41
42
43
44
45
46
47
48
49
50
51
52
53
54
55
56
57
58
59
60
61
62
63
64
65
66
67
68
69
70
package main
import (
"fmt"
"./sort"
)
// sorting of slice of integers
func ints() {
data := []int{74, 59, 238, -784, 9845, 959, 905, 0, 0, 42, 7586, -5467984, 7586}
a := sort.IntArray(data) //conversion to type IntArray
sort.Sort(a)
if !sort.IsSorted(a) {
panic("fail")
}
fmt.Printf("The sorted array is: %v\n", a)
}
// sorting of slice of strings
func strings() {
data := []string{"monday", "friday", "tuesday", "wednesday", "sunday","thursday", "", "saturday"}
a := sort.StringArray(data)
sort.Sort(a)
if !sort.IsSorted(a) {
panic("fail")
}
fmt.Printf("The sorted array is: %v\n", a)
}
// a type which describes a day of the week
type day struct {
num int
shortName string
longName string
}
type dayArray struct {
data []*day
}
func (p *dayArray) Len() int { return len(p.data) }
func (p *dayArray) Less(i, j int) bool { return p.data[i].num < p.data[j].num }
func (p *dayArray) Swap(i, j int) { p.data[i], p.data[j] = p.data[j], p.data[i] }
// sorting of custom type day
func days() {
Sunday := day{0, "SUN", "Sunday"}
Monday := day{1, "MON", "Monday"}
Tuesday := day{2, "TUE", "Tuesday"}
Wednesday := day{3, "WED", "Wednesday"}
Thursday := day{4, "THU", "Thursday"}
Friday := day{5, "FRI", "Friday"}
Saturday := day{6, "SAT", "Saturday"}
data := []*day{&Tuesday, &Thursday, &Wednesday, &Sunday, &Monday, &Friday, &Saturday}
a := dayArray{data}
sort.Sort(&a)
if !sort.IsSorted(&a) {
panic("fail")
}
for _, d := range data {
fmt.Printf("%s ", d.longName)
}
fmt.Printf("\n")
}
func main() {
ints()
strings()
days()
}

11.8 读和写

  • io包中提供了用于读和写的接口io.Reader和io.Writer
1
2
3
4
5
6
7
type Reader interface {
Read(p []byte) (n int, err error)
}
type Writer interface {
Write(p []byte) (n int, err error)
}
  • 只要实现了读写接口,这个对象就是可读写的
  • bufio里面提供了带缓冲的读写

11.9 空接口

定义

  • 空接口不包含任何方法,对实现不做要求 type Any interface{}
  • 类似Java中的Object类
  • 空接口可以被赋予任何值
  • 每个interface变量占据两个字长,一个用来存储包含的类型,一个用来存储包含的数据或者数据指针
1
2
3
4
5
6
7
8
9
10
11
12
13
14
15
16
testFunc := func(any interface{}) {
switch v := any.(type) {
case bool:
fmt.Printf("any %v is a bool type", v)
case int:
fmt.Printf("any %v is an int type", v)
case float32:
fmt.Printf("any %v is a float32 type", v)
case string:
fmt.Printf("any %v is a string type", v)
case specialString:
fmt.Printf("any %v is a special String!", v)
default:
fmt.Println("unknown type!")
}
}

11.9.2 构建通过类型或者包含不通类型变量的数组

1
2
3
4
type Element interface{}
type Vector struct {
a []Element
}
  • Vector里面可以存放任何类型的变量
  • Vector中存储的所有元素都是Element类型,得到袁术类型需要用类型断言

11.9.3 复制数据切片到空接口切片

1
2
3
4
5
var dataSlice []myType = FuncReturnSlice()
var interfaceSlice []interface{} = make([]interface{}, len(dataSlice))
for idx, val := range dataSlice {
interfaceSlice[i] = d
}

11.9.4 通用类型的节点数据结构

1
2
3
4
5
6
7
8
9
10
11
12
13
type Node struct {
left *Node
data interface{]
right *Node
}
func NewNode(left, right *Node) *Node {
return &Node{left, nil, right}
}
func (n *Node) SetData(data interface{}) {
n.data = data
}

11.9.5 接口到接口

  • 一个接口的值可以赋值给另一个接口,只要底层实现了必要的方法
  • 运行时才会检查两个接口是否可以进行赋值,不可以会报错

11.10 反射包

  • 反射是用程序检查其所拥有的结构,类型的一种能力
  • 反射可以在运行时检查类型和变量,比如大小,方法并动态的调用这些方法
  • 反射包中Type用来表示一个Go类型,Value为go提供了反射的接口
  • reflect.TypeOf reflect.ValueOf检查对象的类型和值
  • 反射可以从接口值反射到对象,也可以从对象反射回接口
  • 反射包中的常量
1
2
3
4
5
6
7
8
9
10
11
12
13
14
15
16
17
18
19
20
21
22
23
24
25
26
27
28
29
const (
Invalid Kind = iota
Bool
Int
Int8
Int16
Int32
Int64
Uint
Uint8
Uint16
Uint32
Uint64
Uintptr
Float32
Float64
Complex64
Complex128
Array
Chan
Func
Interface
Map
Ptr
Slice
String
Struct
UnsafePointer
)
  • Kind方法总是返回底层类型

11.10.2 通过反射修改值

1
2
3
4
5
6
var x float64 = 3.4
v := reflect.ValueOf(x)
fmt.Println("settablity of v:", v.Canset())
v = reflect.ValueOf(&x)
v = v.Elem()
v.SetFloat(3.1415)
  • NumField()方法返回结构内的字段数量,通过for循环用索引取得每个字段的值Field

    11.10.3 反射结构

1
2
3
4
5
6
7
8
9
10
11
12
13
14
15
16
17
18
19
20
21
22
23
24
25
26
27
28
29
30
31
type NotknownType struct {
s1, s2, s3 string
}
func (n NotknownType) String() string {
return n.s1 + " - " + n.s2 + " - " + n.s3
}
// variable to investigate:
var secret interface{} = NotknownType{"Ada", "Go", "Oberon"}
func main() {
value := reflect.ValueOf(secret) // <main.NotknownType Value>
typ := reflect.TypeOf(secret) // main.NotknownType
// alternative:
//typ := value.Type() // main.NotknownType
fmt.Println(typ)
knd := value.Kind() // struct
fmt.Println(knd)
// iterate through the fields of the struct:
for i := 0; i < value.NumField(); i++ {
fmt.Printf("Field %d: %v\n", i, value.Field(i))
// error: panic: reflect.Value.SetString using value obtained using unexported field
//value.Field(i).SetString("C#")
}
// call the first method, which is String():
results := value.Method(0).Call(nil)
fmt.Println(results) // [Ada - Go - Oberon]
}
  • 结构体中只有被导出字段(大写的字段)才是可以设置的
1
2
3
4
5
6
7
8
9
10
11
12
13
14
15
16
17
18
type T struct {
A int
B string
}
func main() {
t := T{23, "skidoo"}
s := reflect.ValueOf(&t).Elem()
typeOfT := s.Type()
for i := 0; i < s.NumField(); i++ {
f := s.Field(i)
fmt.Printf("%d: %s %s = %v\n", i,
typeOfT.Field(i).Name, f.Type(), f.Interface())
}
s.Field(0).SetInt(77)
s.Field(1).SetString("Sunset Strip")
fmt.Println("t is now", t)
}

11.11 Printf和反射

  • Printf函数声明为
1
func Printf(format string, args ... interface{}) (n int, err error)
  • ...为空接口类型,Printf可以知道每个参数的类型

11.12 接口和动态类型

11.12.1 Go的动态类型

  • go语言中数据和方法是松耦合的
  • go中的接口任何提供了接口方法实现代码的类型都隐式的实现了该接口
  • duck typing,能做什么比是什么更加重要
1
2
3
4
5
6
7
8
9
10
11
12
13
14
15
16
17
18
19
20
21
22
23
24
25
26
27
type IDuck interface {
Quack()
Walk()
}
func DuckDance(duck IDuck) {
for i := 1; i <= 3; i++ {
duck.Quack()
duck.Walk()
}
}
type Bird struct {
}
func (b *Bird) Quack() {
fmt.Println("bibibi")
}
func (b *Bird) Walk() {
fmt.Println("gogogo")
}
func main() {
b := new(Bird)
DuckDance(b)
}

11.12.2 动态方法调用

  • 当一个变量被赋值给一个接口类型的变量时,编译器会检查其是否实现了该接口的所有函数,空接口可以使用类型断言来判断
  • go提供了动态语言的优点,却没有其他动态语言在运行时随时会报错的缺点
  • Go 的接口提高了代码的分离度,改善了代码的复用性,使得代码开发过程中的设计模式更容易实现。用 Go 接口还能实现 依赖注入模式。

11.12.3 接口的提取

  • 接口的提取是非常有用的设计模式,可以减少需要的类型和方法数量
  • 一些拥有共同行为的对象可以抽象出接口
  • 整个设计可以持续演进,不用废弃之前的决定
  • 类型要实现某个接口,本身不用改变,在类型上实现新的方法就可以

11.12.4 显示的指明类型实现了某个接口

  • 结构体中添加具有描述性名字的方法
1
2
3
4
type Fooer interface {
Foo()
ImplementsFooer()
}

11.12.5 空接口和函数重载

  • go语言是不允许函数重载的
  • go中通过将最后一个参数换成…interface{}来实现函数重载,允许传递任意数量任意类型的参数给函数
1
fmt.Printf(format string, a ...interface{}) (n int, err error)

11.12.6 接口的继承

  • 当一个类型嵌套另外一个类型的指针时,这个类型就可以使用另一个类型的所有方法
  • 多态用的越多,代码就相对越少
  • 类型可以通过继承多个接口来实现多重继承
  • 添加新的接口是非常容易的,因为已有的类型不用变动,仅需要实现新的接口即可

11.13 go中面向对象总结

  • go中没有类,而是松耦合的类型,方法对接口的实现
  • 封装:go的可见层级为两个,包范围内可见和全局可见
  • 继承:用组合实现,内嵌一个或者多个想要的行为的类型,可以多重嵌套
  • 多态:用接口实现,某个类型的实例可以赋值给它所实现的任意接口类型的变量。类型和接口是松耦合的,多重继承可以通过实现多个接口来实现。

11.14 结构体、集合和高阶函数

1
2
3
4
5
6
7
8
9
10
11
12
13
14
15
16
17
18
19
20
21
22
23
24
25
26
27
28
29
30
31
32
33
34
35
36
37
38
39
40
41
42
43
44
45
46
47
48
49
50
51
52
53
54
55
56
57
58
59
60
61
62
63
64
65
66
67
68
69
70
71
72
73
74
75
76
77
78
79
80
81
82
83
84
85
86
87
88
89
90
91
92
93
94
95
// cars.go
package main
import (
"fmt"
)
type Any interface{}
type Car struct {
Model string
Manufacturer string
BuildYear int
// ...
}
type Cars []*Car
func main() {
// make some cars:
ford := &Car{"Fiesta","Ford", 2008}
bmw := &Car{"XL 450", "BMW", 2011}
merc := &Car{"D600", "Mercedes", 2009}
bmw2 := &Car{"X 800", "BMW", 2008}
// query:
allCars := Cars([]*Car{ford, bmw, merc, bmw2})
allNewBMWs := allCars.FindAll(func(car *Car) bool {
return (car.Manufacturer == "BMW") && (car.BuildYear > 2010)
})
fmt.Println("AllCars: ", allCars)
fmt.Println("New BMWs: ", allNewBMWs)
//
manufacturers := []string{"Ford", "Aston Martin", "Land Rover", "BMW", "Jaguar"}
sortedAppender, sortedCars := MakeSortedAppender(manufacturers)
allCars.Process(sortedAppender)
fmt.Println("Map sortedCars: ", sortedCars)
BMWCount := len(sortedCars["BMW"])
fmt.Println("We have ", BMWCount, " BMWs")
}
// Process all cars with the given function f:
func (cs Cars) Process(f func(car *Car)) {
for _, c := range cs {
f(c)
}
}
// Find all cars matching a given criteria.
func (cs Cars) FindAll(f func(car *Car) bool) Cars {
cars := make([]*Car, 0)
cs.Process(func(c *Car) {
if f(c) {
cars = append(cars, c)
}
})
return cars
}
// Process cars and create new data.
func (cs Cars) Map(f func(car *Car) Any) []Any {
result := make([]Any, 0)
ix := 0
cs.Process(func(c *Car) {
result[ix] = f(c)
ix++
})
return result
}
func MakeSortedAppender(manufacturers []string) (func(car *Car), map[string]Cars) {
// Prepare maps of sorted cars.
sortedCars := make(map[string]Cars)
for _, m := range manufacturers {
sortedCars[m] = make([]*Car, 0)
}
sortedCars["Default"] = make([]*Car, 0)
// Prepare appender function:
appender := func(c *Car) {
if _, ok := sortedCars[c.Manufacturer]; ok {
sortedCars[c.Manufacturer] = append(sortedCars[c.Manufacturer], c)
} else {
sortedCars["Default"] = append(sortedCars["Default"], c)
}
}
return appender, sortedCars
}
/* Output:
AllCars: [0xf8400038a0 0xf840003bd0 0xf840003ba0 0xf840003b70]
New BMWs: [0xf840003bd0]
Map sortedCars: map[Default:[0xf840003ba0] Jaguar:[] Land Rover:[] BMW:[0xf840003bd0 0xf840003b70] Aston Martin:[] Ford:[0xf8400038a0]]
We have 2 BMWs
*/

设计模式之原型模式

发表于 2019-04-21 | 分类于 Java , design patterns

模式定义

用原型实例指定创建对象的种类,并通过拷贝这些原型创建新的对象。

模式使用场景

  1. 类初始化需要消耗非常多的资源,这个资源包括数据,硬件资源等,通过原型拷贝避免这些消耗。
  2. 通过new产生一个对象需要非常繁琐的数据准备或访问权限,则可以使用原型模式。
  3. 一个对象需要提供给其他对象访问,而且各个调用者可能都需要修改其值时,可以考虑使用原型模式拷贝多个对象供调用者使用。

UML图

Alt text

角色描述

* Client: 客户端用户
* Prototype:抽象类或接口,声明具备clone能力
* ConcretePrototype:具体的原型类

实现

文档拷贝为例。

Prototype抽象类为java.lang.clone,ConcretePrototype通过重写该方法完成对象的拷贝功能。

1
2
3
4
5
6
7
8
9
10
11
12
13
14
15
16
17
18
19
20
21
22
23
24
25
26
27
28
29
30
31
32
33
34
35
36
37
38
39
40
41
42
43
44
45
46
47
48
49
50
51
52
53
54
55
56
57
58
59
60
package prototype;
import java.util.ArrayList;
/**
* Created by cdx0312
* 2018/3/25
*/
public class ConcretePrototype implements Cloneable{
private String mText;
private ArrayList<String> mImages = new ArrayList<>();
public ConcretePrototype() {
System.out.println("concretePrototype构造函数");
}
@Override
protected Object clone() throws CloneNotSupportedException {
try {
ConcretePrototype concretePrototype = (ConcretePrototype) super.clone();
concretePrototype.mText = this.mText;
concretePrototype.mImages = this.mImages;
return concretePrototype;
} catch (Exception e) {
e.printStackTrace();
}
return null;
}
public String getmText() {
return mText;
}
public void setmText(String mText) {
this.mText = mText;
}
public ArrayList<String> getmImages() {
return mImages;
}
public void setmImages(ArrayList<String> mImages) {
this.mImages = mImages;
}
public void addImage(String img) {
this.mImages.add(img);
}
public void showContent() {
System.out.println("==========start===========");
System.out.println("Text: " + mText);
System.out.println("Images List: ");
for (String string : mImages) {
System.out.println("image name : " + string);
}
System.out.println("============end==========");
}
}

Client:

1
2
3
4
5
6
7
8
9
10
11
12
13
14
15
16
17
18
19
20
21
22
23
24
25
26
package prototype;
/**
* Created by cdx0312
* 2018/3/25
*/
public class Client {
public static void main(String[] args) throws CloneNotSupportedException {
//创建对象
ConcretePrototype original = new ConcretePrototype();
original.setmText("first");
original.addImage("pic 1");
original.addImage("pic 2");
original.addImage("pic 3");
original.addImage("pic 4");
original.showContent();
//复制对象
ConcretePrototype clone = (ConcretePrototype) original.clone();
clone.showContent();
//修改并展示复制的对象
clone.setmText("clone");
clone.showContent();
//展示原型对象
original.showContent();
}
}

结果:修改clone之后的对象的值不会印象到原来的值。

1
2
3
4
5
6
7
8
9
10
11
12
13
14
15
16
17
18
19
20
21
22
23
24
25
26
27
28
29
30
31
32
33
concretePrototype构造函数
==========start===========
Text: first
Images List:
image name : pic 1
image name : pic 2
image name : pic 3
image name : pic 4
============end==========
==========start===========
Text: first
Images List:
image name : pic 1
image name : pic 2
image name : pic 3
image name : pic 4
============end==========
==========start===========
Text: clone
Images List:
image name : pic 1
image name : pic 2
image name : pic 3
image name : pic 4
============end==========
==========start===========
Text: first
Images List:
image name : pic 1
image name : pic 2
image name : pic 3
image name : pic 4
============end==========

深浅拷贝的区别:引用类型拷贝过程中,只拷贝了其引用,并没有将对象进行复制:

1
2
3
4
5
6
7
8
9
10
11
12
13
14
15
16
17
18
19
20
21
22
23
24
25
26
27
package prototype;
/**
* Created by cdx0312
* 2018/3/25
*/
public class Client1 {
public static void main(String[] args) throws CloneNotSupportedException {
//创建对象
ConcretePrototype original = new ConcretePrototype();
original.setmText("first");
original.addImage("pic 1");
original.addImage("pic 2");
original.addImage("pic 3");
original.addImage("pic 4");
original.showContent();
ConcretePrototype clone = (ConcretePrototype) original.clone();
clone.showContent();
clone.setmText("clone1");
clone.addImage("new pic 5");
clone.showContent();
original.showContent();
}
}
1
2
3
4
5
6
7
8
9
10
11
12
13
14
15
16
17
18
19
20
21
22
23
24
25
26
27
28
29
30
31
32
33
34
35
concretePrototype构造函数
==========start===========
Text: first
Images List:
image name : pic 1
image name : pic 2
image name : pic 3
image name : pic 4
============end==========
==========start===========
Text: first
Images List:
image name : pic 1
image name : pic 2
image name : pic 3
image name : pic 4
============end==========
==========start===========
Text: clone1
Images List:
image name : pic 1
image name : pic 2
image name : pic 3
image name : pic 4
image name : new pic 5
============end==========
==========start===========
Text: first
Images List:
image name : pic 1
image name : pic 2
image name : pic 3
image name : pic 4
image name : new pic 5
============end==========

深拷贝过程中需要将引用类型的字段也要进行拷贝,而不是单纯的拷贝引用:

1
2
3
4
5
6
7
8
9
10
11
12
13
14
15
16
17
18
/**
* 深拷贝
* @return
* @throws CloneNotSupportedException
*/
@Override
protected Object clone() throws CloneNotSupportedException {
try {
ConcretePrototype concretePrototype = (ConcretePrototype) super.clone();
concretePrototype.mText = this.mText;
concretePrototype.mImages = (ArrayList<String>) this.mImages.clone();
return concretePrototype;
} catch (Exception e) {
e.printStackTrace();
}
return null;
}

优点和缺点

  • 优点:原型模式是在内存二进制流的拷贝,要比直接new一个对象性能好很多,特别是需要在一个循环体中产生大量对象时。

  • 缺点:直接在内存中拷贝,构造方法不会执行,减少了约束,需要注意。

设计模式简介

发表于 2019-04-21 | 分类于 Java , design patterns

分类

  • 创建型模式:工厂方法模式,抽象工厂模式,单例模式,建造者模式,原型模式
  • 结构型模式:适配器模式,装饰器模式,代理模式,外观模式,桥接模式,组合模式,享元模式
  • 行为型模式:策略模式,模板方法模式,观察者模式,迭代子模式,责任链模式,命令模式,备忘录模式,状态模式,访问者模式,中介者模式,解释器模式。

设计模式六大原则

  1. 总原则-开闭原则

对扩展开放,对修改封闭。

在需要对程序进行扩展时,不去修改原来的代码,而是要扩展原有代码,类似热插拔。需要使用接口或者抽象类。

  1. 单一职能原则
  • 不要存在多余一个类变更的原因,也就是每个类应该实现单一的职责,否则需要将类进行拆分。
  1. 里氏替换原则
  • 任何基类可以出现的地方,子类一定可以出现。里氏替换原则是继承复用的基石,只有当衍生类可以替换基类,软件单位的功能不受影响时,基类才能真正被复用,而衍生类也能够在基类的基础上增加新的行为。

  • 里氏替换原则是对实现抽象化的具体步骤的规范。其中子类对父类的方法尽量不要重写和重载。因为父类代表着定义好的结构,通过这个规范的接口与外界交互,子类不应该破坏。

  1. 依赖倒转原则
  • 面向接口编程,依赖于抽象而不依赖于具体。写代码时用到具体类时,不与具体类交互,而是与具体类的上层接口交互。
  1. 接口隔离原则
  • 每个接口中不存在子类用不到却必须实现的方法,否则就拆分接口。使用多个隔离的接口,比使用单个接口要好。
  1. 迪米特法则
  • 一个类对自己依赖的类知道的越少越好。无论被依赖的类多么复杂,都应该讲逻辑封装到方法的内部,通过public方法提供给外部。这样当被依赖的类变化时,才能最小的影响该类。

  • 最少知道原则:只与直接的朋友通信,类之间要是有耦合关系,就称为朋友关系。耦合分为依赖,关联,聚合,组合灯,我们成出现为成员变量,方法参数,方法返回值中的类为直接朋友。局部变量,临时变量则不是直接朋友。我们要求陌生的类不要作为局部变量出现在类中。

  1. 合成复用原则
  • 尽量首先使用合成、聚合方式,而不是使用继承。

设计模式之代理模式

发表于 2019-04-21 | 分类于 Java , design patterns

模式定义

为其他对象提供一种代理,以控制对这个对象的访问。代理对象起到中介作用,可以去掉功能服务或者增加额外的功能服务。

静态代理

代理和被代理对象在代理之前是确定的。他们都是事先相同的接口或者继承相同的抽象类。

Alt text

创建一个接口Moveable,Car继承Moveable接口,要求用代理类来记录Car的运行时间。

Car继承Moveable接口:

1
2
3
public interface Moveable {
void move();
}

Car:

1
2
3
4
5
6
7
8
9
10
public class Car implements Moveable{
@Override
public void move() {
try {
Thread.sleep(new Random().nextInt(1000));
} catch (InterruptedException e) {
e.printStackTrace();
}
}
}

继承实现静态代理

1
2
3
4
5
6
7
8
9
10
11
public class Car2 extends Car{
@Override
public void move() {
long startTime = System.currentTimeMillis();
System.out.println(startTime);
super.move();
long endTime = System.currentTimeMillis();
System.out.println(endTime);
System.out.println(endTime - startTime);
}
}

聚合实现静态代理

1
2
3
4
5
6
7
8
9
10
11
12
13
14
15
16
17
18
public class Car3 implements Moveable{
private Car car;
public Car3(Car car) {
this.car = car;
}
@Override
public void move() {
long startTime = System.currentTimeMillis();
System.out.println(startTime);
car.move();
long endTime = System.currentTimeMillis();
System.out.println(endTime);
System.out.println(endTime - startTime);
}
}
  • 考虑到继承方式扩展代理功能的不方便,推荐使用聚合实现静态代理。也就是代理类和实际类实现共同的接口,代理类中包含所实现接口的引用。
1
2
3
4
5
6
7
8
9
10
11
12
13
14
15
public class CarLogProxy implements Moveable{
private Moveable moveable;
public CarLogProxy(Moveable moveable) {
this.moveable = moveable;
}
@Override
public void move() {
System.out.println("log start");
moveable.move();
System.out.println("log end");
}
}
1
2
3
4
5
6
7
8
9
10
11
12
13
14
15
16
17
18
public class CarTimeProxy implements Moveable{
private Moveable moveable;
public CarTimeProxy(Moveable moveable) {
this.moveable = moveable;
}
@Override
public void move() {
long startTime = System.currentTimeMillis();
System.out.println(startTime);
moveable.move();
long endTime = System.currentTimeMillis();
System.out.println(endTime);
System.out.println(endTime - startTime);
}
}
1
2
3
4
5
6
7
8
public class Test {
public static void main(String[] args) {
Moveable car = new Car();
CarTimeProxy carTimeProxy = new CarTimeProxy(car);
CarLogProxy carLogProxy = new CarLogProxy(carTimeProxy);
carLogProxy.move();
}
}

动态代理

前面实现了Car类的静态代理,为其添加了运行时间记录和日志记录的功能。如果需要为火车或者自行车添加类似的功能,需要重新定义相同的类,类十分臃肿,同时代码重用性不高,因此引入了动态代理,也就是在程序

jdk动态代理

Alt text

  • InvocationHandler接口,接口中定义了一个invoke方法,invoke方法中第一个参数表示代理类,第二个参数指被代理的方法,args指该方法的参数数组。这个抽象方法会在代理类中动态实现。
1
2
3
4
public interface InvocationHandler {
public Object invoke(Object proxy, Method method, Object[] args)
throws Throwable;
}
  • Proxy:该类为动态代理类,其中的newProxyInstance方法返回一个代理类实例,返回后的代理类可以被当做代理类使用,可使用被代理类的在接口中声明过的方法。
1
2
3
4
5
6
7
8
9
10
11
12
13
14
15
16
17
18
19
20
21
22
23
24
25
26
27
28
29
30
31
32
33
34
35
36
37
38
39
40
41
42
43
44
45
46
47
48
49
50
public static Object newProxyInstance(ClassLoader loader,
Class<?>[] interfaces,
InvocationHandler h)
throws IllegalArgumentException
{
Objects.requireNonNull(h);
final Class<?>[] intfs = interfaces.clone();
final SecurityManager sm = System.getSecurityManager();
if (sm != null) {
checkProxyAccess(Reflection.getCallerClass(), loader, intfs);
}
/*
* Look up or generate the designated proxy class.
*/
Class<?> cl = getProxyClass0(loader, intfs);
/*
* Invoke its constructor with the designated invocation handler.
*/
try {
if (sm != null) {
checkNewProxyPermission(Reflection.getCallerClass(), cl);
}
final Constructor<?> cons = cl.getConstructor(constructorParams);
final InvocationHandler ih = h;
if (!Modifier.isPublic(cl.getModifiers())) {
AccessController.doPrivileged(new PrivilegedAction<Void>() {
public Void run() {
cons.setAccessible(true);
return null;
}
});
}
return cons.newInstance(new Object[]{h});
} catch (IllegalAccessException|InstantiationException e) {
throw new InternalError(e.toString(), e);
} catch (InvocationTargetException e) {
Throwable t = e.getCause();
if (t instanceof RuntimeException) {
throw (RuntimeException) t;
} else {
throw new InternalError(t.toString(), t);
}
} catch (NoSuchMethodException e) {
throw new InternalError(e.toString(), e);
}
}

动态代理实现步骤

  1. 创建一个实现接口InvocationHandler的类,实现invoke方法
1
2
3
4
5
6
7
8
9
10
11
12
13
14
15
16
17
18
19
20
21
22
23
24
public class TimeHandler implements InvocationHandler{
private Object target;
public TimeHandler(Object target) {
this.target = target;
}
/**
*
* @param proxy 被代理的对象
* @param method 被代理对象的方法
* @param args 被代理对象的方法的参数
* @return Object对象,方法的返回值
* @throws Throwable
*/
@Override
public Object invoke(Object proxy, Method method, Object[] args) throws Throwable {
System.out.println("time begin");
method.invoke(target);
System.out.println("time end");
return null;
}
}
  1. 创建被代理的类以及接口(Car以及Moveable)
  2. 调用Proxy的静态方法,创建一个代理类
  3. 通过代理调用方法
1
2
3
4
5
6
7
8
9
10
11
12
13
14
15
16
17
public class Test {
public static void main(String[] args) {
Car car = new Car();
InvocationHandler h = new TimeHandler(car);
Class<?> cls = car.getClass();
/**
* loader:类加载器
* interfaces:实现接口
* h :invocationHandler
*/
Moveable m = (Moveable) Proxy.newProxyInstance(cls.getClassLoader(), cls.getInterfaces(), h);
m.move();
}
}

JDK动态代理与CGLIB动态代理的区别

jdk动态代理 CGLIB动态代理
只能代理实现了接口的类 针对类来实现代理
没有实现接口的类不能实现JDK动态代理 对指定目标类产生一个子类,通过方法拦截技术拦截所有父类方法调用
JDK动态代理利用反射机制生成一个实现代理接口的匿名类,在调用具体方法前调用InvocationHandler来处理 cglib是利用asm开源包,对代理对象的class文件加载进来,通过修改其字节码生成子类来处理

模拟JDK动态代理的实现

实现功能,通过Proxy的newproxyInstance返回代理对象
1、声明一段源码,动态产生代理
2、编译源码,产生新的类
3、将这个类load到内存中,产生一个新的对象
4、return代理对象

handler:

1
2
3
4
5
6
7
8
9
10
11
12
13
14
15
16
17
18
19
20
21
22
23
24
25
26
27
28
29
30
31
32
33
34
35
package proxy;
import java.lang.reflect.Method;
public interface InvocationHandler {
public void invoke(Object o, Method m);
}
package proxy;
import java.lang.reflect.InvocationTargetException;
import java.lang.reflect.Method;
public class TimeHandler implements InvocationHandler{
private Object target;
public TimeHandler(Object target) {
this.target = target;
}
@Override
public void invoke(Object o, Method m) {
try {
long starttime = System.currentTimeMillis();
System.out.println("汽车开始行驶....");
m.invoke(target);
long endtime = System.currentTimeMillis();
System.out.println("汽车结束行驶.... 汽车行驶时间:"+ (endtime - starttime) + "毫秒!");
} catch (IllegalAccessException | InvocationTargetException e) {
e.printStackTrace();
}
}
}

proxy:

1
2
3
4
5
6
7
8
9
10
11
12
13
14
15
16
17
18
19
20
21
22
23
24
25
26
27
28
29
30
31
32
33
34
35
36
37
38
39
40
41
42
43
44
45
46
47
48
49
50
public class Proxy {
public static Object newProxyInstance(Class infce, InvocationHandler h) throws IOException, ClassNotFoundException, NoSuchMethodException, IllegalAccessException, InvocationTargetException, InstantiationException {
//创建源码
String rt = "\r\n";
String methodStr = "";
for(Method m : infce.getMethods()){
methodStr += " @Override" + rt +
" public void " + m.getName() + "() {" + rt +
" try{" + rt +
" Method md = " + infce.getName() + ".class.getMethod(\""
+ m.getName() + "\");" + rt +
" h.invoke(this,md);" +rt+
" }catch(Exception e){ e.printStackTrace();}" + rt +
" }" ;
}
String str =
"package proxy;" + rt +
"import java.lang.reflect.Method;" + rt +
"import proxy.InvocationHandler;" + rt+
"public class $Proxy0 implements " + infce.getName() + " {" + rt +
" public $Proxy0(InvocationHandler h) {" + rt +
" this.h = h;" + rt +
" }" + rt +
" private InvocationHandler h;" + rt+
methodStr + rt +
"}" ;
String fileName = System.getProperty("user.dir") + "/out/production/Design_Patterns_new/proxy/$Proxy0.java";
File file = new File(fileName);
FileUtils.writeStringToFile(file, str);
//编译源码
JavaCompiler compiler = ToolProvider.getSystemJavaCompiler();
StandardJavaFileManager fileManager = compiler.getStandardFileManager(null, null, null);
Iterable units = fileManager.getJavaFileObjects(fileName);
//编译任务
JavaCompiler.CompilationTask task = compiler.getTask(null, fileManager, null, null, null, units);
//执行任务
task.call();
fileManager.close();
//load到内存
ClassLoader loader = ClassLoader.getSystemClassLoader();
Class<?> c = loader.loadClass("proxy.$Proxy0");
Constructor constructor = c.getConstructor(InvocationHandler.class);
return constructor.newInstance(h);
}
}

设计模式之单例模式与工厂方法

发表于 2019-04-21 | 分类于 Java , design patterns

设计模式

设计模式是一套被反复使用的,多数人知晓的,经过分类编目的,代码设计经验的总结。使用设计模式是为了可重用代码。

单例模式

  1. 定义:单例模式确保只有一个实例,而且自行实例化并向整个系统提供这个实例。

  2. 类型:创建类模式

  3. 组成:私有构造方法则不能通过构造方法来创建类,静态属性在类加载时就创建了一个对象,公有静态方法保证外部类可以直接调用。

    • 私有的构造方法
    • 指向自己实例的私有静态引用
    • 以自己实例为返回值的静态的公有方法
  4. 实现:

    1. 饿汉式单例:单例类被加载时候,就实例化一个对象交个自己引用

      1
      2
      3
      4
      5
      6
      7
      8
      9
      10
      public class Singleton {
      private Singleton() {
      }
      private static Singleton singleton = new Singleton();
      public static Singleton getInstance() {
      return singleton;
      }
      }
    2. 懒汉式实例:调用取得方法实例时才会实例化对象

      1
      2
      3
      4
      5
      6
      7
      8
      9
      10
      11
      12
      public class Singleton1 {
      private Singleton1(){
      }
      private static Singleton1 singleton1;
      public static synchronized Singleton1 getInstacne(){
      if (singleton1 == null)
      singleton1 = new Singleton1();
      return singleton1;
      }
      }
  5. 优点:

    • 内存中只有一个对象,节省内存空间
    • 避免频繁的创建和销毁对象,可以提高性能
    • 避免对共享资源的多重占用
    • 可以全局访问
  6. 应用场景:

    • 需要频繁实例化然后销毁的对象
    • 创建对象耗时过多或者消耗资源过多,但又经常用到的对象。
    • 有状态的工具类对象
    • 频繁访问数据库或文件的对象
  7. 注意事项:

    • 只能使用单例类提供的方法获得单例对象,不要使用反射,否则会实例化一个新对象。
    • 不要做断开单例类对象与类中静态引用的操作。
    • 多线程使用单例共享资源时,注意线程安全的问题。
  8. 相关问题:

    • 单例模式的对象长时间不用会被jvm回收吗?
      不会,Hotspot中只要对象和GC Roots之间有可达引用链,也就是单例对象和单例中的引用没有被断开就不会被回收。

    • 一个jvm中会出现多个单例吗?
      不使用反射的话,在一个jvm中不会出现多个单例。

    • 单例模式只有饿汉和懒汉两种吗?
      所有可以实现一个实例的类,都是单例模式。

    • 单例模式可以被继承吗?
      饿汉和懒汉,private方法不可以被继承。

工厂方法模式

  1. 定义:定义一个用于创建对象的接口,让子类决定实例化哪一个类,工厂方法使一个类的实例化延迟到其子类。

  2. 类型:创建类模式

  3. 实现:

    工厂模式根据抽象程度的不同分为三种:

    • 简单工厂模式(静态工厂模式):创建一个工厂来创建新的对象。

      Alt text

      工厂类

      1
      2
      3
      4
      5
      6
      7
      8
      public class Factory {
      public Product createFactory(int type) {
      if (type == 1)
      return new Product1();
      else
      return new Product2();
      }
      }

      产品抽象类和具体产品

      1
      2
      3
      4
      5
      6
      7
      8
      9
      10
      11
      12
      13
      14
      public abstract class Product {
      }
      public class Product1 extends Product{
      public Product1() {
      System.out.println("product1");
      }
      }
      public class Product2 extends Product{
      public Product2() {
      System.out.println("product2");
      }
      }

      消费者

      1
      2
      3
      4
      5
      6
      7
      public class Customer {
      public static void main(String[] args) {
      Factory factory = new Factory();
      Product product1 = factory.createFactory(1);
      Product product2 = factory.createFactory(2);
      }
      }
      • 组成:

        • 工厂类:用于创建商品
        • 抽象产品:具体产品继承的父类或者实现的接口
        • 具体产品:工厂类创建的对象
      • 此时当我们想要添加一种产品时,需要修改工厂类的业务员逻辑,实际中对应很多产品,对于工厂类来说负担太大,因此引入工厂方法模式,也就是讲工厂类定义成接口,增加一个商品,就增加该商品对应的工厂类的实现。

    • 工厂方法模式

      Alt text

      产品类:

      1
      2
      3
      4
      5
      6
      7
      8
      9
      10
      11
      12
      13
      14
      15
      16
      17
      public interface IProduct {
      public void productMethod();
      }
      public class Product implements IProduct{
      @Override
      public void productMethod() {
      System.out.println("产品");
      }
      }
      public class Product1 implements IProduct{
      @Override
      public void productMethod() {
      System.out.println("产品1");
      }
      }

      工厂类

      1
      2
      3
      4
      5
      6
      7
      8
      9
      10
      11
      12
      13
      14
      15
      16
      17
      public interface IFactory {
      public IProduct createProduct();
      }
      public class Factory implements IFactory{
      @Override
      public IProduct createProduct() {
      return new Product();
      }
      }
      public class Factory1 implements IFactory{
      @Override
      public IProduct createProduct() {
      return new Product1();
      }
      }

      客户类

      1
      2
      3
      4
      5
      6
      7
      8
      9
      10
      11
      public class Client {
      public static void main(String[] args) {
      IFactory factory = new Factory();
      IProduct product = factory.createProduct();
      product.productMethod();
      IFactory factory1 = new Factory1();
      IProduct product1 = factory1.createProduct();
      product1.productMethod();
      }
      }

      工厂方法模式去掉了简单工厂模式中工厂方法的静态属性,使得它可以被子类继承。这样在简单工厂模式中集中在工厂方法中的压力就转到不同的工厂子类这种去了。

      • 组成:

        • 抽象工厂:具体工厂必须实现的接口或父类
        • 具体工厂:含有和具体业务逻辑有关的代码。
        • 抽象产品:具体产品继承的接口或父类。
        • 具体产品:创建产品的类。
      • 工厂方法模式对对象的创建进行了包装,使得客户程序中仅仅处理抽象产品角色提供的接口。这样的缺点是使得对象的数量成倍增加。

    • 抽象工厂模式

      产品类

      1
      2
      3
      4
      5
      6
      7
      8
      9
      10
      11
      12
      13
      14
      15
      16
      17
      18
      19
      20
      21
      22
      23
      24
      25
      26
      27
      28
      29
      30
      31
      32
      33
      34
      35
      public interface IProductA {
      public void productMethod();
      }
      public class ProductA implements IProductA {
      @Override
      public void productMethod() {
      System.out.println("A产品");
      }
      }
      public class ProductA1 implements IProductA {
      @Override
      public void productMethod() {
      System.out.println("A产品1");
      }
      }
      public interface IProductB {
      public void productMethod();
      }
      public class ProductB implements IProductB {
      @Override
      public void productMethod() {
      System.out.println("B产品");
      }
      }
      public class ProductB1 implements IProductB {
      @Override
      public void productMethod() {
      System.out.println("B产品1");
      }
      }

      工厂类

      1
      2
      3
      4
      5
      6
      7
      8
      9
      10
      11
      12
      13
      14
      15
      16
      17
      18
      19
      20
      21
      22
      23
      24
      25
      26
      27
      28
      29
      public interface AbstratFactory {
      public IProductA createProductA();
      public IProductB createProductB();
      }
      public class Factory implements AbstratFactory{
      @Override
      public IProductA createProductA() {
      return new ProductA();
      }
      @Override
      public IProductB createProductB() {
      return new ProductB();
      }
      }
      public class Factory1 implements AbstratFactory{
      @Override
      public IProductA createProductA() {
      return new ProductA1();
      }
      @Override
      public IProductB createProductB() {
      return new ProductB1();
      }
      }

      客户端

      1
      2
      3
      4
      5
      6
      7
      8
      9
      10
      11
      12
      13
      14
      15
      16
      17
      public class Client {
      public static void main(String[] args) {
      //生产产品
      AbstratFactory factory = new Factory();
      IProductA productA = factory.createProductA();
      productA.productMethod();
      IProductB productB = factory.createProductB();
      productB.productMethod();
      //生产产品1
      AbstratFactory factory1 = new Factory1();
      IProductA productA1 = factory1.createProductA();
      IProductB productB1 = factory1.createProductB();
      productA1.productMethod();
      productB1.productMethod();
      }
      }
      • 无论是简单工厂模式,工厂方法模式,还是抽象工厂模式,他们都属于工厂模式,在形式和特点上也是极为相似的,他们的最终目的都是为了解耦。在使用时,我们不必去在意这个模式到底工厂方法模式还是抽象工厂模式,因为他们之间的演变常常是令人琢磨不透的。经常你会发现,明明使用的工厂方法模式,当新需求来临,稍加修改,加入了一个新方法后,由于类中的产品构成了不同等级结构中的产品族,它就变成抽象工厂模式了;而对于抽象工厂模式,当减少一个方法使的提供的产品不再构成产品族之后,它就演变成了工厂方法模式。

设计模式之Spring中的应用

发表于 2019-04-21 | 分类于 Java , design patterns , Spring

Spring中使用的设计模式

  1. 简单工厂

    • 又称为静态工厂,简单工厂模式的实质是由一个工厂类根据传入的参数,动态决定创建哪一个产品类。
    • Spring中BeanFactory通过传入一个唯一标示来获取bean对象
  2. 工厂方法

    • 程序将对象的创建及初始化职责交给工厂对象,工厂父类负责定义创建产品对象的公共接口,工厂子类负责生成具体的产品对象。将产品类的实例化操作延迟到工厂子类中完成。
    • Spring中的FactoryBean就是一个典型的工厂方法模式。
  3. 单例

    • 保证一个类仅有一个实例,并提供一个访问他的全局访问点。
    • Spring下默认的bean均为singleton,通过singleton或者scope属性指定
  4. 适配器

    • 将一个接口转换成客户希望的另一个接口,使得接口不兼容的类可以一起工作,其别名为Wrapper。
    • Spring中AOP的处理利用了Adapter模式
  5. 装饰器

    • 动态的给一个对象添加一些额外的职责。就增加对象功能来说,装饰模式比生成子类实现更为灵活,别名与适配器相同。
    • Spring中类名中含有Wrapper或者Decorator中应用了装饰器
  6. 代理

    • 为其他对象提供一种代理以控制对这个对象的访问。
    • Spring中AOP就是利用JDK动态代理来增强类的切面管理。
  7. 观察者

    • 定义对象间的一种一对多的依赖关系,当一个对象的状态发生改变时,所有依赖于他的对象都被通知并被自动更新
    • spring中listener利用了观察者模式
  8. 策略

    • 定义一系列的算法,将他们封装起来,并且使他们可互相替换,策略模式让算法独立于使用它的客户而变化,也称为政策模式。
    • Spring在实例化对象的时候使用到策略模式。
  9. 模板方法

    • 定义一个操作中的算法的骨架,而将一些步骤延迟到子类中,使得子类可以不改变一个算法的结构即可重新定义该算法的某些特定步骤。
    • Spring中jdbcTemplate就使用了模板方法。

设计模式之七种单例模式

发表于 2019-04-21 | 分类于 Java , design patterns

对其中单例模式做个总结,以备不时之需。

饿汉单例模式

1
2
3
4
5
6
7
8
9
10
11
12
13
14
15
16
17
18
package singleton;
/**
* Created by cdx0312
* 2018/3/23
* 饿汉,基于ClassLoader机制避免了多线程的同步问题,加载过程较慢,获取对象速度较快
* 不过instance在类装载时就实例化。虽然大多数情况下调用单例模式的getInstance方法导致类加载,但是也不能确定没有其他
* 静态方法导致类被加载,从而没有达到懒加载的效果。
*/
public class Singleton {
private Singleton() {
}
private static Singleton singleton = new Singleton();
public static Singleton getInstance() {
return singleton;
}
}

懒汉(线程不安全)

1
2
3
4
5
6
7
8
9
10
11
12
13
14
15
16
17
18
19
20
package singleton;
/**
* Created by cdx0312
* 2018/3/24
* 懒汉设计模式,线程安全,但是效率很低,每次调用getInstance方法都需要
* 获得锁,而大多数情况下不需要同步
*/
public class Singleton1 {
private Singleton1(){
}
private static Singleton1 singleton1;
public static synchronized Singleton1 getInstacne(){
if (singleton1 == null)
singleton1 = new Singleton1();
return singleton1;
}
}

懒汉(线程安全)

1
2
3
4
5
6
7
8
9
10
11
12
13
14
15
16
17
18
19
package singleton;
/**
* Created by cdx0312
* 2018/3/24
* 懒汉设计模式,线程不安全
*/
public class Singleton2 {
private Singleton2(){
}
private static Singleton2 singleton1;
public static Singleton2 getInstacne(){
if (singleton1 == null)
singleton1 = new Singleton2();
return singleton1;
}
}

双重检查单例模式

1
2
3
4
5
6
7
8
9
10
11
12
13
14
15
16
17
18
19
20
21
22
23
24
25
26
27
28
29
package singleton;
/**
* Created by cdx0312
* 2018/3/30
* 双重检查模式,第一次是为了减少不必要的同步,当singleton对象存在时,
* 直接返回实例对象,则同步只发生在多个线程同时调用getInstance加载类
* 第二次判空是为了singleton为null才创建实例。
* DCL优点是资源利用率高,第一次执行getInstance时单例对象才被实例化,效率高。
* 缺点是第一次加载速度慢,高并发场景中也会影响其性能,但是也存在DCL失效,
* 建议使用静态内部类单例模式来替代DCL
*/
public class Singleton3 {
private volatile static Singleton3 singleton;
private Singleton3() {
}
public static Singleton3 getInstance() {
if (singleton == null) {
synchronized (Singleton3.class) {
if (singleton == null) {
singleton = new Singleton3();
}
}
}
return singleton;
}
}

静态内部类

1
2
3
4
5
6
7
8
9
10
11
12
13
14
15
16
17
18
19
20
21
22
package singleton;
/**
* Created by cdx0312
* 2018/3/30
* 静态内部类单例:
* 第一次加载Singleton类时并不会初始化是Instance,只有第一次调用Singleton
* 方法时虚拟机加载SingletonHolder并初始化sInstance,这样不仅能确保线程安
* 全也能保证Singleton的唯一性,推荐使用。
*/
public class Singleton4 {
private Singleton4() {
}
public static Singleton4 getInstance() {
return SingletonHolder.sInstance;
}
private static class SingletonHolder{
private static final Singleton4 sInstance = new Singleton4();
}
}

枚举

1
2
3
4
5
6
7
8
9
10
11
12
13
14
package singleton;
/**
* Created by cdx0312
* 2018/3/30
* 默认枚举类实例的创建是线程安全的,并且在任何情况下都是单例,上述的几种
* 单例在反序列化的情况下会创建对象,将一个单例实例对象写到磁盘再读回来,
* 从而获得一个实例。反序列化操作提供了
*/
public enum Singleton5 {
INSTANCE;
public void doSomething() {
}
}

容器实现单例

1
2
3
4
5
6
7
8
9
10
11
12
13
14
15
16
17
18
19
20
21
22
23
24
25
26
27
28
29
package singleton;
import java.util.HashMap;
import java.util.Map;
/**
* Created by cdx0312
* 2018/3/30
* 使用容器实现单例模式
* 用SingletonManager 将多种的单例类统一管理,在使用时根据key获取对象
* 对应类型的对象。这种方式使得我们可以管理多种类型的单例,并且在使用
* 时可以通过统一的接口进行获取操作,降低了用户的使用成本,也对用户隐
* 藏了具体实现,降低了耦合度。
*/
public class Singleton6 {
private static Map<String, Object> objectMap = new HashMap<>();
private Singleton6() {
}
public static void registerService(String key, Object instance) {
if (!objectMap.containsKey(key)) {
objectMap.put(key, instance);
}
}
public static Object getService(String key) {
return objectMap.get(key);
}
}

设计模式之Builder模式

发表于 2019-04-21 | 分类于 Java , design patterns

模式定义

将一个复杂对象的构建与他的表示分离,使得同样的构建过程可以创建不同的表示。

模式使用场景

  1. 相同的方法,不同的执行顺序,产生不同的时间结果时。
  2. 多个部件或零件,都可以装配到一个对象中,但是产生的结果又不相同时。
  3. 产品类非常复杂,或者产品类中的调用顺序不同产生了不同的效能时。

UML图

Alt text

角色描述

* Product产品类:产品的抽象类
* Builder:抽象类,规范产品的组件,一般由子类实现具体的组装过程。
* ConcreteBuilder:具体的构造器
* Director:统一组装过程

实现

电脑组装过程比较复杂,步骤很多,但是顺序却不确定。适用于Builder模式

Computer抽象类:

1
2
3
4
5
6
7
8
9
10
11
12
13
14
15
16
17
18
19
20
21
22
23
public abstract class Computer {
protected int mCpuCore = 1;
protected int mRanSize = 0;
protected String mOs = "Dos";
public Computer() {
}
public abstract void setmCpuCore(int mCpuCore);
public abstract void setmRanSize(int mRanSize);
public abstract void setmOs(String mOs);
@Override
public String toString() {
return "Computer{" +
"mCpuCore=" + mCpuCore +
", mRanSize=" + mRanSize +
", mOs='" + mOs + '\'' +
'}';
}
}

AppleComputer实现类:

1
2
3
4
5
6
7
8
9
10
11
12
13
14
15
16
17
18
19
public class AppleComputer extends Computer{
protected AppleComputer(){
}
@Override
public void setmCpuCore(int mCpuCore) {
super.mCpuCore = mCpuCore;
}
@Override
public void setmRanSize(int mRanSize) {
super.mRanSize = mRanSize;
}
@Override
public void setmOs(String mOs) {
super.mOs = mOs;
}
}

Builder抽象类

1
2
3
4
5
6
7
8
9
public abstract class Builder {
public abstract void buildCPU(int core);
public abstract void buildRAM(int gb);
public abstract void buildOs(String os);
public abstract Computer create();
}

AppleBuilder实现类

1
2
3
4
5
6
7
8
9
10
11
12
13
14
15
16
17
18
19
20
21
22
23
24
public class AppleBuilder extends Builder{
private Computer mApplePC = new AppleComputer();
@Override
public void buildCPU(int core) {
mApplePC.setmCpuCore(core);
}
@Override
public void buildRAM(int gb) {
mApplePC.setmRanSize(gb);
}
@Override
public void buildOs(String os) {
mApplePC.setmOs(os);
}
@Override
public Computer create() {
return mApplePC;
}
}
1
2
3
4
5
6
7
8
9
10
11
12
13
public class Director {
Builder builder = null;
public Director(Builder builder) {
this.builder = builder;
}
public void construct(int cpu, int ram, String os) {
builder.buildCPU(cpu);
builder.buildRAM(ram);
builder.buildOs(os);
}
}

Test

1
2
3
4
5
6
7
8
public class Test {
public static void main(String[] args) {
Builder builder = new AppleBuilder();
Director director = new Director(builder);
director.construct(4,2,"Max OS X 10.0.3");
System.out.println(builder.create().toString());
}
}

优点和缺点

  • 优点:

    • 良好的封装性,使用Builder模式可以使客户端不必知道产品内部组成的细节。
    • 建造者独立,容易扩展
    • 在对象创建过程中会使用到系统中的其他对象,这些对象在产品的创建过程中不易得到。
  • 缺点:

    • 会产生多余的Builder对象和Director对象,消耗内存
    • 对象的构建过程暴露。
1…345…11
cdx

cdx

Be a better man!

110 日志
36 分类
31 标签
GitHub E-Mail
© 2020 cdx
由 Hexo 强力驱动
|
主题 — NexT.Mist v5.1.2